Transforming your bedroom doesn’t have to break the bank! With so many stylish and creative ideas available, a budget-friendly makeover is more achievable than ever. Whether you’re looking to refresh your space with simple swaps or add personal touches without overspending, affordable bedroom upgrades are gaining popularity because they prove that you don’t need a big budget to create a beautiful, cozy retreat.
In this article, you’ll discover a diverse range of clever ideas to elevate your bedroom’s style on a dime. From DIY decor projects to smart furniture swaps and budget-friendly decor tips, there’s something for everyone. Get ready to turn your bedroom into a stylish sanctuary that reflects your personality—all without emptying your wallet!
1. Refresh Walls with Peel-and-Stick Wallpaper or Removable Wall Decals
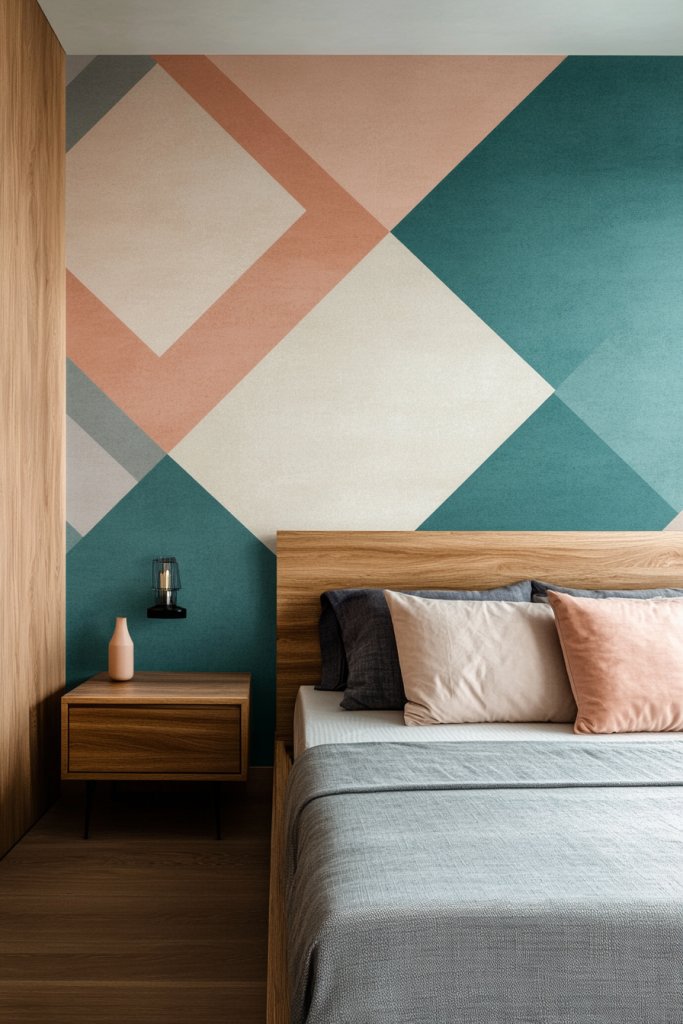
Ever feel like your bedroom’s walls are just screaming for a makeover but you don’t want to commit to expensive or permanent solutions? Peel-and-stick wallpaper or removable decals are perfect for those who crave change without the hassle. They let you add personality, pattern, and color quickly, transforming your space in a flash. Plus, they’re ideal for renters or anyone hesitant to damage walls.
Imagine walking into a room where a bold geometric pattern in trendy hues adorns your walls, instantly elevating the whole vibe. The textured surface of peel-and-stick wallpaper adds depth, while decals bring playful elements like floral designs or motivational quotes. They cling smoothly without bubbles and can be repositioned easily, giving you a fresh aesthetic every time you want a change. The room feels brighter, more lively, and unmistakably personalized.
Choose patterns that match your style—minimalist stripes, boho motifs, or playful patterns for a kids’ room. Seasonal changes are a breeze: swap out decals for holiday themes or new trends. For small spaces, opt for subtle textures; in larger rooms, go for bold murals. DIY enthusiasts can even create custom decals using printable adhesive sheets, making it super adaptable. It’s all about matching your mood and flair.
Start by cleaning your walls thoroughly to ensure good adhesion. Roll out the wallpaper carefully, smoothing out air bubbles with a squeegee or credit card. For decals, plan your design layout before peeling off backing, then stick from one corner outward. Use a level or ruler for straight lines, especially with larger wallpaper panels. For easy removal later, avoid overly textured walls and opt for thinner materials. Applying in dry conditions helps prevent wrinkles or misalignment.
Add extra flair by framing sections of wallpaper or decals with inexpensive border trim. Layer decals over painted walls for a mixed-media look, or combine multiple patterns for eclectic charm. You could also add metallic or matte finishes to certain decals for a luxurious touch. Personalize further by creating your own designs digitally and printing them as decals—totally unique! The key is mixing and matching textures and patterns for a look that’s all you.
Updating your walls with peel-and-stick options is a quick win that instantly boosts your room’s vibe. It’s a simple, affordable way to express your personality and stay on top of decorating trends. Ready to give your bedroom a fresh new look without the stress? Just peel, stick, and enjoy your newly styled sanctuary!
2. Swap Out Bedding for New, Affordable Sets in Trendy Colors or Patterns
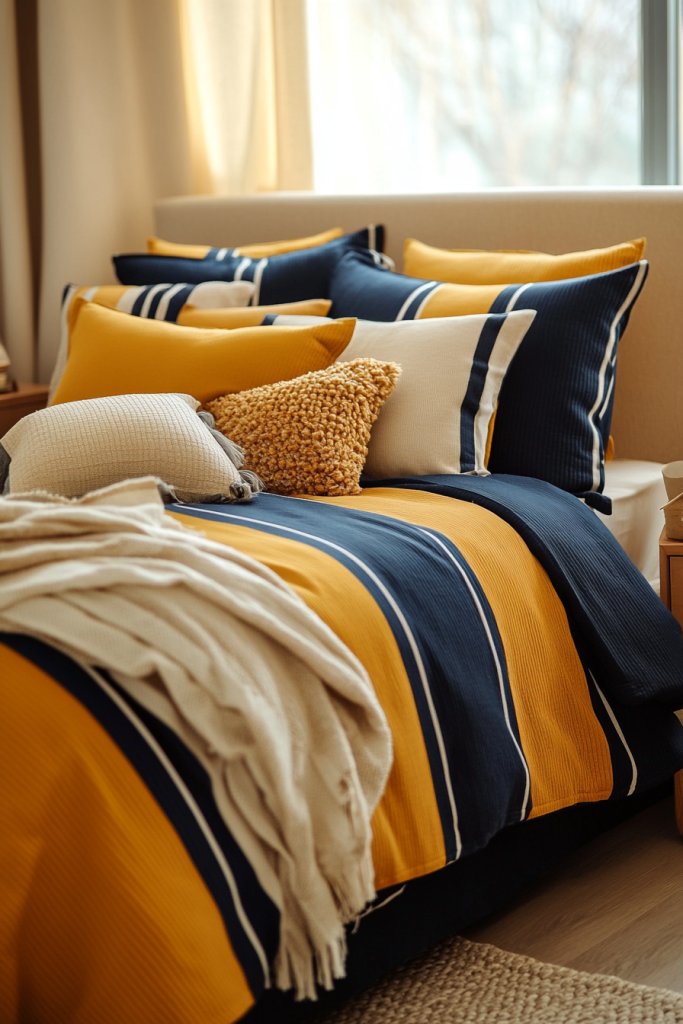
Tired of your dull, outdated bedding dragging down your bedroom’s vibe? Upgrading your bedding is one of the easiest ways to refresh your entire space without breaking the bank. Affordable sets in trendy colors or patterns can turn your bed from boring to beautiful in minutes. Plus, it’s a fun way to experiment with style and personality.
Picture a cozy bed dressed in a soft cream duvet with textured throw pillows in vibrant coral or deep navy. The sheets have subtle stripes, adding visual interest without overwhelming. A chunky knit blanket or a faux fur throw draped at the foot adds tactile softness. The overall look feels inviting, modern, and perfectly curated—like something out of a magazine but on a budget. It’s all about mixing textures and colors that reflect your style.
Switch up your bedding for different seasons: lightweight cotton for summer, plush flannel for winter. For a minimalist look, pick solid colors; for boho or eclectic styles, opt for bold patterns or layered prints. You can also swap out pillow covers or add decorative shams for a quick change. If you’re into themes, choose sets that match your current mood or season—think floral for spring, earthy tones for fall.
Start by measuring your mattress to find the right size. Choose bedding sets made from breathable, easy-care fabrics like cotton or microfiber for longevity. Look for sales or bulk deals online, and opt for versatile colors that coordinate with your wall color or furniture. When making the bed, layer with a duvet or comforter, then add accent pillows or shams for visual pop. Wash new bedding before use to soften the fabric and remove any chemicals. Rotate sets to extend their lifespan.
Add your personal touch by mixing and matching pillow covers, throws, and sheets. Incorporate textured fabrics like linen or velvet for a luxe feel. Use decorative trims or embroidery for a custom look. Swap out pillow arrangements seasonally or to match your decor updates. Don’t be afraid to experiment with color blocking or mixing patterns—just keep a cohesive palette.
New bedding can instantly transform your bedroom into a cozy retreat. It’s an affordable, simple way to boost your mood and refresh your decor. With so many styles and colors available, you can easily keep your bedroom looking trendy and inviting. Confidence is key—your bed should be your favorite spot to unwind!
3. Incorporate Budget-Friendly String or Fairy Lights for Cozy Ambiance
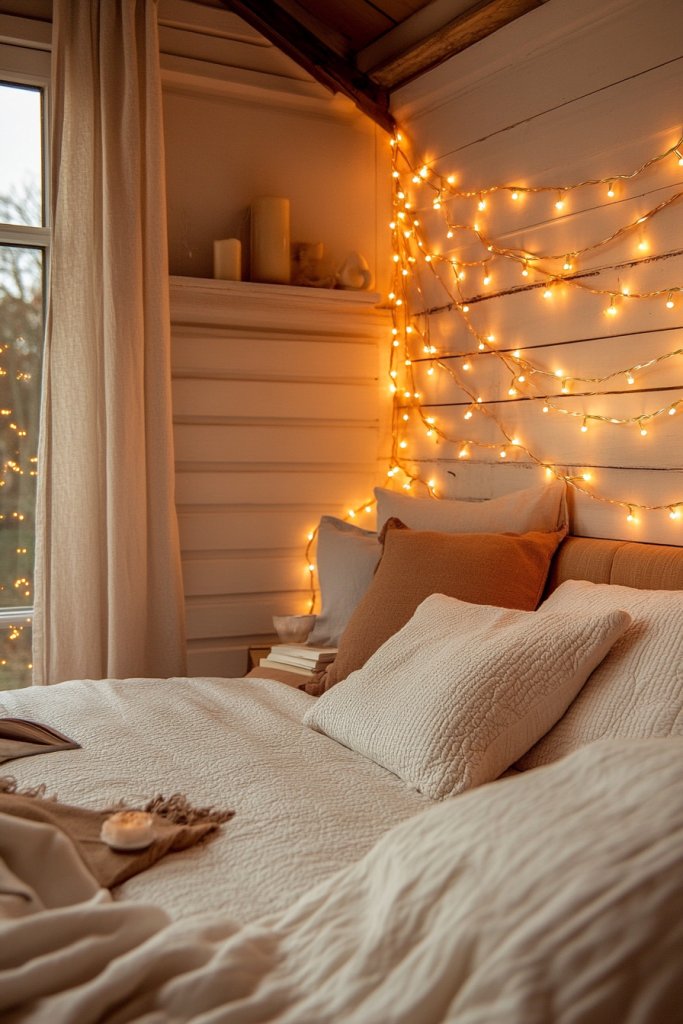
Looking to add warmth and charm to your bedroom without spending a fortune? String or fairy lights are the perfect touch to create a cozy, inviting atmosphere. They’re affordable, easy to install, and instantly elevate your decor. Plus, they provide soft lighting that’s perfect for winding down after a long day.
Picture delicate string lights draped along your headboard or around window frames, casting a gentle glow. The tiny bulbs twinkle softly, creating a magical ambiance, especially at night. Imagine a cozy nook with warm lights intertwined with textured fabrics or hanging from a decorative branch. The effect makes the room feel warm, intimate, and stylish—like a scene from a romantic movie.
Use different colors or shapes of bulbs to match your style—warm white for classic coziness, colored for playful vibes, or Edison-style for vintage charm. Hang lights in creative patterns such as zigzags, spirals, or framing artwork or mirrors. For small rooms, string lights can replace traditional lamps; in larger spaces, they add ambiance without overwhelming.
Start by choosing lightweight string lights, preferably with a low wattage and safe-to-use features. Decide where to hang—around your headboard, along wall edges, or over a canopy. Secure the lights with removable hooks, adhesive clips, or clothespins—whatever keeps them neat. Avoid running cords across walkways or where they can be tripped over. Plug into nearby outlets, and consider timers for automatic on/off functions.
Create a layered look by combining fairy lights with decorative textiles or DIY garlands. Wrap lights around decorative items or furniture to add visual interest. Use dimmer switches or smart plugs to control brightness and mood. For special occasions, add small paper lanterns or DIY fabric shades for a personalized touch. The goal is to craft a space that feels both magical and uniquely yours.
Adding fairy lights is a quick, budget-friendly way to upgrade your bedroom’s ambiance. It’s a simple project with a big impact, perfect for DIY enthusiasts or beginners. Once installed, your room will feel warmer and more inviting—ideal for relaxing or romantic evenings. Ready to turn your space into a cozy retreat? Just string them up and enjoy the glow!
4. Repurpose and Refinish Thrifted or Secondhand Furniture
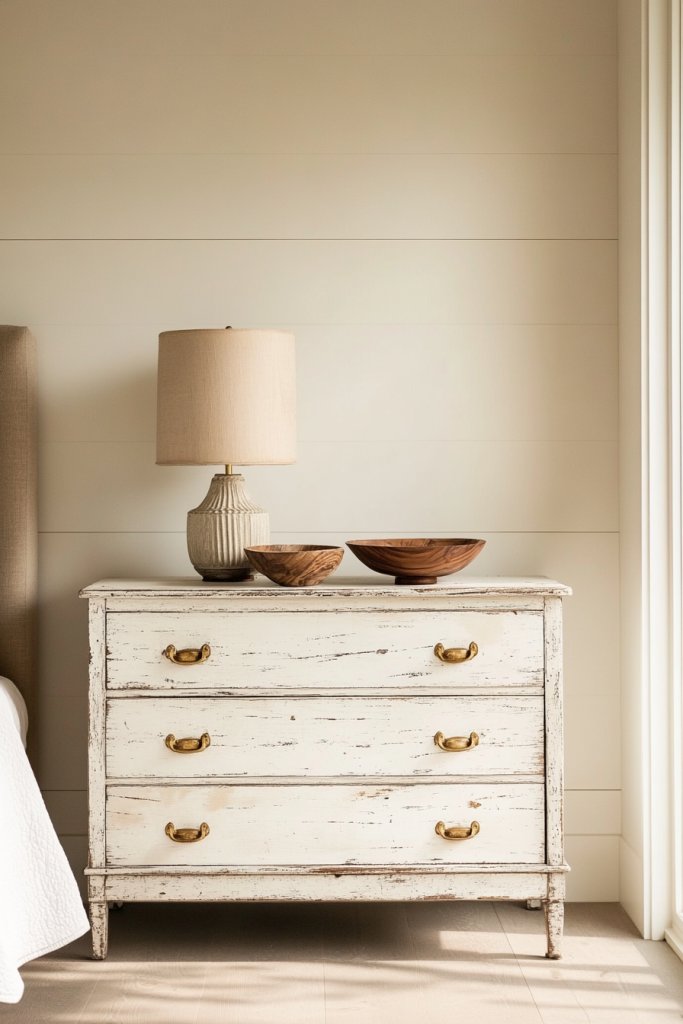
Ever walk into a thrift store and spot a piece that just needs a little love? Repurposing secondhand furniture is a wallet-friendly way to get stylish, unique pieces without the hefty price tag. It’s also eco-friendly, giving old furniture a new purpose and personality. Who knew that a little sanding and paint could turn trash into treasure?
Imagine a vintage wooden dresser with chipped paint, transformed into a chic statement piece with a fresh coat of pastel or bold color. Maybe an outdated nightstand gets a modern upgrade with a sleek black stain or a trendy distressed finish. The surface textures—rough, smooth, matte, or glossy—add character, making each piece a conversation starter. The room instantly feels more curated and personalized.
Choose furniture styles that match your aesthetic—industrial, shabby chic, mid-century modern—and customize accordingly. If space is tight, opt for compact or multi-use pieces; for larger rooms, bigger statement furniture works well. You can also mix and match different finishes or paint techniques to add visual interest. Seasonal color updates are easy—just repaint or re-stain as your style evolves.
Start by sourcing quality thrifted pieces—check local shops, online marketplaces, or garage sales. Clean furniture thoroughly, removing old hardware and sanding surfaces to prep for paint or stain. Use primer if necessary, then apply your chosen finish with brushes or rollers. For a distressed look, lightly sand certain areas after painting. Replace or upgrade hardware to match your decor theme. Seal with a clear topcoat for durability.
Add new hardware that complements your style—brass handles, matte black pulls, or vintage knobs. Personalize with stenciled patterns, decals, or decorative elements like faux leather accents. Create a cohesive look by painting multiple pieces in matching colors or finishes. Use your refurbished furniture as focal points or functional art in your space, showcasing your creativity.
Refurbishing thrifted furniture not only saves money but also boosts your confidence as a DIYer. Each piece reflects your personality and style while helping the environment. It’s a satisfying project that results in one-of-a-kind decor. Ready to hunt, transform, and enjoy your new furniture treasures? Let the DIY adventure begin!
5. Create a Gallery Wall with Framed Prints, Quotes, or Personal Photos

Does your bedroom feel a bit empty or uninspired? Creating a gallery wall is an easy, budget-friendly way to add personality and visual interest. It allows you to showcase your favorite prints, quotes, or even personal photos without splurging on expensive art. Plus, it’s a fun project to curate your own mini art collection.
Picture a carefully arranged collection of black-and-white photos, colorful prints, and hand-lettered quotes all framed in mismatched or coordinated frames. The varied sizes and textures create a dynamic focal point that draws the eye. The arrangement can span an entire wall or be a centered feature above your bed. It tells your story visually, making your room uniquely yours. The mix of personal and curated art feels warm, inviting, and full of personality.
Mix different frame styles and colors for an eclectic vibe, or stick to a uniform look for a sleek, modern feel. Change out prints seasonally or for special occasions—like a new motivational quote or favorite photo. Use washi tape or poster putty for easy swaps without damaging walls. For small spaces, a smaller gallery can add charm without overwhelming. In larger rooms, go big with a multi-tiered arrangement for maximum impact.
Start by selecting your favorite images and prints—use free printable quotes, personal photos, or inexpensive art from thrift stores. Lay out your frames on the floor first to experiment with arrangements. Use painter’s tape to mark the outline on the wall for precise placement. Hang each frame securely, ensuring even spacing and alignment. Keep the arrangement balanced, mixing sizes and orientations for visual flow. Replace or rotate prints for ongoing refreshes.
Add small decorative elements like washi tape borders or fabric mats to elevate simple prints. Incorporate meaningful objects like vintage postcards, pressed flowers, or memorabilia into your frames. Use themed color palettes to create harmony or embrace a boho look with mismatched frames. Personal touches like handwritten notes or custom illustrations make it even more special.
A gallery wall turns blank space into a heartfelt showcase of your personality. It’s a DIY project that results in a stunning visual statement, boosting your confidence as a decorator. Over time, you can update the prints or add new frames to keep it fresh. Your bedroom will feel more vibrant and uniquely you—ready to start curating your masterpiece?
6. Add Functional and Decorative Storage Solutions Using Baskets and Under-Bed Organizers
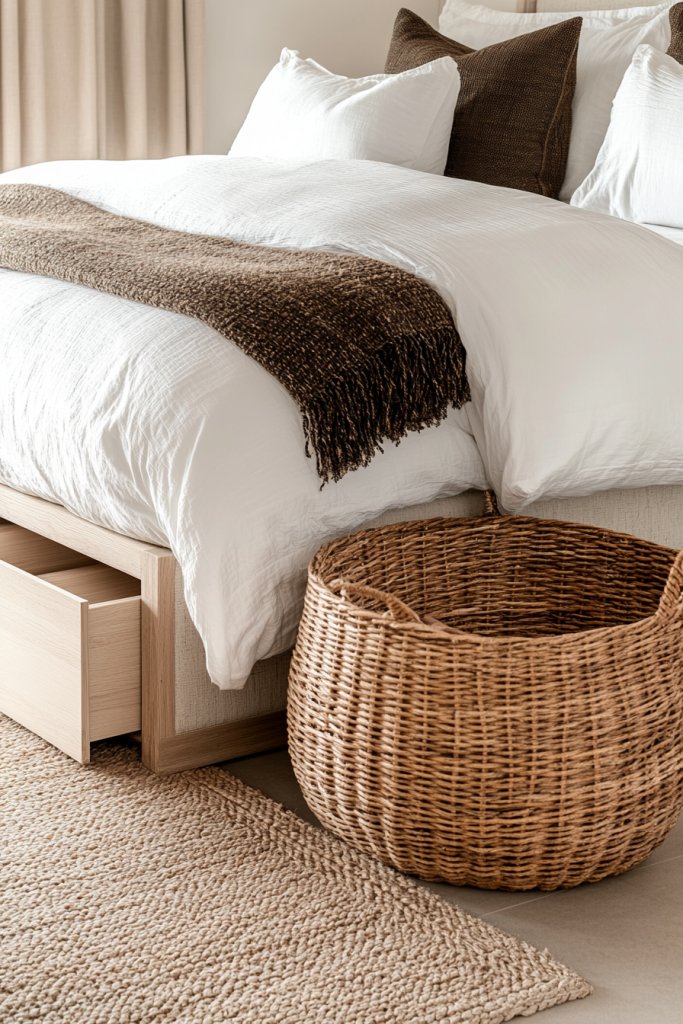
Clutter is the enemy of a peaceful bedroom, and finding stylish storage options without sacrificing space can be tricky. Baskets and under-bed organizers are a budget-friendly solution that hides away your stuff while adding decorative charm. They help keep your space tidy and make everything easily accessible. Who says storage can’t be cute?
Imagine woven baskets in natural tones tucked under your bed or placed on open shelves, filled with blankets, shoes, or accessories. Their textures range from rattan and seagrass to fabric with fun patterns, adding warmth and texture to your decor. The organized chaos looks intentional and inviting—like a curated boutique. When you open a basket, you feel a sense of calm, knowing everything is in its place.
Choose baskets and containers that match your decor style—sleek metal bins for industrial vibes, woven baskets for boho, or colorful fabric bins for playful spaces. For seasonal changes, swap out textiles or colors to refresh the look. Under-bed storage works well for out-of-season clothing, extra bedding, or shoes. Use label tags or decorative tags to keep everything organized and easy to find.
Select sturdy baskets with handles for easy maneuvering—measure your under-bed space for perfect fit. Use stackable bins to maximize vertical storage. Place larger baskets at the foot of your bed or in closets, and smaller ones on shelves or inside drawers. For open shelving, add decorative elements like faux plants or books on top to elevate their style. Regularly declutter to keep the system functional.
Decorate baskets with fabric liners, ribbons, or paint for a customized look. Use decorative labels or tags with your handwriting for a personal touch. Coordinate basket colors with your room’s color scheme or mix textures for visual interest. Consider adding a few decorative throws or pillows nearby to tie everything together in a cozy, organized space.
Smart storage solutions turn chaos into calm, making your bedroom a restful retreat. It’s an easy, budget-friendly way to boost your organization skills and style. Over time, you’ll enjoy the satisfaction of a clutter-free space that’s both functional and beautiful. Ready to tidy up in style? Get those baskets and start organizing!
7. Use Removable Wall Hooks and Tension Rods to Hang Accessories and Organize
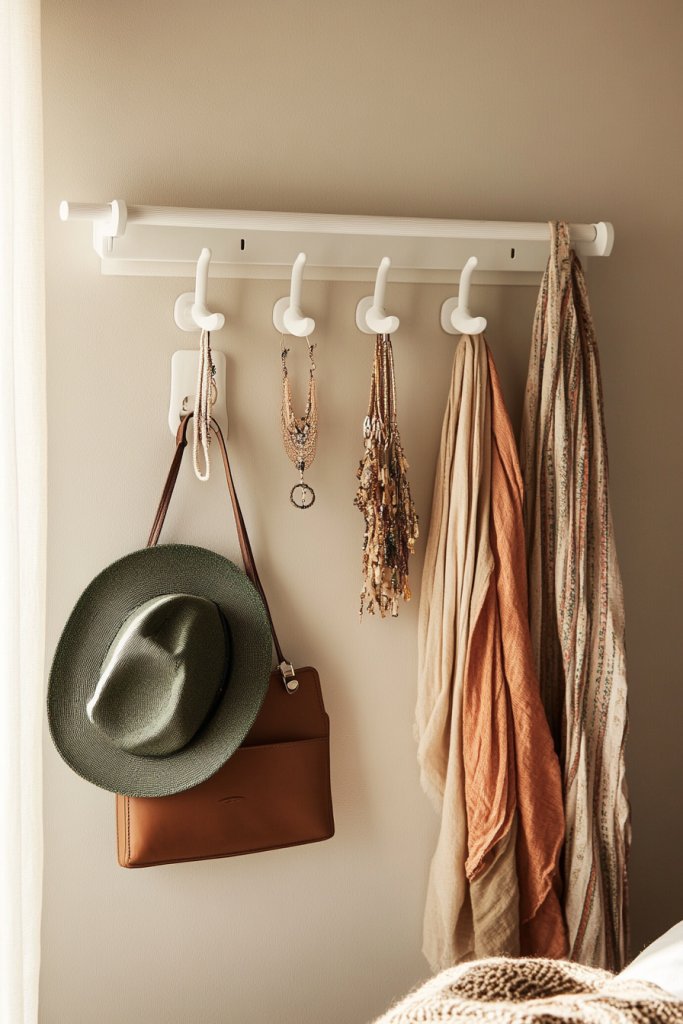
Cluttered surfaces and crowded closets can make your bedroom feel chaotic. Using removable wall hooks and tension rods offers a simple, affordable way to organize accessories, bags, or jewelry. They’re perfect for renters or anyone who hates damaging walls but still wants a tidy space. Plus, they’re super versatile and easy to move around.
Imagine a wall-mounted hook strip holding your favorite hats, scarves, and jewelry neatly in place. Or picture a tension rod hanging inside a closet or behind a door, draped with your accessories in an organized cascade. These solutions turn clutter into curated displays, making everything accessible and visually appealing. The room instantly feels more orderly and stylish—no more digging through drawers.
Choose sleek metal hooks for a modern look or decorative adhesive hooks for a softer aesthetic. Tension rods can be placed horizontally or vertically to suit your needs—try layering for more storage. Use multiple hooks or rods grouped together for a wall collage effect. For seasonal accessories, switch out items easily and keep things fresh.
Select hooks that suit your weight requirements and wall surfaces—adhesive for smooth surfaces, screw-in for more weight. Plan your layout by measuring spacing and placement. Stick hooks with a level to ensure they’re straight, and hang rods securely across designated areas. Use hooks or clips to hang jewelry, bags, or lightweight clothing. Regularly check and adjust for stability.
Personalize with decorative hooks in fun shapes or colors that match your decor. Use fabric or leather straps to hang larger items like bags or hats. Organize by color or style for a visual impact. Add small storage pouches or pockets to hooks for extra functionality. Keep your accessories tidy and easy to grab.
This simple organization hack transforms chaos into calm, making your room more peaceful. It’s a quick, budget-friendly way to keep your accessories accessible and your space looking stylish. Once you see how much easier your mornings become, you’ll wonder why you didn’t do it sooner. Ready to get organized and boost your room’s style? Just hang, clip, and enjoy!
8. Incorporate DIY Art Projects Using Canvas, Prints, or Paper Cuttings
Your bedroom walls can feel empty or uninspired, but expensive artwork isn’t always within reach. DIY art projects are a budget-friendly way to add personality and style. Creating your own canvases, prints, or paper cuttings allows you to customize your decor while having fun. It’s a creative outlet that results in unique wall art.
Picture a large, abstract canvas painted with bold strokes in your favorite colors, hanging above your bed. Or imagine a gallery of paper cutouts—floral shapes, geometric patterns, or quotes—arranged in a stylish collage. Handmade art adds texture and depth, making your walls come alive. Whether minimalist or detailed, DIY art turns your space into a reflection of your personality.
Use inexpensive supplies like acrylic paints, markers, or printable papers. Create a series of prints with different themes or colors, then frame them in mismatched or matching frames. Incorporate mixed media—add fabric, metallic accents, or textured paper for variation. Change your art seasonally or for special occasions to keep your decor fresh.
Start with a plan or sketch of your design. Use canvases, poster boards, or thick paper for your base. Paint, draw, or print your designs, then seal with a spray fixative or clear coat for longevity. Arrange your pieces on the floor first, then hang with removable hooks or double-sided tape. Keep spacing even and balanced for a professional look. Rotate or update your art periodically.
Add personal touches like handwritten quotes, family photos, or small memorabilia. Mix different art styles for an eclectic vibe or keep it uniform for a clean look. Use metallic or glitter accents for a glamorous touch. Incorporate textured elements like fabric patches or embossed paper for tactile interest.
Creating your own wall art is a rewarding way to showcase your creativity and style. It’s a cost-effective solution that adds character and makes your bedroom uniquely yours. Once you see your handmade pieces on the wall, you’ll gain confidence in your DIY skills. Ready to craft your personal gallery? Get your supplies and start creating!
9. Rearrange Furniture for a New Layout and Better Flow
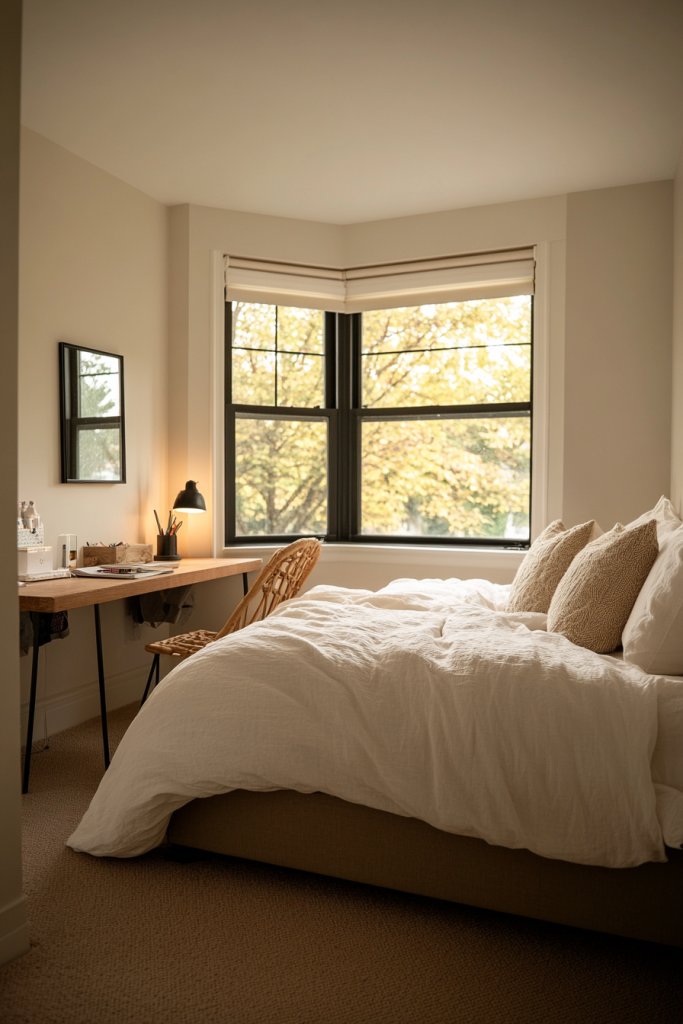
Feeling like your bedroom layout is stale or cramped? Simply rearranging your furniture can give your space a whole new vibe. It’s a low-cost refresh that can improve flow, functionality, and style. Plus, it’s a fun puzzle—who knew moving things around could make such a big difference?
Picture your bed now positioned opposite the window, creating a cozy nook with ample space for movement. Or imagine shifting your dresser closer to the door to maximize walking space and create a welcoming entry. The new arrangement may reveal previously hidden spots perfect for a reading corner or extra storage. It’s like giving your room a fresh personality without buying a thing.
Try different configurations based on your needs—maximize natural light, create a conversation zone, or improve privacy. For small rooms, floating furniture or multi-functional pieces work well. Larger rooms can handle multiple zones—sleeping, working, relaxing. Seasonal or mood shifts may inspire you to experiment with different layouts for a fresh feel or to better suit your lifestyle.
Start by measuring your space and furniture. Sketch out different layouts or use online room planners for visualization. Move pieces gradually, testing traffic flow and sightlines. Consider the placement of windows, doors, and outlets to optimize usability. For heavier furniture, use sliders or pads for easy repositioning. Adjust rugs, lighting, or decor to match the new layout for a harmonious look. Take your time to find the best flow.
Add decorative touches like throws, cushions, or small accessories to enhance the new layout. Use your new space to highlight favorite items or create cozy zones. Incorporate functional furniture like storage benches or side tables for added convenience. Think creatively—turn an awkward corner into a mini workspace or reading nook. The goal is a room that feels right for you.
Rearranging is an easy, cost-free way to breathe new life into your bedroom. It boosts your confidence in your decorating instincts and helps you understand your space better. When your room feels fresh and functional, your mood lifts too. Ready for a simple change that makes a big impact? Just move things around and see the magic happen.
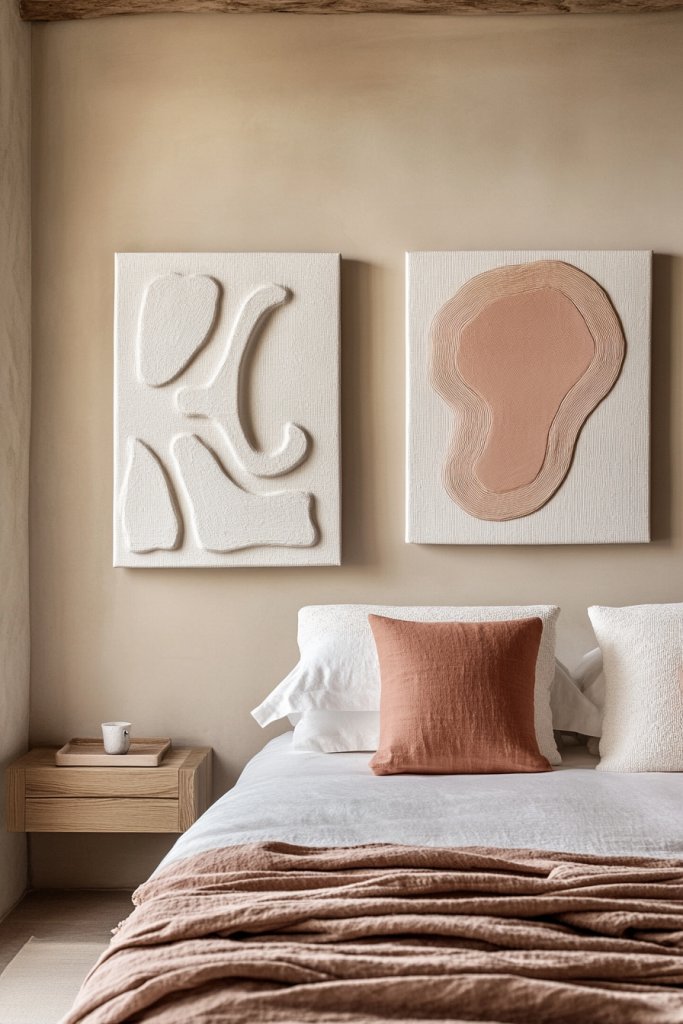
10. Add Small, Affordable Accent Pieces Like Throw Pillows or Decorative Trays
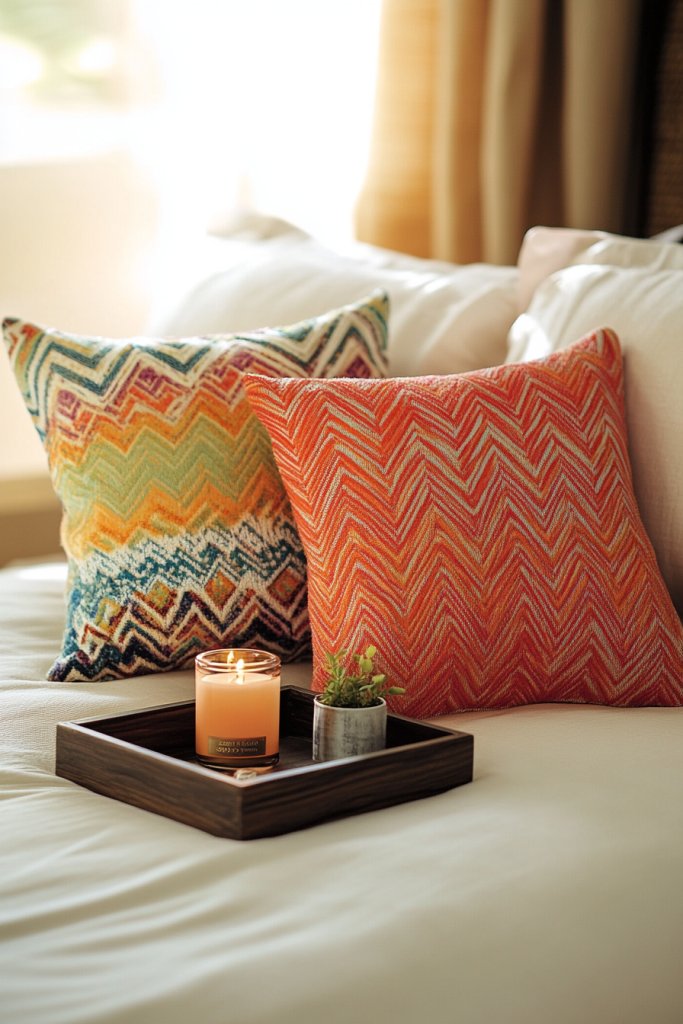
Sometimes, all your bedroom needs to look more stylish are a few well-chosen accents. Throw pillows, decorative trays, or small accessories are inexpensive ways to add pops of color and personality. They’re quick fixes that can refresh your decor without a full overhaul. Who knew small details could make such a big difference?
Picture a soft cream or muted blush throw pillow with textured fabric and embellishments like tassels or embroidery. Or imagine a sleek, decorative tray in metallic or matte finishes, holding your favorite candles, jewelry, or skincare products. These small pieces elevate your bed and surfaces, making your room look curated and intentional. They add layers of comfort and style, inviting you to relax.
Mix and match pillows in different sizes, patterns, and textures to create a layered look. Switch out pillow covers seasonally or for special occasions—think velvet for winter or linen for summer. Use trays to organize small items or display decorative objects. Incorporate bold colors or metallic accents for a luxe vibe, or keep it neutral for a calming atmosphere.
Choose pillows that complement your bedding and decor—consider size, fabric, and pattern. Sew or buy removable covers for easy updates. Place pillows in a mix of sizes on your bed for a plush, inviting look. Use decorative trays on nightstands or dressers to group small items neatly. Regularly rotate and wash pillow covers to keep everything fresh. Keep accessories within your budget by shopping sales or thrift stores.
Add personal touches like embroidered initials or favorite colors. Use pillows to introduce new textures—think faux fur, velvet, or chunky knit. Create themed arrangements for holidays or seasons. Incorporate meaningful objects on trays—photos, souvenirs, or handmade crafts—to make your space truly yours. Keep it playful or sophisticated based on your mood.
Small accents are a cost-effective way to elevate your decor and reflect your personality. They give your bedroom a finished, styled look and boost your confidence as a decorator. Over time, adding new pieces keeps your space fresh and exciting. Ready to enhance your bedroom’s style with just a few accessories? Pick your favorites and start decorating!
11. Incorporate Plants or Succulents in DIY or Budget-Friendly Planters
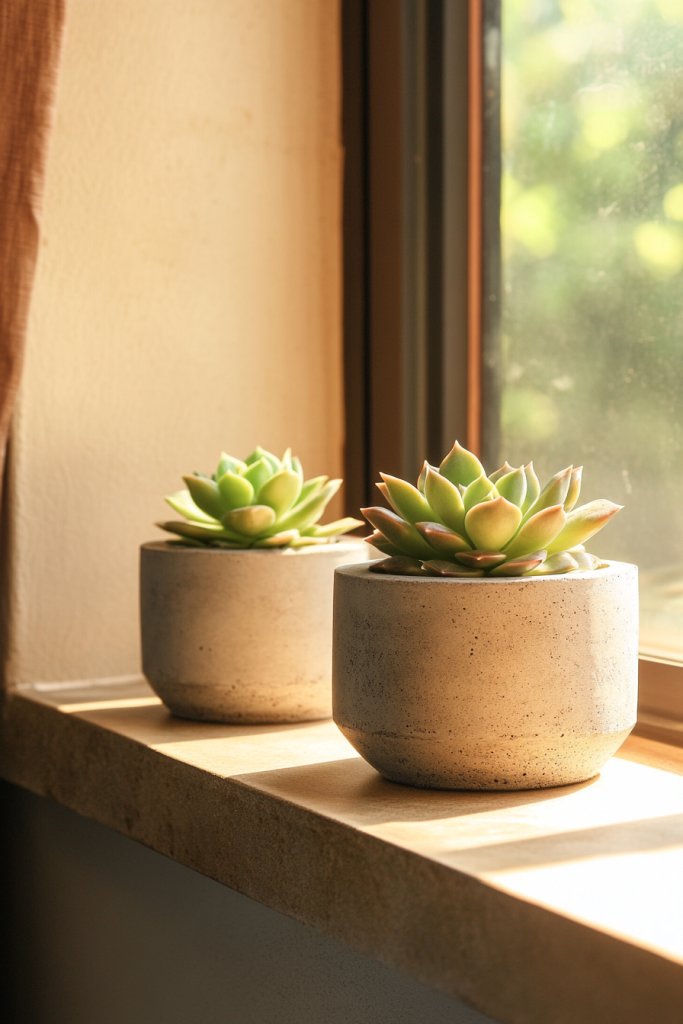
Want to bring a touch of nature into your bedroom but think plants are expensive or high-maintenance? Low-cost succulents or DIY planters are perfect for adding life and freshness without the hassle. They’re an affordable way to boost your mood, purify the air, and boost your decor with minimal effort. Who says green thumbs are required?
Imagine tiny succulents in colorful, geometric ceramic pots arranged on a windowsill or a shelf. The plants’ varied textures and shapes add visual interest, while their simple, modern containers keep things stylish and minimal. Alternatively, create a DIY planter with reclaimed wood or painted cans, giving your greenery a rustic or playful touch. The result is a lively, inviting space that feels fresh and vibrant.
Choose plants based on your sunlight and care preferences—succulents and cacti for low-maintenance, lush ferns or pothos for more humidity-loving varieties. Use inexpensive containers like painted tin cans, vintage teacups, or repurposed jars to add personality. Group multiple planters together for a mini indoor garden or spread them out for visual balance. Change out plants seasonally or as your style evolves.
Start by selecting plants suited for your environment and skill level. Use well-draining soil and inexpensive containers—think thrifted pottery or DIY painted cans. Arrange your planters on windowsills, shelves, or bedside tables. Water sparingly, especially succulents, to avoid overwatering. Decorate your planters with painted designs, stones, or small figurines for extra flair. Regularly prune and replace plants for ongoing freshness.
Create themed planters matching your decor—boho, minimalist, or colorful. Add decorative stones, shells, or DIY painted labels. Incorporate small fairy lights or decorative stakes for added charm. Use plants to introduce seasonal colors or textures, enhancing your overall style. Personal touches turn your green space into a curated, lively corner.
Adding plants is a simple, affordable way to energize your room and improve your well-being. Watching your mini garden grow boosts confidence and encourages ongoing decorating projects. Plus, plants are a natural, budget-friendly decor element that feels fresh and calming. Ready to green up your bedroom? Just choose your plants, pot them creatively, and enjoy the vibe!
Conclusion
Revamping your bedroom on a budget is easier than you think with a variety of creative, affordable ideas. Whether it’s repurposing old furniture, adding DIY decor, or simply changing up accessories, these tips will help you achieve a fresh, stylish look without overspending. Don’t hesitate—try out these ideas and make your bedroom a beautiful, personalized retreat. Your dream space is just a few budget-friendly tweaks away!
Leave a Reply