Looking to add a splash of personality and charm to your bedroom? Creating a picture wall is one of the most popular and delightful ways to do just that! Not only do these walls serve as a focal point, but they also let you showcase your favorite memories, art, and style in a way that truly reflects who you are. Whether you prefer a sleek, modern look or a cozy, eclectic vibe, a picture wall offers endless opportunities for personal expression.
In this article, you’ll discover a variety of inspiring bedroom picture wall ideas that cater to different tastes and styles. From minimalist arrangements to bold gallery walls, each concept is designed to help you transform your space into a reflection of your personality. Get ready to explore creative ways to turn blank walls into captivating storytelling canvases that make your bedroom uniquely yours!
1. Gallery Wall of Travel Memories with Vintage Frames
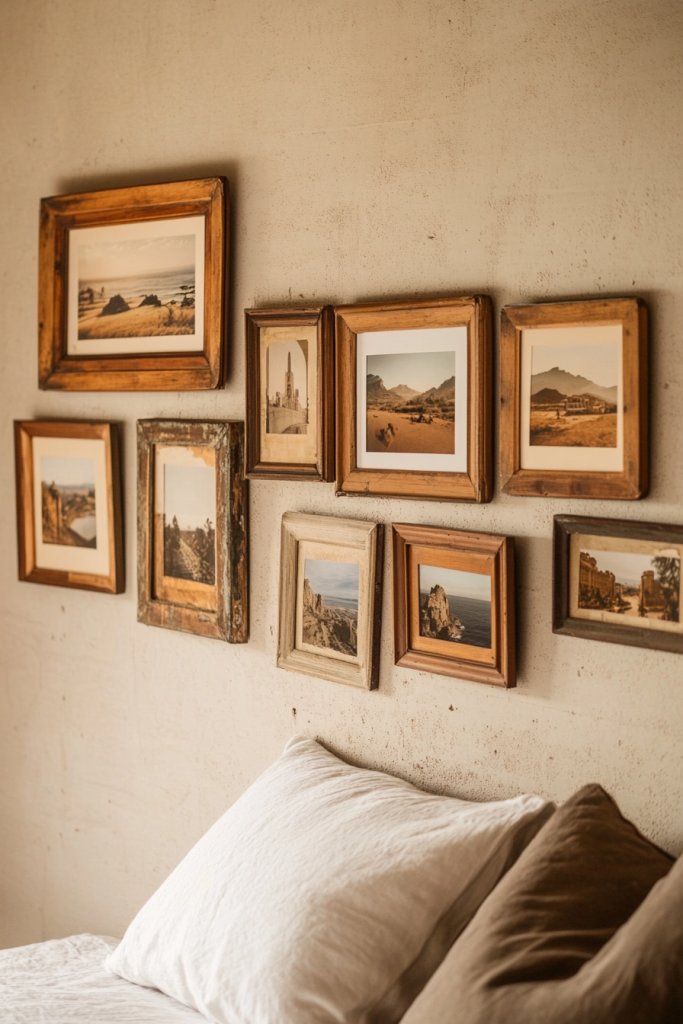
Ever wonder how to make your bedroom feel more personal and nostalgic? A cluttered wall of random photos doesn’t cut it anymore. You want a curated space that sparks joy and transports you back to favorite trips. Creating a travel memories gallery is your ticket to a stylish, meaningful display.
Imagine a wall filled with mismatched vintage frames, each holding a snapshot from a different adventure. The photos are in black and white or sepia, adding a timeless touch. Textured frames with worn edges give a nostalgic vibe, while colorful prints pop against neutral walls. The whole arrangement feels like a mini-museum of your life’s journeys.
Mix vintage frames with modern metallic ones for an eclectic look, or stick to all distressed wood for rustic charm. For small rooms, cluster the frames tightly for impact; larger spaces allow for a more spaced-out, gallery-style layout. Seasonal updates, like adding new travel shots or swapping frames, keep the display fresh. You can also theme sections, such as beaches, mountains, or cityscapes.
Start by selecting your favorite travel photos and sourcing mismatched vintage frames from thrift stores or online marketplaces. Arrange them on the floor first to plan your layout. Use painter’s tape to mark the wall positions before hanging to avoid unnecessary holes. Tools like a level and measuring tape help achieve a balanced look. Secure frames with sturdy hooks or nails, making sure they hang straight and evenly spaced. Consider adding small decorative accents like vintage postcards or travel tickets for extra flair.
Add personal touches by writing captions or stories on small tags attached to each frame. Incorporate souvenirs like small postcards, maps, or mini travel-themed sculptures nearby. Use different frame textures—rattan, distressed wood, or metallic—to create visual interest. You could also rotate photos seasonally to showcase recent adventures or memories.
This travel memory gallery transforms your bedroom into a personal museum of your adventures, inspiring wanderlust daily. It’s an easy way to showcase your unique story without cluttering the space. Now, every glance at your wall reminds you of incredible journeys and future plans. Ready to turn your travel memories into art? It’s simpler than you think!
2. Symmetrical Framed Quotes and Affirmations
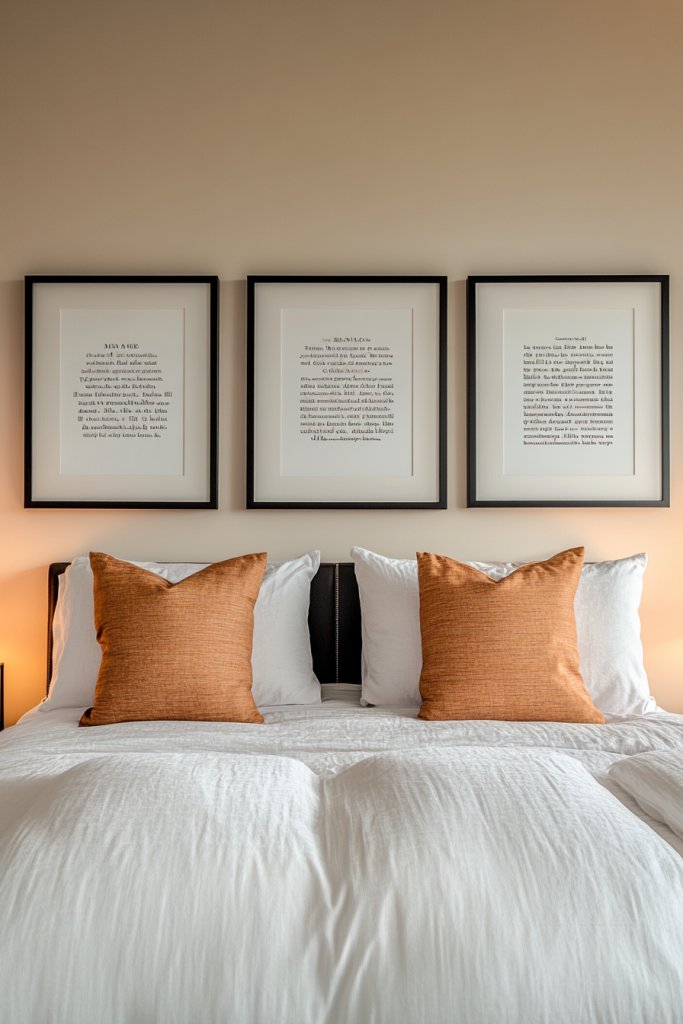
Feeling uninspired in your own space? A dull wall of generic decor won’t boost your mood or motivation. You crave a focal point that’s both uplifting and organized, but nothing too chaotic. Symmetrical framed quotes and affirmations might just be the perfect solution to elevate your bedroom vibe.
Picture a clean, balanced arrangement of matching frames in a grid. Each frame contains a bold quote or affirmation in sleek typography, set against colorful or neutral backgrounds. The symmetry creates a calming, orderly feel, while the positive messages energize your mornings. Soft lighting highlights the frames, making the words pop and feel empowering.
Opt for black-and-white frames for a minimalist look, or go for metallic finishes for a luxe touch. You can align the frames horizontally for a modern look or stack them vertically for a statement wall. Change quotes seasonally or as your mindset evolves, keeping the display fresh. For smaller spaces, a single column of quotes can be just as impactful.
Choose your favorite affirmations printed on high-quality paper or canvas. Select matching frames that complement your bedroom decor—think sleek aluminum or matte black wood. Measure wall space carefully to create a precise grid, using painter’s tape to mark placements. Hang the frames with appropriate hooks, ensuring they’re perfectly aligned with a level tool. Keep spacing consistent to maintain that symmetry. Consider adding subtle LED backlighting behind the frames for a glow effect.
Customize quotes to reflect your personal goals and values. Use handwritten notes or calligraphy for a more personal touch. Incorporate small decorative elements like patterned tapes or textured backgrounds to add depth. You can also layer in small decorative items like candles or tiny sculptures nearby for a curated look.
A framed quote wall sets a positive tone every day, turning your bedroom into a sanctuary of motivation. It’s a simple, impactful way to remind yourself of your goals. Plus, it’s easy to update as your aspirations grow. Get ready to start each day with a boost of confidence!
3. Collage of Childhood Photos in a Large Grid
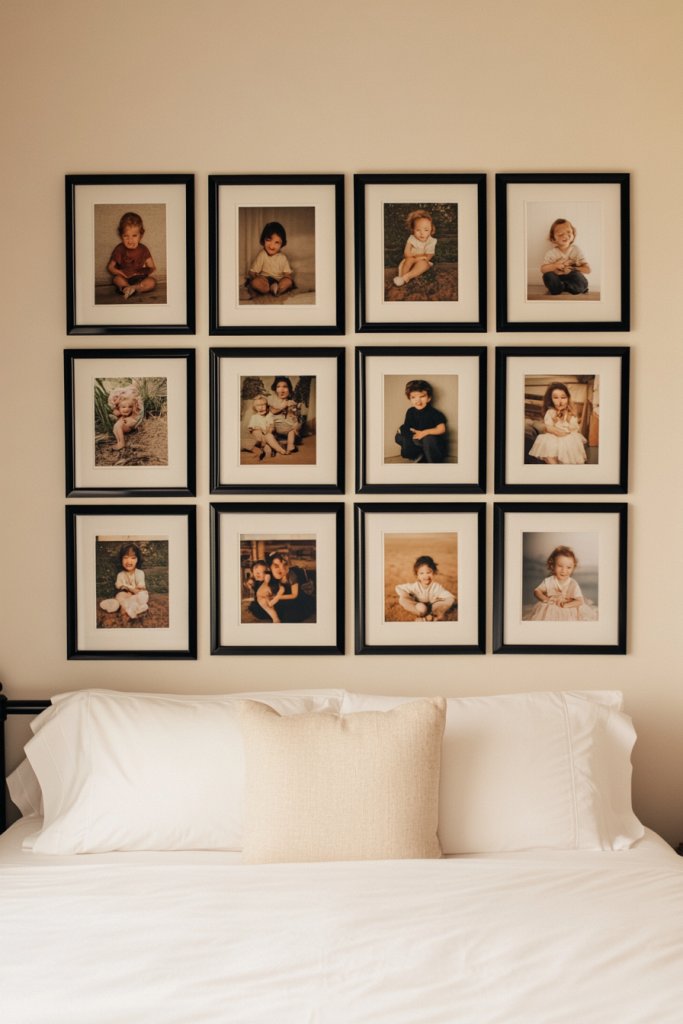
Want to add a nostalgic, heartfelt touch to your bedroom? A chaotic collection of childhood photos scattered around doesn’t quite do justice to those precious memories. You need a more intentional, eye-catching way to display your past. A large grid collage of childhood photos transforms your wall into a sweet, sentimental centerpiece.
Envision a big, uniform grid of black-and-white or sepia-toned childhood shots, each framed identically. The grid covers a substantial wall area, creating a visual timeline of innocence and growth. The consistent framing and layout give a modern edge to the nostalgic images. The photos evoke warmth and memories, drawing viewers into your childhood story.
Use matching frames for a sleek, contemporary look, or mix vintage and modern frames for eclectic charm. You can arrange the grid symmetrically for order or asymmetrically for a more playful vibe. Rotate and update the collage periodically with new or favorite childhood photos. For small rooms, a partial grid or a vertical strip can work well without overwhelming the space.
Gather your favorite childhood photos, scan or print them in uniform sizes. Choose frames that match your aesthetic—simple black or white, or colorful for a fun twist. Lay out the grid on the floor first to plan spacing and alignment. Use painter’s tape to mark the exact positions on the wall. Hang each frame carefully with level and measuring tools to ensure perfect straightness. Keep spacing consistent and consider adding a subtle background color or wallpaper behind the collage for contrast.
Add small personal touches like handwritten labels or dates on some photos. Incorporate small memorabilia—like tiny toys or medals—inside frames or nearby to enrich the story. Use decorative corner clips or washi tape for a non-permanent, creative framing option. Changing out a few photos over time keeps the collage fresh and meaningful.
This childhood photo collage not only decorates your wall but also reminds you of your roots and growth. It’s a heartfelt tribute to your journey, making your space uniquely yours. It sparks nostalgia while being a stunning visual feature. Ready to relive those sweet memories every day? It’s easier than you think!
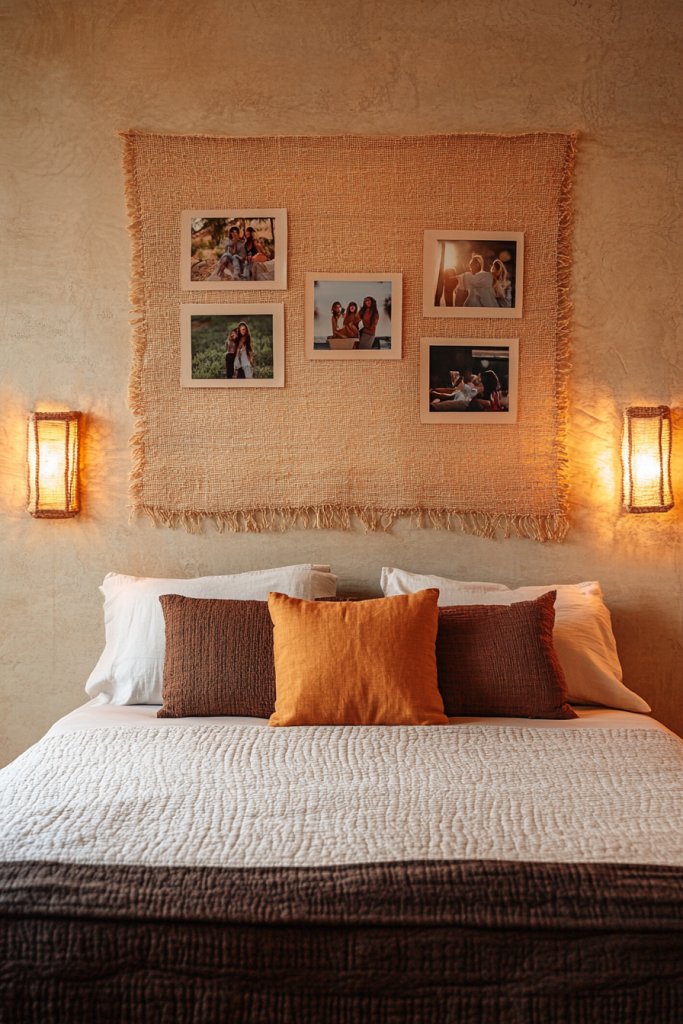
4. Boho-Chic Wall with Woven Wall Hangings and Pic Frames
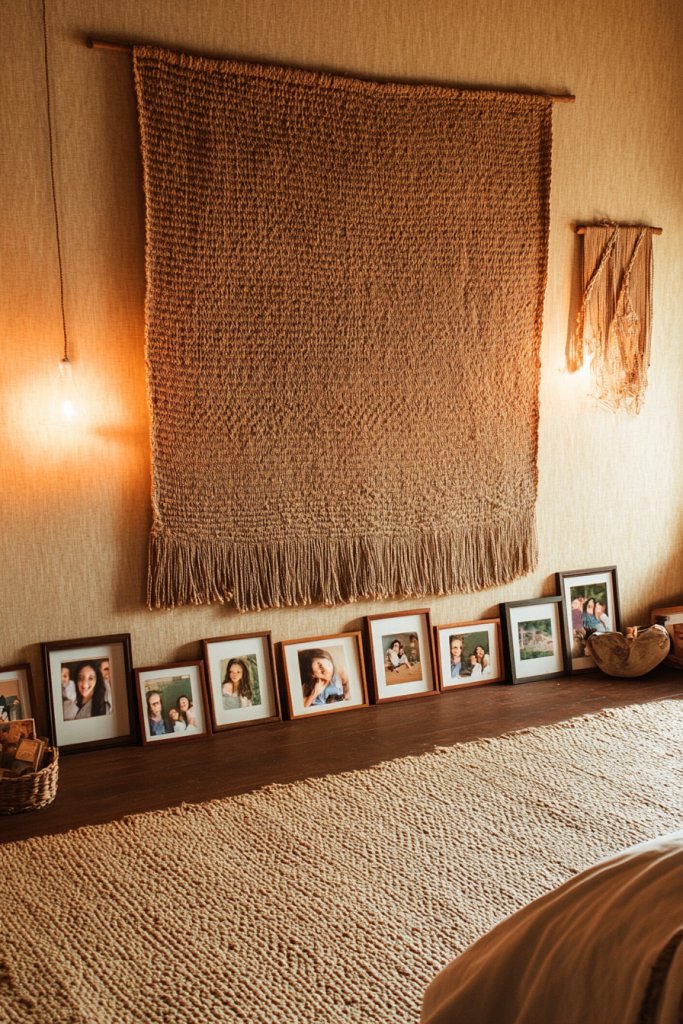
Feeling like your bedroom lacks texture and personality? Flat walls without dimension can feel boring and uninspired. You want a cozy, eclectic vibe that combines comfort with style. A boho-chic wall with woven hangings and mixed pic frames hits that sweet spot perfectly.
Visualize a wall layered with textured woven textiles—think tasseled wall hangings, macramé, or rattan panels—intermixed with casual picture frames. The textiles add tactile richness, while the frames display your favorite casual photos or artwork. Earthy tones like terracotta, beige, and muted greens create a warm, inviting atmosphere. The combination results in a relaxed, artistic aesthetic that invites touch and exploration.
Mix different textures—jute, rattan, knotted yarn—to add visual interest. For a more polished look, keep the woven pieces symmetrical, or go for an organic, asymmetrical arrangement for a laid-back vibe. Seasonal updates could include swapping textiles or changing photos within the frames. Use an eclectic mix of frame styles—boho-inspired wood, distressed metal, or colorful painted options—to suit your personality.
Start by selecting woven textiles that match your color palette—handmade or store-bought work well. Secure textiles with nails or removable hooks, arranging them in a layered, overlapping fashion. Mix in various sized picture frames with your favorite casual photos, hanging them at different heights for a relaxed look. Use command hooks or sturdy adhesive strips for easy repositioning. For a cohesive look, keep the color scheme warm and natural, avoiding overly shiny or modern finishes.
Personalize with small textile accents like embroidered patches or tassels. Incorporate your favorite travel souvenirs or small decorative items into the mix. Use fabric dyes or paints to customize textiles further. You can also add string lights with warm bulbs for a cozy glow that enhances the boho vibe.
A boho-chic wall adds warmth and personality, making your bedroom truly feel like your sanctuary. It’s an effortless way to showcase your love for textures and eclectic style. Plus, it’s adaptable—easily change textiles or photos as your tastes evolve. Get ready to craft a wall that’s as cozy as your favorite sweater!
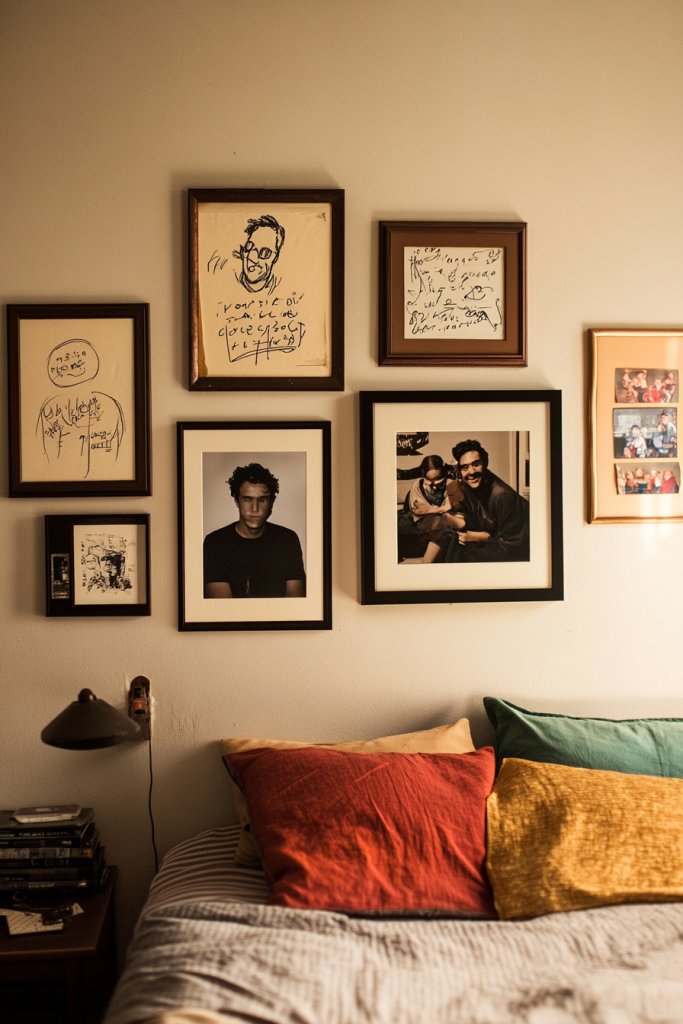
5. Mix of Personal Artwork and Handwritten Notes
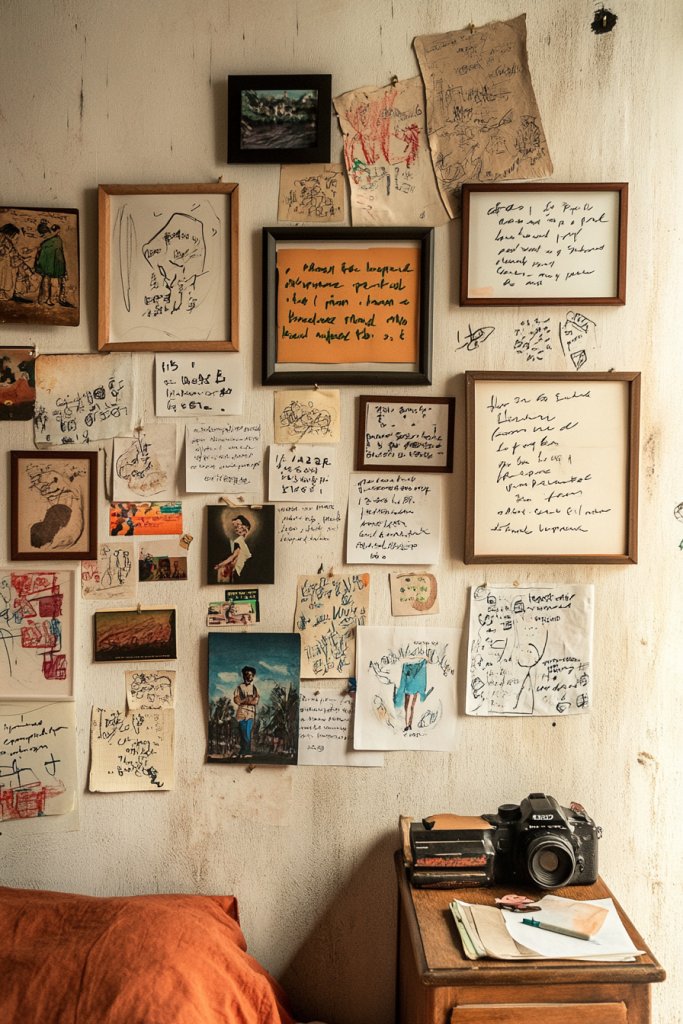
Tired of generic wall decor that feels impersonal? You crave a space that reflects your personality and creativity. Simply hanging store-bought art isn’t enough anymore. Combining your own artwork and handwritten notes creates a truly authentic and inspiring bedroom wall.
Picture a collage of small sketches, doodles, and handwritten affirmations arranged casually but intentionally. The artwork varies from simple pen sketches to colorful illustrations or motivational quotes you’ve written yourself. The wall looks lively and personal, with a mix of textures and colors that showcase your artistic side. It invites viewers to connect with your personality through your own creations.
Frame your artwork in simple frames for a polished look, or use clipboards and washi tape for an informal, ever-changing display. Arrange pieces in a grid, a cluster, or a freeform layout, depending on your space and mood. Incorporate different types of paper—watercolor, textured cardstock, or plain paper—for variety. Change out artwork seasonally or as your skills improve for ongoing freshness.
Gather your drawings, doodles, and handwritten notes—use quality paper or scan and print digital versions if needed. Select frames that enhance your artwork, pairing minimalist styles with bold colors for impact. Arrange your pieces on the floor first to find a layout you love. Use painter’s tape to mark the placement on the wall, then hang or clip your artwork accordingly. Keep the arrangement balanced but dynamic, mixing sizes and orientations.
Add personal touches like decorated borders, watercolor accents, or small embellishments to your artwork. Incorporate meaningful quotes or affirmations that motivate you. Use decorative clips, washi tapes, or even string to hang notes temporarily without damaging walls. Personalize with a favorite quote or mantra in your handwriting to keep it special.
Displaying your own art and notes turns your bedroom into a creative sanctuary. It shows off your talents and makes your space uniquely yours. Plus, it encourages ongoing artistic growth and self-expression. Ready to turn your doodles into wall art? So easy and rewarding!
6. Vertical Photo Line with Minimalist Clips

Do you feel your photos are just cluttering your phone or camera roll? Want a quick way to showcase your favorite memories without overwhelming your wall? A vertical photo line with minimalist clips offers an effortless, stylish solution. It’s perfect for displaying rotating favorites and keeping your space fresh.
Imagine a sleek wire or string stretched vertically along your wall, secured with small hooks. Clips hold your photos in place, allowing you to change them easily. The photos are in varied sizes and orientations, giving a casual yet curated look. The thin wire or cord blends seamlessly into the background, focusing attention on your images. It’s a simple, modern way to keep your memories front and center.
Use a black or metallic wire for a contemporary feel, or opt for a colorful cord for a playful vibe. Adjust the length based on your wall space, from a narrow strip to a full-length feature. For a more polished look, keep the clips uniform; for a casual style, mix different clip designs. Seasonal updates are easy—just clip new photos or remove old ones as needed.
Purchase a thin, durable wire or cord, and small sturdy hooks for wall mounting. Measure vertical space carefully, then install hooks at equal intervals. Use mini clips or clothespins to attach your photos—think simple wooden or metal clips. Hang the wire taut for a clean look or let it sag slightly for a relaxed style. Regularly rotate your photos to keep the display lively. This setup requires minimal tools and effort.
Decorate clips with washi tape or paint for added personality. Incorporate small decorative elements like charms or mini banners alongside your photos. Use themed or color-coordinated photos for a cohesive look. Add a string of fairy lights for a cozy glow that highlights your images at night.
This photo line adds a dynamic, personal touch to your bedroom wall. It makes your favorite moments easy to update and refresh. Plus, it keeps your space feeling vibrant and current without much effort. Ready to showcase your memories with style? Easy, right?
7. Triptych or Multi-Panel Abstract Art with Personal Photos
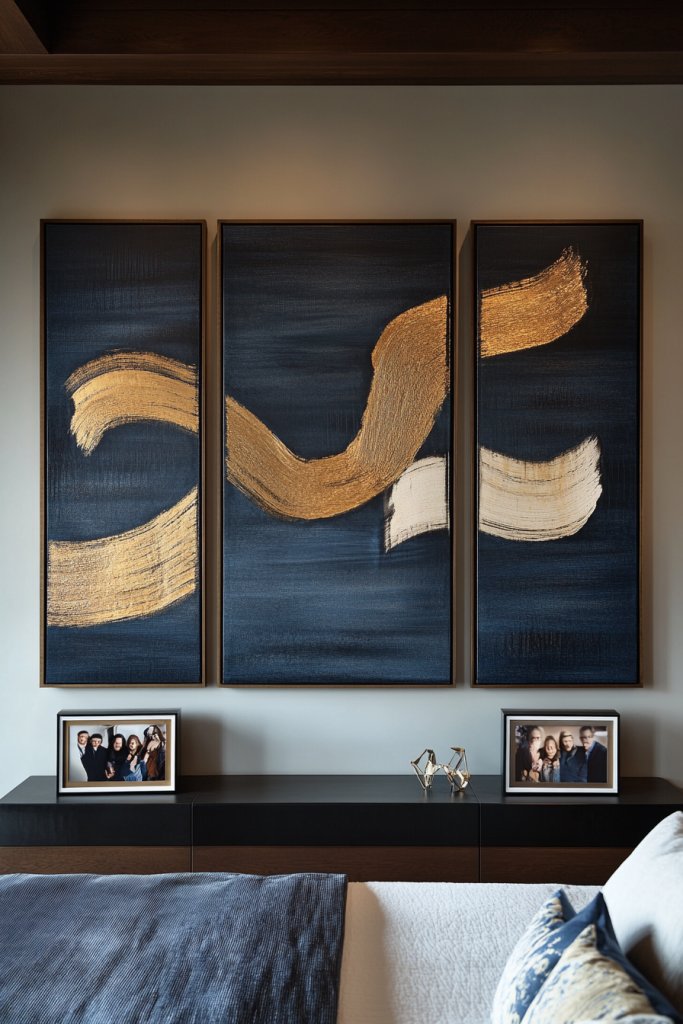
Looking to create a bold, contemporary focal point in your bedroom? Standard framed photos sometimes lack impact, especially in larger spaces. Combining abstract art panels with personal photos offers a modern twist that’s both personal and artistic. It’s a statement wall that reflects your personality and taste.
Visualize three large, cohesive abstract art panels—think fluid shapes, subtle textures, or vibrant color blocks—paired with personal photos integrated into the design. The artwork creates a dramatic backdrop, while the photos add intimacy. The combination balances abstraction with personal storytelling, making your wall an artful conversation starter. The panels can be aligned symmetrically or asymmetrically for different effects.
Choose abstract art in bold colors for energetic spaces or muted tones for calm retreats. You can opt for canvas prints or framed panels, depending on your aesthetic. Integrate your photos by overlaying them on the artwork or placing them nearby in matching frames. Adjust the scale of the panels based on your wall size—large in open spaces, smaller for cozy corners. Seasonal or thematic updates keep it fresh.
Select abstract art panels from art stores or create your own digital designs. For personal photos, choose images that complement the color palette. Mount the panels at eye level, using frames or directly on the wall with mounting strips. Arrange the photos within or around the panels, ensuring visual harmony. Use level tools for precise alignment, and consider lighting options like picture lights or spotlights to highlight the art.
Add personal touches by customizing the abstract panels with your favorite colors or textures. Incorporate small decorative elements like metallic accents or textured finishes. Personalize photos by adding borders, filters, or overlays that match the artwork’s style. You can also include small memorabilia or meaningful objects in the display area.
This multi-panel approach elevates your bedroom into a stylish, personalized art gallery. It demonstrates your creative eye and willingness to experiment. The blend of abstract and personal makes your space uniquely yours, inspiring you daily. Ready to turn your wall into a modern masterpiece? Let’s do it!
8. Framed Polaroids in a Polished Grid Pattern
Ever feel your instant photos are just cluttering your digital gallery? Want a sleek way to display those nostalgic Polaroids? Arranging them in a polished grid turns a casual collection into a stylish feature. It’s a great way to capture fleeting moments and make them last visually.
Visualize a precise grid of uniformly framed Polaroids on your wall. The photos, in their vintage tones, are arranged symmetrically for a clean, modern appearance. The frames are simple, perhaps white or black, emphasizing the photos’ charm. The grid stretches across a large wall or a narrow corridor, creating a focal point that’s both nostalgic and contemporary. Soft lighting enhances the vintage feel.
Use matching frames for a minimalist look or mix colors and textures for a more eclectic vibe. For a less structured feel, stagger the photos in a grid pattern or create a freeform collage. For seasonal updates, swap out older photos for new favorites. You can also incorporate Polaroids with different filters or borders for variety.
Select your favorite Polaroids and choose frames that complement their vintage aesthetic—white, black, or transparent acrylic work well. Measure your wall space and plan a grid layout, using painter’s tape to mark positions. Hang each frame with appropriate hooks or mounting strips, ensuring alignment with a level. Keep consistent spacing between frames for a tidy look. Consider adding tiny LED lights behind the grid for a subtle glow.
Label some Polaroids with dates or small captions using handwriting or labels for added context. Incorporate decorative elements like string lights or small shelves for mini souvenirs. Frame a few Polaroids with decorative borders or mats to add variety. Personalize the display further by including handwritten notes or doodles around the photos.
A grid of framed Polaroids turns your instant snapshots into a curated piece of art. It celebrates spontaneous memories with a stylish twist. Every glance reminds you of joyful moments and creates a cozy, personalized atmosphere. Ready to showcase your instant memories beautifully? Absolutely!
9. Anecdotal Photo and Quote Cluster in Asymmetrical Layout
Feeling like your wall lacks personality and spontaneity? Symmetrical arrangements can sometimes feel too staged or sterile. You want a dynamic display that tells your story with energy and authenticity. An asymmetrical cluster of photos and quotes offers a personal, lively vibe that sparks conversation.
Imagine a collection of your favorite candid photos and heartfelt quotes arranged in an organic, unbalanced way. The layout feels spontaneous but intentional, with images overlapping slightly or placed at different heights. Mix in handwritten notes, small artworks, or decorative elements to add layers of interest. The overall effect is vibrant, personal, and full of life.
Use a variety of frame styles and sizes for a playful, eclectic look. You can stick to a color theme or mix everything for maximum personality. Incorporate different textures—fabric, paper, or even fabric patches—to add depth. Change the arrangement seasonally or as your mood shifts, making it a living, breathing part of your space.
Gather your favorite photos, quotes, and small artworks. Choose frames or mount pieces directly on the wall with washi tape or adhesive strips for a non-permanent option. Arrange them on the floor first, playing with placement until you find a balanced, energetic composition. Use a level and measuring tape to transfer the layout onto the wall. Hang or tape the pieces, ensuring they look spontaneous but intentional. Keep the arrangement flexible for easy updates.
Add personal touches like handwritten captions, doodles, or decorative borders. Incorporate small memorabilia or meaningful objects nearby. Use contrasting frame colors or materials for visual interest. Incorporate your favorite colors or themes to reflect your personality and keep the display fresh.
This asymmetrical cluster creates a lively atmosphere that’s uniquely yours. It celebrates your personality and memories in a way that feels natural and authentic. Plus, it’s easy to update and adapt, keeping your space fresh and inspiring. Ready to craft a wall that’s full of life? Let’s do it!
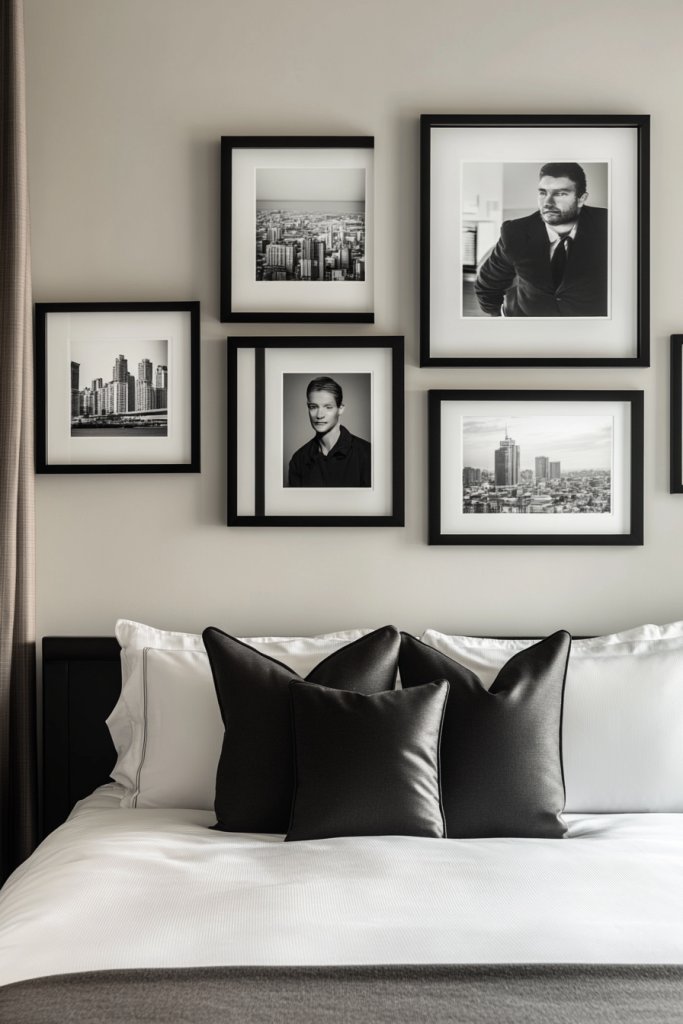
10. Artistic Black-and-White Portraits in Sleek Frames
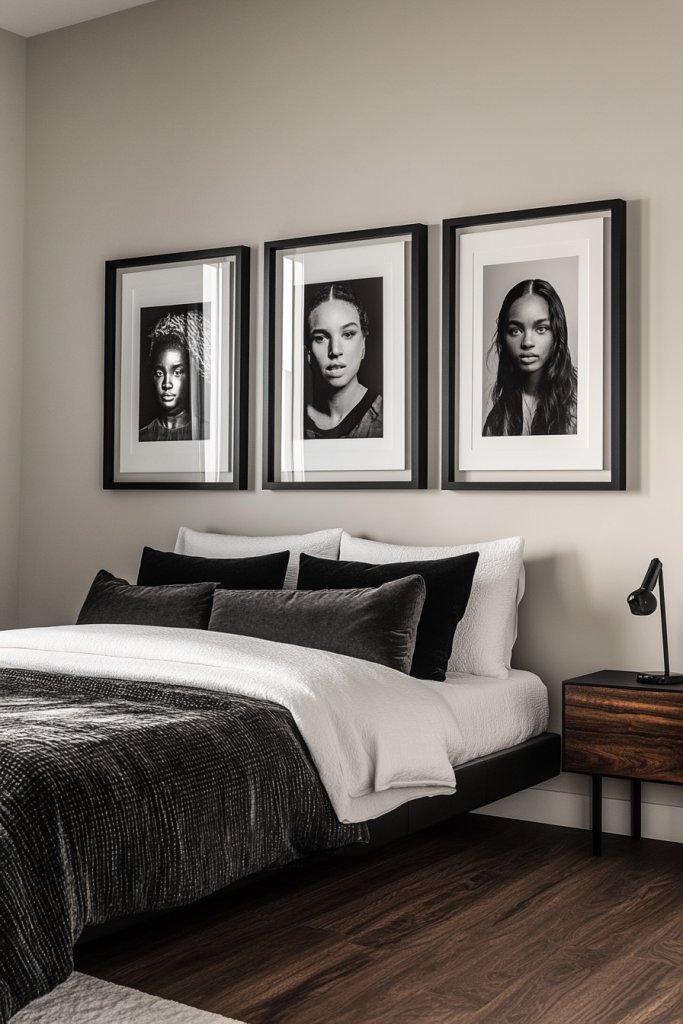
Want to elevate your bedroom decor with a touch of elegance? Busy, colorful walls can sometimes feel overwhelming or cluttered. You seek a sophisticated, timeless look that adds depth and class. Black-and-white portraits in sleek frames offer a minimalist yet impactful solution.
Picture a wall lined with large, monochrome portraits of loved ones, icons, or inspiring figures. The images are framed in slim black or metallic frames, creating a clean, modern aesthetic. The contrast of black and white adds drama and focus, emphasizing emotion and personality. The arrangement is balanced, with some portraits larger than others for visual interest.
Keep all frames uniform for a sleek, cohesive look, or mix different textures like matte black, gloss, or brushed metal for variety. Arrange the portraits in a grid, a salon-style cluster, or asymmetrically for a more dynamic feel. Incorporate a few color photos or artwork sparingly to break the monotony if desired. The style works well in minimalist, industrial, or modern decor themes.
Select your preferred portraits, printing them in high resolution or sourcing professional prints. Choose slim, modern frames that complement your decor style. Measure wall space carefully and plan your layout—use painter’s tape to mark positions. Hang the frames evenly, ensuring they are level and aligned. Use appropriate hooks or nails for stability. Lighting can be subtle—think track lighting or spotlights to highlight the portraits.
Add personal touches by including a few candid or artistic shots among the portraits. Use decorative mats or borders to frame some images differently, creating visual variety. Incorporate small decorative elements like metallic accents or textured wall paint to enhance the modern aesthetic. Regularly update the portraits to keep the display fresh and relevant.
Black-and-white portraits lend an air of timeless elegance and emotional depth to your space. They reflect sophistication and a curated taste, boosting your confidence in your decor choices. This style is versatile enough to fit various themes while maintaining a polished look. Ready to add a touch of class? It’s simpler than you think!
11. Mix of Framed Personal Achievements and Certificates
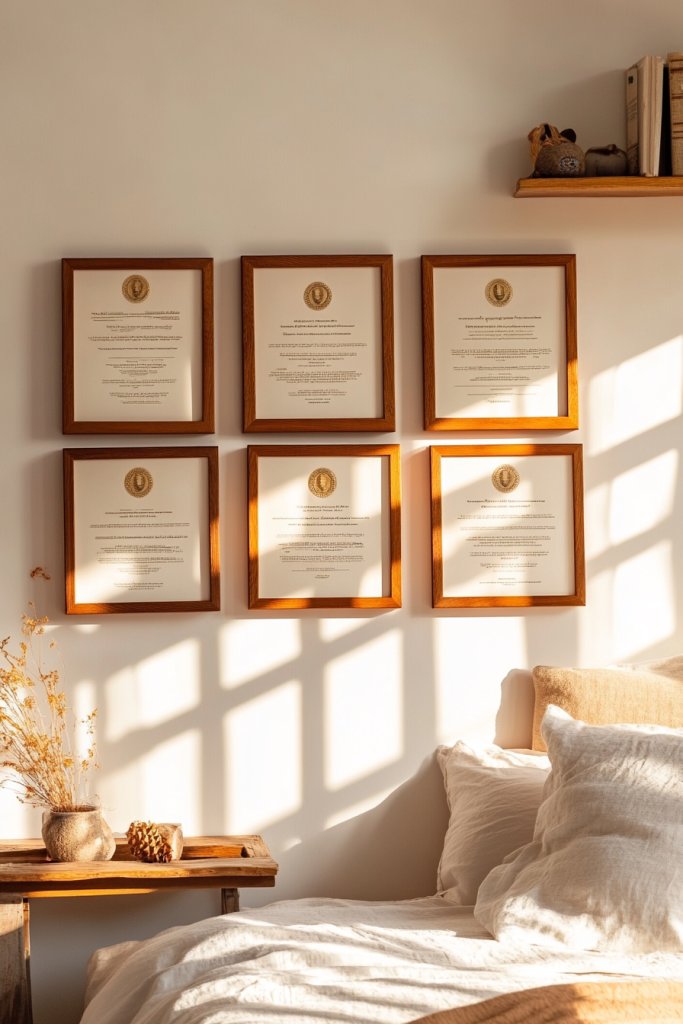
Do you have a collection of awards, diplomas, or personal milestones tucked away? They deserve a place where they can inspire and motivate you daily. But hanging plain certificates in a cluttered way doesn’t do them justice. A curated mix of achievements in stylish frames turns your wall into a motivational gallery.
Imagine a wall showcasing your accomplishments, each framed in sleek or decorative frames. The certificates are organized in a grid or staggered layout, highlighting your journey. Add other personal memorabilia or casual photos nearby for context. The display combines professionalism with personality, making your achievements a proud part of your daily environment.
Use uniform frames for a neat, professional look, or mix vintage and modern frames for an eclectic vibe. Arrange them symmetrically for order, or asymmetrically for a more dynamic feel. Incorporate small decorative elements like medals, ribbons, or badges to add texture. Periodically update the wall with new achievements or motivational quotes.
Gather your awards, certificates, and memorabilia. Choose frames that suit your decor style—metallic, wood, or sleek acrylic. Measure wall space and plan your layout, possibly on the floor first. Use painter’s tape to map out the arrangement on the wall. Hang each piece securely, ensuring they are level and spaced evenly. Consider adding small wall-mounted shelves for display of extra memorabilia.
Personalize with handwritten notes, motivational quotes, or your own designs on the certificates. Incorporate small personal objects like favorite books or mementos for added interest. Use decorative background papers or mats behind the certificates for a more polished look. Rotate or add new achievements over time to keep the display fresh.
Showcasing your achievements inspires confidence and pride every day. It’s a visual reminder of your hard work and milestones. This display encourages ongoing motivation and personal growth. Ready to turn your accomplishments into inspiring decor? Let’s do it!
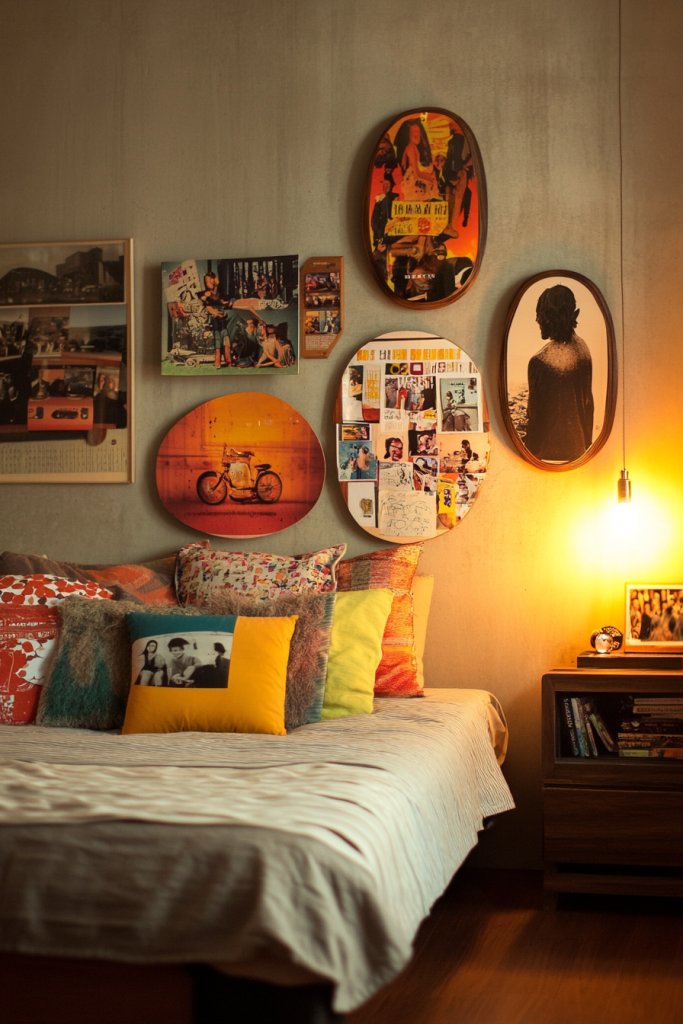
12. Vintage Poster and Personal Photo Combo for Eclectic Style

Tired of your bedroom feeling too uniform or bland? Want to add a dash of personality and history? Combining vintage posters with personal photos creates an eclectic, vibrant wall that tells your story. It’s a bold way to showcase your taste and memories simultaneously.
Visualize a mix of worn vintage posters—think retro travel ads, music band prints, or classic movie posters—paired with candid personal photos. The posters are slightly faded or distressed, adding character. The photos are in casual frames or pinned directly to the wall, creating a layered, textured look. The result is a lively, personality-rich aesthetic that feels authentic and inviting.
Keep a consistent color theme—vintage tones, sepia, or faded colors—for harmony. For a more curated look, group posters on one side and photos on the other; for a more chaotic vibe, intermix them randomly. Swap posters seasonally or when you find new favorites. Use a mix of frame styles—vintage, minimalist, or decorative—to enhance the eclectic feel.
Source vintage posters from thrift stores, online shops, or print your favorites. Choose frames matching your style—rustic wood, metal, or distressed finishes. Arrange posters and photos on the floor first to finalize layout. Use washi tape or painter’s tape to mark placement on the wall. Hang each piece securely, mixing frames and sizes for visual interest. Consider adding string lights or decorative elements around the display for extra charm.
Personalize posters with handwritten notes or your own art overlays. Incorporate small memorabilia—musical instruments, vintage cameras—around the display. Mix in textiles like tassels or fabric patches for added texture. Rotate posters and photos periodically to keep the wall lively and fresh.
This eclectic mix makes your bedroom a reflection of your diverse interests. It exudes personality and creativity, inspiring you daily. Plus, it’s easy to adapt as your tastes evolve. Ready to craft a visually rich, personal gallery? Let’s get started!
13. Nature-Inspired Personal Photo Display with Botanical Prints
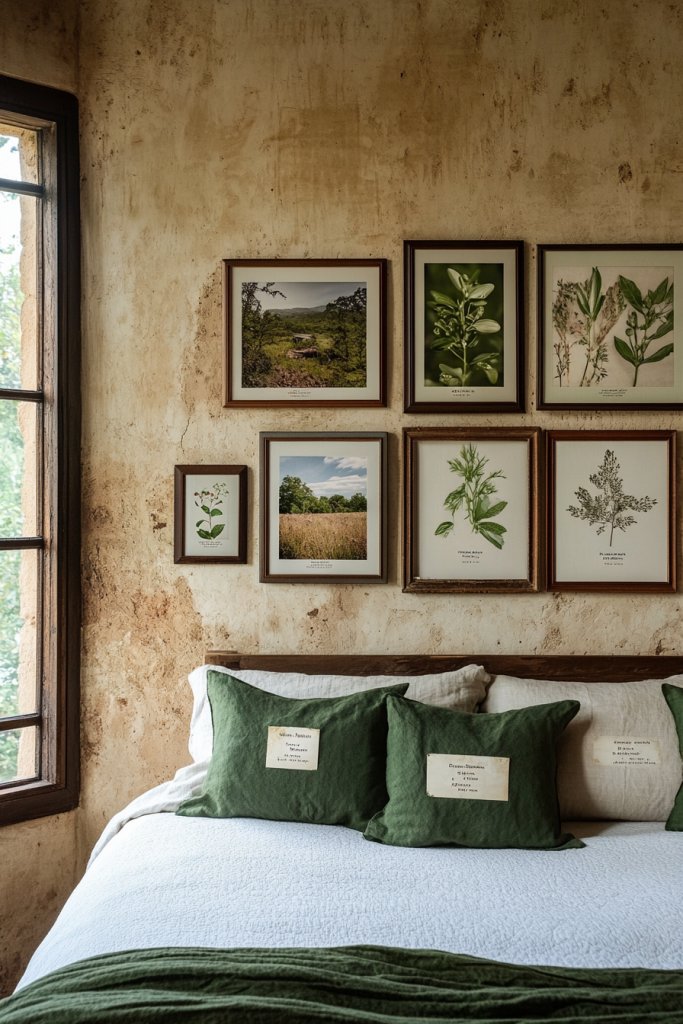
Craving a calming, fresh vibe in your bedroom? Generic decor can’t deliver that natural, peaceful feeling you seek. Combining personal outdoor photos with botanical prints creates a serene sanctuary. It’s a way to bring the outdoors inside without plants cluttering your space.
Imagine a wall where your favorite outdoor photos—mountains, beaches, forests—are framed alongside minimalistic botanical prints or sketches. The natural color palette—greens, browns, soft blues—creates harmony. Textured wooden frames or canvas prints add warmth. The arrangement feels organic, flowing, and soothing, like a personal retreat.
Mix photo sizes and framing styles—simple wood, matte finishes, or textured backgrounds—to enhance the natural vibe. For small spaces, create a vertical strip of images; larger walls can host a sprawling collage. Seasonal updates could include new outdoor shots or fresh botanical prints. Incorporate natural textures like jute or linen mats for a tactile experience.
Select your outdoor photos and botanical prints, opting for high-quality prints on matte or canvas surfaces. Choose frames that match your decor—raw wood, bamboo, or simple black. Arrange the images on the floor to plan your layout, then mark positions with painter’s tape. Hang each piece with sturdy hooks, ensuring alignment and spacing. Keep the arrangement fluid and harmonious, mimicking natural landscapes.
Incorporate small natural elements—like dried flowers, feathers, or stones—near the display. Personalize with handwritten notes about your outdoor adventures. Use textured or embroidered mats behind key images for added depth. Change out the photos seasonally to reflect new adventures or favorite landscapes.
This nature-inspired display creates a peaceful, restorative environment that boosts your mood. It reminds you of your outdoor adventures and inspires future explorations. The aesthetic is timeless and adaptable, perfect for a tranquil retreat. Ready to bring your favorite outdoor memories inside? Let’s do it!
14. Customized Map with Pinpoints of Special Locations
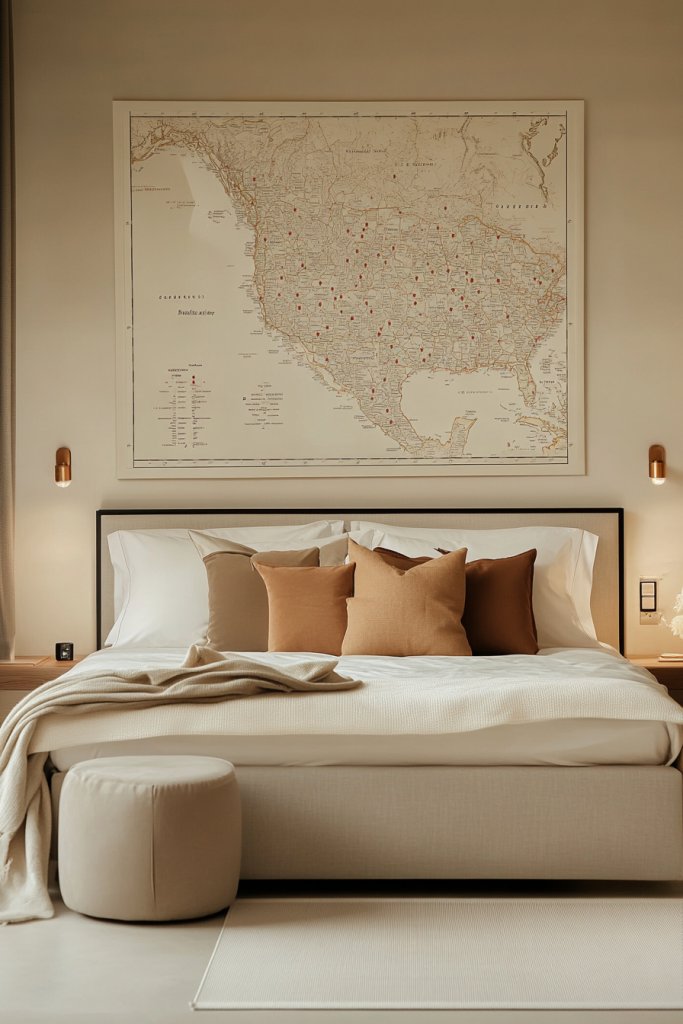
Ever felt that your room is missing a meaningful centerpiece? You have dreams, travels, or hometowns you want to celebrate visually. A customized map with pinpoints of special locations turns your wall into a personal story map. It’s a conversation starter and a daily inspiration.
Picture a stylish map—either vintage, modern, or artistic—mounted on your wall. Tiny pins or markers highlight places you’ve visited or hold sentimental value. Photos, tickets, or small mementos are attached near each point, telling a vivid story. The map’s design can be minimalist or detailed, depending on your style. This creates an interactive, evolving display full of memories.
Choose various map styles—silhouette, vintage, watercolor—to match your decor. Use different pin colors to categorize types of trips or milestones. Incorporate small frames or corkboards near the map for photos or notes. Seasonal updates could include new travels or milestones like graduation or new home. Keep the map central, with related memorabilia around it.
Order a customized map print or create your own digitally. Mount it with secure, removable adhesive or framing. Mark locations with pins, stickers, or custom markers. Attach photos, tickets, or notes near each location with small clips or washi tape. Use a level to ensure the map hangs straight and mark placement carefully. Surround it with complementary decor like string lights or shelves.
Add personal touches like handwritten labels or stories near each pin. Incorporate travel souvenirs, mini globes, or compasses nearby. Use decorative pins or custom markers that match your room’s theme. Change pins or add new locations as your adventures grow, keeping the display dynamic.
A personalized map transforms your space into a visual journey of your life. It motivates future travels and celebrates your experiences. It’s a unique, inspiring focal point that’s both functional and decorative. Ready to plot your story on your wall? Let’s do it!
15. Monochrome Theme with Black and White Photo Frames
Struggling to make your bedroom decor look cohesive and sleek? A cluttered mix of colors and styles can feel chaotic. You crave a unified aesthetic that exudes sophistication and calm. A monochrome theme with black and white photo frames offers a simple yet powerful way to achieve that.
Visualize a wall filled with black and white photos, all in matching frames—matte black, white, or metallic. The uniformity creates a clean, elegant look, emphasizing emotion and storytelling. Photos could include loved ones, landscapes, or abstract images, all in grayscale. The simplicity of the palette allows the focus to remain on the content, creating a timeless, harmonious effect.
Keep all frames in the same color and style for a highly cohesive look, or mix different textures within the monochrome palette for subtle variety. Arrange the photos in a grid, a salon style, or asymmetrically for visual interest. You can also introduce a single splash of color—like a bright art piece or accent pillow—if you want a focal point.
Print or select high-quality black and white photos that resonate with you. Choose frames that match your style—sleek metal, matte wood, or classic black. Measure your wall space and plan your layout—use painter’s tape to mark positions. Mount the frames securely, ensuring they’re level and evenly spaced. Lighting should be soft and unobtrusive, highlighting the images without glare. Consider adding LED backlights or picture lights for a dramatic effect.
Personalize by adding handwritten captions or small decorative elements in the same monochrome palette. Incorporate textured backgrounds or mats behind some photos for depth. Rotate images for variety or add seasonal themes to keep the display fresh. Keep the overall look minimal yet meaningful.
A monochrome gallery elevates your decor, making your space feel calm, curated, and stylish. It’s a versatile trend that suits various decor styles and ages. Plus, it’s easy to update and adapt as your tastes evolve. Ready to embrace timeless elegance? It’s simpler than you think!
16. Floating Shelves with Rotating Personal Photo Displays
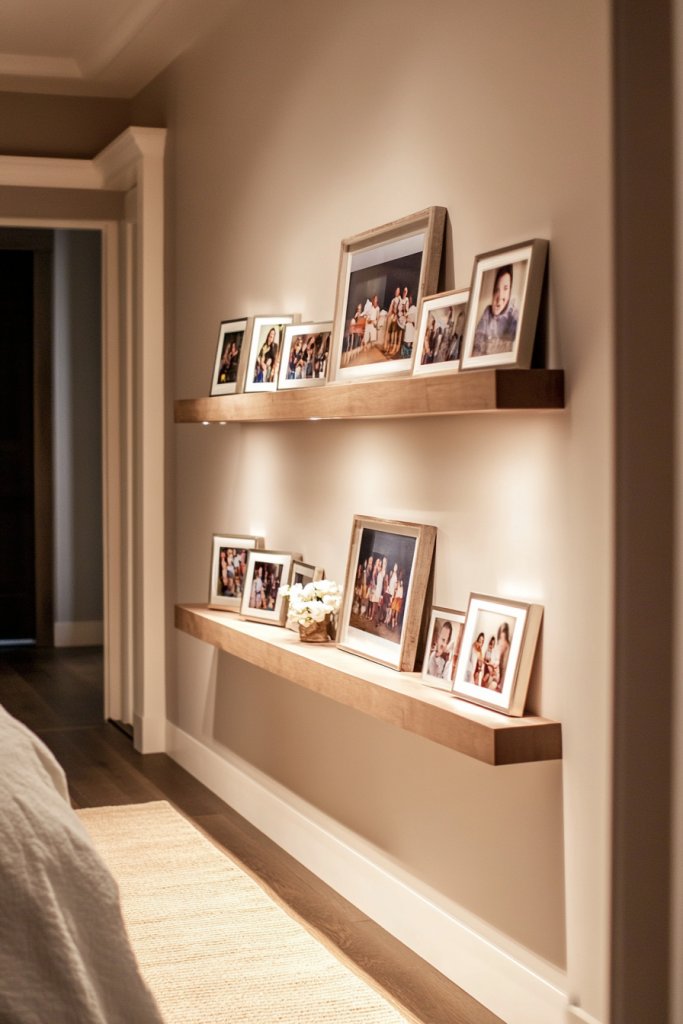
Ever wish your photos could be on display without cluttering your walls? Fixed frames feel limiting when your memories keep changing. Floating shelves with rotating photos give you a flexible, modern way to showcase your favorites. It’s stylish, customizable, and perfect for changing seasons or moods.
Imagine narrow floating shelves installed at different heights along your wall, holding small framed photos, mini art pieces, or memorabilia. The shelves are sleek and minimalist, blending into your decor. Photos are rotated regularly, creating a dynamic, ever-changing gallery. The display feels curated yet casual, with a sense of movement and freshness.
Use different shelf lengths and placements to suit your space and style—linear, staggered, or layered. Incorporate small decorative objects like sculptures, candles, or books for added interest. For a cohesive look, stick to a color palette or material—wood, metal, or acrylic. Change the display for holidays, birthdays, or new adventures, keeping it lively.
Select the right floating shelves for your wall—consider weight capacity and style. Install them securely with appropriate anchors and screws. Arrange your photos on the shelves first, experimenting with placement and spacing. Use small stands or stands behind frames to angle or elevate certain photos for variety. Regularly swap out images or add new ones for a fresh look. Keep tools like a level and measuring tape handy.
Personalize with small decorative objects or themed accessories. Use photo mats or borders for a polished appearance. Incorporate seasonal or travel-themed items to reflect your interests. Add LED strip lighting underneath shelves for a soft glow that highlights your display.
Floating shelves turn your photos into a flexible art installation, inspiring creativity and change. They make your space feel fresh and personal without permanent commitments. It’s a practical, stylish way to celebrate your memories and interests. Ready to elevate your decor? Let’s do it!
17. Artistic Clusters of Personal Art and Photos in Rounded Shapes
Feeling your walls are too rigid or formal? You crave a playful, contemporary look that’s full of personality. Artistic clusters of personal art and photos in rounded shapes break the mold, creating a fun, modern aesthetic. It’s an expressive way to showcase your creativity.
Picture a collection of circular canvases, rounded photo frames, or cutouts arranged in organic clusters. The shapes overlap slightly, creating a lively, flowing composition. Photos of friends, family, or favorite moments are mixed with abstract art or doodles. The round shapes soften the overall look and add visual interest, making your wall feel inviting and dynamic.
Use a mix of sizes and frame styles—metal, wood, or painted canvases—for variety. Arrange the circles in asymmetrical, freeform clusters or structured patterns for different effects. Incorporate small decorative elements like metallic accents, textured backgrounds, or layered papers. Seasonal updates or new art pieces can refresh the display, keeping it engaging.
Create or source circular art canvases, prints, or frames. Lay out your cluster on the floor first, experimenting with placement and overlaps. Mark positions on the wall using painter’s tape or paper templates. Hang each piece with appropriate hooks or adhesive strips, ensuring the shapes stay aligned and evenly spaced. Use a level to keep everything tidy. Play with the arrangement until it feels lively and balanced.
Add personal touches like handwritten quotes or doodles inside the circles. Incorporate textured or metallic backgrounds for depth. Personalize by including small memorabilia or tiny decorative objects near the cluster. Change out art and photos periodically to reflect your evolving style.
This playful cluster approach creates a fresh, modern vibe that celebrates your personality. It’s a creative way to turn your wall into a piece of art that’s uniquely yours. Plus, it’s flexible—easily updated and reshaped as your interests change. Ready to craft a lively, artistic wall? Let’s go!
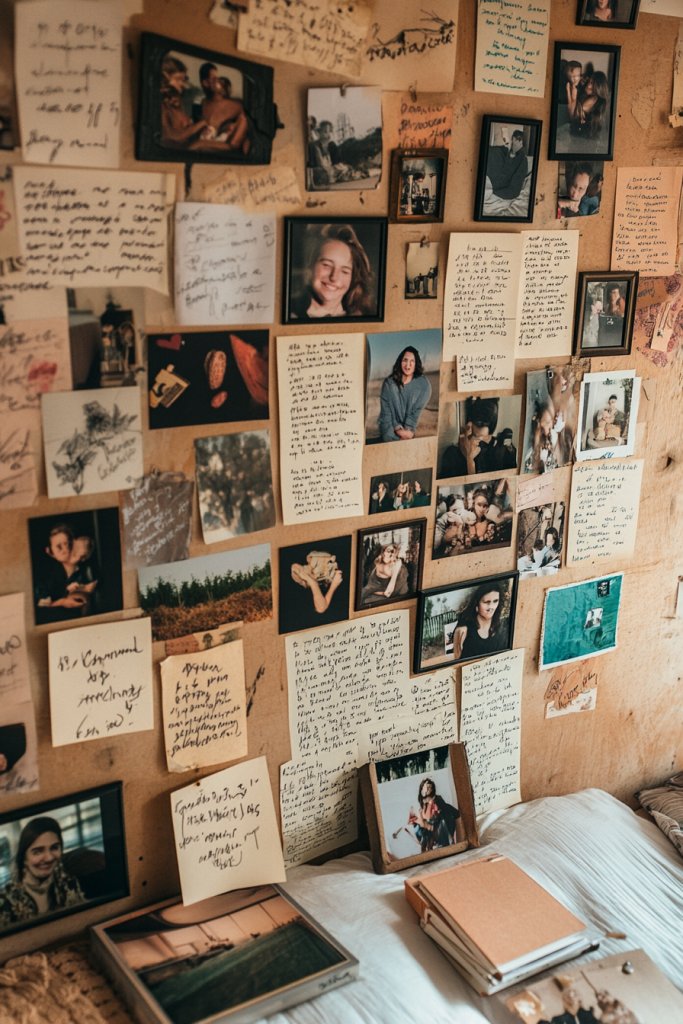
18. Inspirational Mood Board with Photos, Clippings, and Textures

Do you feel your bedroom lacks inspiration and energy? Generic decor doesn’t motivate or excite you daily. Creating a mood board filled with photos, fabric swatches, and snippets of text turns your wall into a personal vision map. It’s a powerful way to stay focused and inspired.
Visualize a textured, layered wall with an eclectic mix of personal photos, inspiring quotes, fabric samples, and small decorative items. The arrangement is deliberately imperfect—overlapping, tilted, and varied in size—giving a creative, curated look. The textures and colors evoke feelings and aspirations, making your space a hub of motivation and creativity.
Use corkboards, fabric-covered boards, or mixed media canvases to attach your snippets. Incorporate different textures—wool, linen, paper—to add tactile interest. Change or add elements seasonally or as your goals evolve. Keep the overall palette aligned with your mood—calm neutrals, vibrant colors, or monochromes—and layer items for depth.
Collect photos, quotes, fabric swatches, and small objects that inspire you. Mount a large board or several smaller ones on your wall, using pins, clips, or adhesive strips. Arrange items freely, overlapping and layering for a collage effect. Add decorative tape or washi for borders and accents. Keep it flexible for updates and adjustments.
Add handwritten notes, motivational phrases, or your own sketches. Incorporate textured fabrics or small objects—like a piece of jewelry or a keychain—that hold personal meaning. Use color coding or thematic sections to organize your goals or moods. Refresh regularly to keep the energy high.
A mood board transforms your space into a daily source of motivation and clarity. It helps you focus on your goals while making your room feel vibrant and alive. Plus, it’s a fun, creative process that keeps your environment inspiring. Ready to make your own? Let’s create!
19. Photo Wall with Personal Milestones in a Timeline Layout
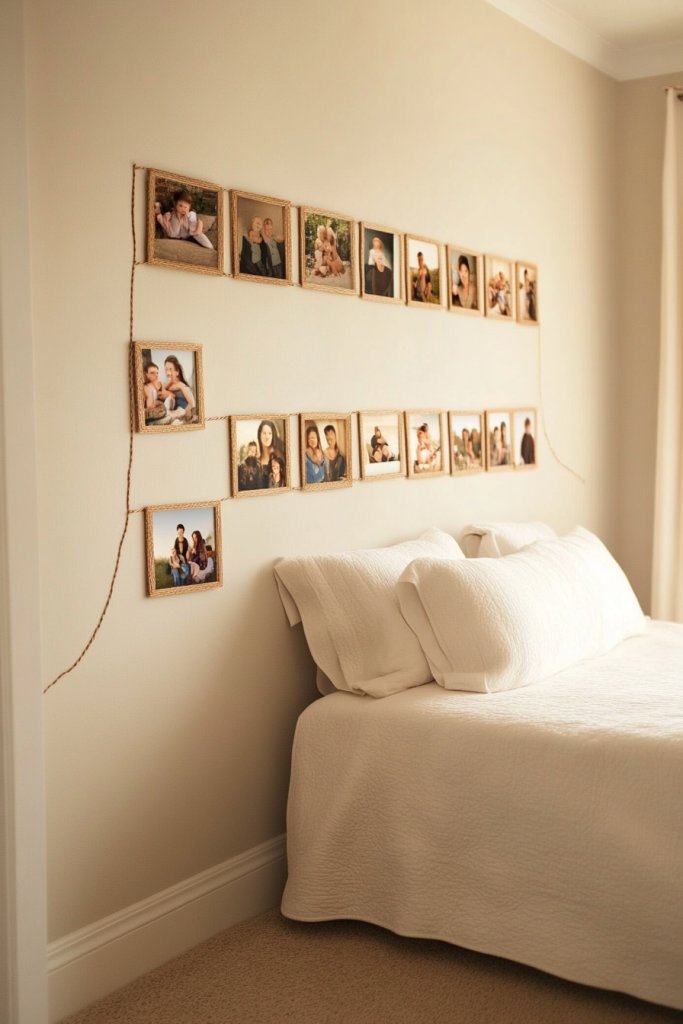
Want your bedroom to tell a story? Simply hanging photos feels disconnected from your personal journey. Creating a timeline of milestones turns your wall into a narrative of growth and achievement. It’s a meaningful, visual way to celebrate your progress and future goals.
Imagine a horizontal or vertical line of photos marking key moments—graduations, travels, career wins—connected by a simple line or decorative element. The photos are in chronological order, with captions or dates. The layout is clean and organized, making it easy to follow your story. The display motivates and reminds you of your journey every day.
Use a consistent framing style for cohesion or mix frame styles for a more dynamic look. Add small decorative elements like arrows, icons, or symbols to emphasize progression. Adjust the timeline’s length based on your milestones, and update it as you achieve new goals. This layout works well in narrow spaces or large walls.
Select photos that mark your milestones, adding captions or dates either handwritten or printed. Lay out the timeline on the floor first for spacing, then transfer to the wall with painter’s tape. Hang photos at regular intervals, using level tools to ensure straightness. Connect each with a thin string, wire, or decorative line to simulate a timeline. Keep it simple and clear for maximum impact.
Add small decorative elements like icons, arrows, or symbols to highlight different types of milestones. Incorporate memorabilia or small objects related to each event. Use themed backgrounds or textured papers behind the photos. Change or add milestones as your journey continues.
This timeline wall celebrates your achievements and motivates ongoing growth. It visually reminds you of how far you’ve come and where you’re headed. It’s a personalized story that inspires confidence every day. Ready to craft your own timeline? Let’s do it!
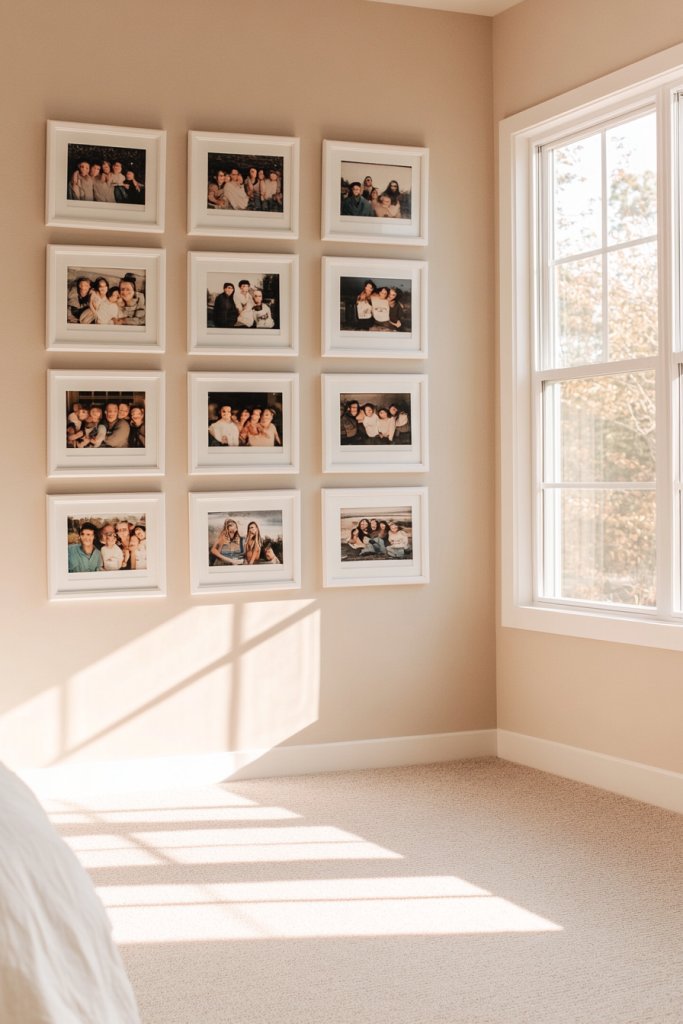
20. Minimalist Grid with Large Statement Photo as Focal Point
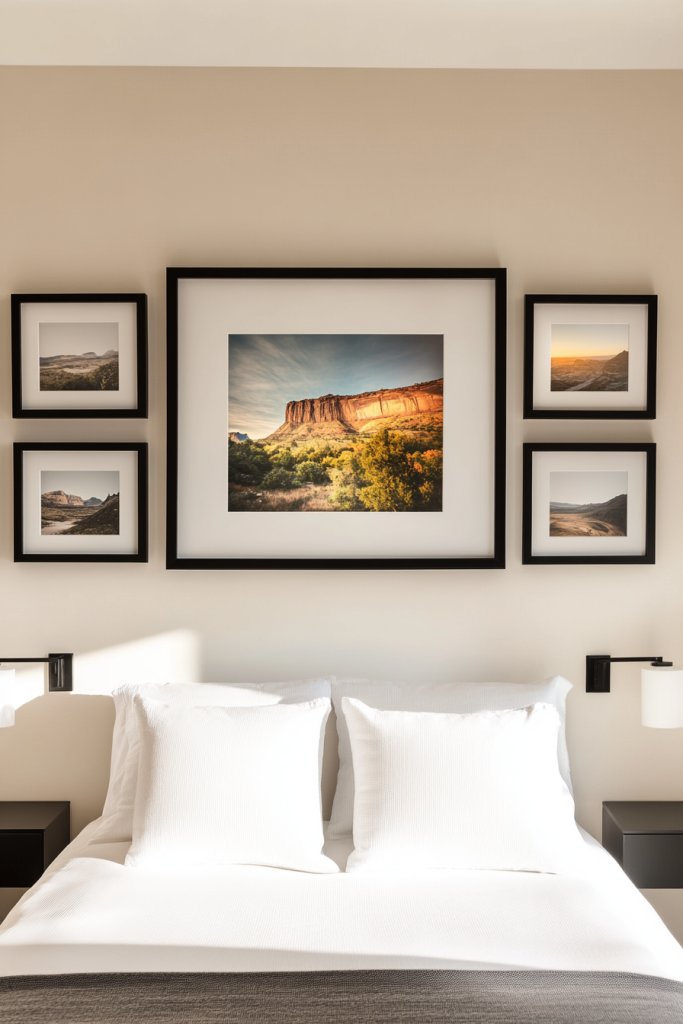
Feeling overwhelmed by cluttered, busy walls? You crave simplicity and impact in your decor. A minimalist grid featuring one large statement photo as the focal point offers a clean, modern look that’s both stylish and calming. It’s a statement of confidence in less is more.
Picture a large, bold photo—perhaps a favorite landscape, portrait, or abstract shot—centered on the wall. Surrounding it is a precise grid of smaller, complementary photos or art pieces in matching frames. The symmetry and balance create a sleek, uncluttered aesthetic. The large photo draws immediate attention, anchoring the display.
Use monochrome or muted color schemes for a sophisticated look, or add pops of color for vibrancy. Keep all frames uniform for a cohesive style, or mix textures for interest. Adjust the grid size based on wall space and choose a dominant photo that resonates with you. Update the smaller images seasonally or with new memories.
Select a large, impactful photo and print it in high quality. Choose matching frames for the grid—sleek black, white, or metallic. Measure and mark the grid layout carefully, using painter’s tape for accuracy. Hang the large photo first, then arrange the smaller frames around it, maintaining equal spacing. Use a level to ensure everything lines up perfectly. Keep the overall look simple and elegant.
Personalize with subtle captions or decorative borders for the smaller images. Incorporate textured backgrounds or mats behind your photos for added depth. Switch out the smaller images periodically to reflect new experiences or favorites. Keep the overall aesthetic minimal but meaningful.
This grid showcases your favorite moments in a refined, uncluttered way. It transforms your wall into a focal point that’s both personal and stylish. Plus, it’s easy to update, keeping your decor fresh and relevant. Ready for a sleek, modern look? Let’s do it!
21. Mixed Media Wall with Personal Photos and Fabric Art
Are your walls feeling a little too plain or predictable? You want a creative, tactile display that combines various materials and personal memories. A mixed media wall with personal photos and fabric art adds richness and depth. It’s a bold statement that celebrates your artistic side.
Imagine a wall layered with textured fabrics—knitted patches, embroidered pieces, or sewn textiles—intermixed with framed personal photos. The textures create visual interest and invite touch. Photos can be printed on fabric, mounted on textiles, or framed alongside fabric art. The overall effect is eclectic, warm, and inviting, blending craft with personal history.
Mix different textures and colors—soft linens, chunky knits, smooth silks—to match your style. Arrange the pieces in a grid, cluster, or freeform layout depending on your space and preference. Incorporate small decorative objects like beads, buttons, or charms into the fabric art for added detail. Change or add new elements seasonally for freshness.
Create or source fabric art pieces—handmade or bought—that suit your aesthetic. Mount fabric patches with fabric-safe adhesive or sew them onto a canvas or backing board. Frame your photos in simple or decorative frames, or mount directly onto fabric or canvas. Arrange the elements on the wall first, then secure them with hooks or adhesive strips. Use complementary colors and textures for harmony. Keep the display flexible for updates.
Add embroidered initials, quotes, or decorative stitching to your fabric art. Incorporate meaningful small objects—like jewelry or keepsakes—into the display. Use dyeing or painting techniques to customize textiles further. Personalize with labels or handwritten notes for a heartfelt touch. Rotate or update pieces to reflect changes in your style or experiences.
A mixed media wall celebrates your creativity and personal story in a tactile, artistic way. It makes your bedroom a warm, inviting space full of texture and personality. Plus, it’s a project that evolves with you, keeping your decor fresh and inspiring. Ready to craft your own tactile masterpiece? Let’s start!
22. Framed Personal Sketches and Doodles with Photos
Feeling uninspired by store-bought decor? Want a truly personal, artistic touch that reflects your inner creativity? Framed sketches and doodles, combined with candid photos, give your bedroom a uniquely handmade vibe. It’s a playful, heartfelt way to decorate and showcase your talents.
Picture a wall where your personal sketches—be it portraits, abstract doodles, or design ideas—are framed and arranged alongside casual photos. The sketches are in simple frames or mounted directly on the wall, adding an artistic, spontaneous feel. The mix of art and photos creates a warm, creative environment that feels genuine and inspiring. The varied sizes and styles make it lively and eclectic.
Frame your sketches in simple black or white frames for a clean look, or use colorful or textured frames for more impact. Arrange them in a grid, a cluster, or a freeform layout—whichever suits your space and personality. Incorporate different types of paper—sketch paper, watercolor paper, or mixed media—to add variety. Regularly update with new sketches or photos to keep it fresh.
Create or select your sketches and doodles, either by drawing digitally or physically. Print or frame your favorites, using simple or decorative frames. Arrange the pieces on the floor first, then transfer the layout to the wall with painter’s tape. Hang each piece securely, ensuring level placement. Mix sizes and orientations for a dynamic look. Consider adding small decorative elements like washi tape or stickers.
Personalize your sketches with handwritten notes, signatures, or color accents. Incorporate small memorabilia like stickers, buttons, or small charms. Use decorative backgrounds or mats behind some sketches for added depth. Keep updating with new artwork or doodles to reflect your growth. Display your sketches alongside photos for a complete personal story.
Showcasing your sketches and doodles makes your bedroom a creative haven. It celebrates your talents and personality in a genuine way. Every piece reminds you of your growth as an artist and individual. It’s an inspiring, ongoing project that adds warmth and authenticity to your space. Ready to display your art and memories? Let’s do it!
23. Rustic Wooden Frame Cluster with Family Photos
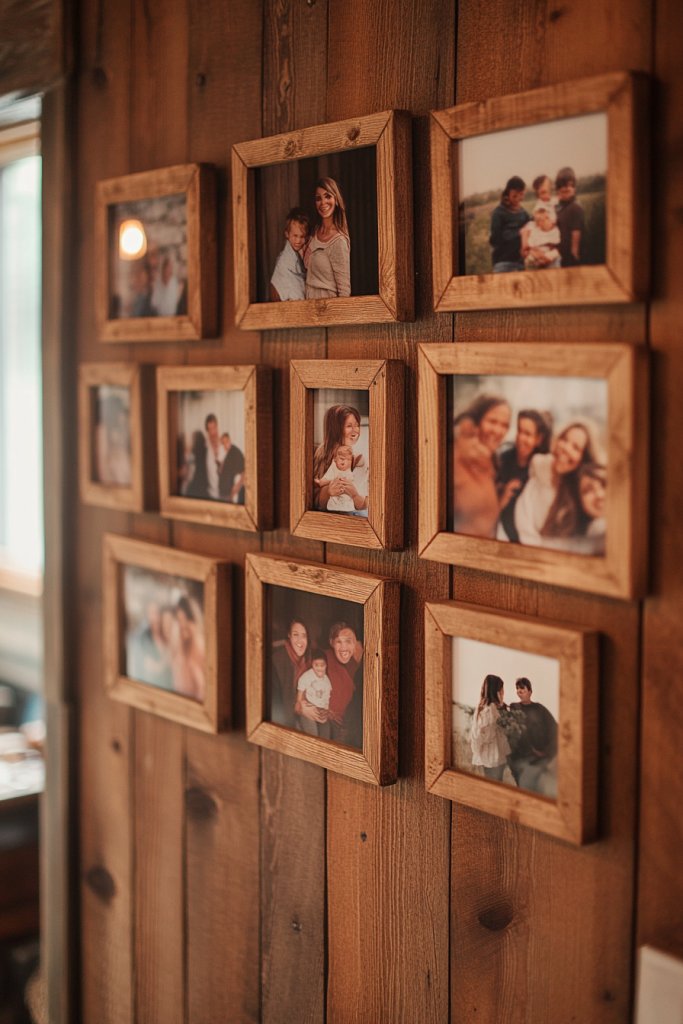
Looking for a warm, inviting focal point in your bedroom? Generic mass-produced art doesn’t feel personal enough. A rustic wooden frame cluster with family photos brings warmth and a sense of history to your space. It’s perfect for creating a cozy, nostalgic atmosphere.
Visualize a grouping of mismatched rustic wooden frames in various sizes, filled with candid family photos. The frames have a weathered, natural look—think distressed wood, barnyard charm, or vintage palettes. The photos, in sepia or soft tones, evoke emotion and connection. The arrangement is slightly asymmetrical, giving a relaxed, lived-in feel that invites closeness.
Mix different wood tones or keep everything uniform for consistency. Arrange the frames in a loose cluster or a more structured grid, depending on your style. Incorporate small wooden plaques, vintage keys, or other memorabilia for added interest. Change out photos seasonally or for special occasions to keep the display fresh and meaningful.
Source rustic wooden frames from thrift stores, craft shops, or custom orders. Gather your favorite family photos, printing or enlarging them as needed. Lay out the frames on the floor first, then mark their positions on the wall with painter’s tape. Hang each frame securely, ensuring they’re level and evenly spaced. Use nails or hooks suitable for heavier frames. Enhance the rustic charm with string lights or fabric accents if desired.
Add small handwritten labels, dates, or captions to your photos. Incorporate small wooden or fabric embellishments that match the rustic theme. Personalize with a family crest, initials, or meaningful quotes on a plaque or banner nearby. Rotate and update the photos over time to include new memories.
This rustic family photo cluster creates a warm, inviting atmosphere that celebrates your loved ones. It fosters a sense of belonging and nostalgia every time you see it. Plus, it’s a timeless style that can evolve with your family’s story. Ready to craft a heartfelt, rustic display? Let’s do it!
24. Digital Photo Wall with a Screen or Digital Frame
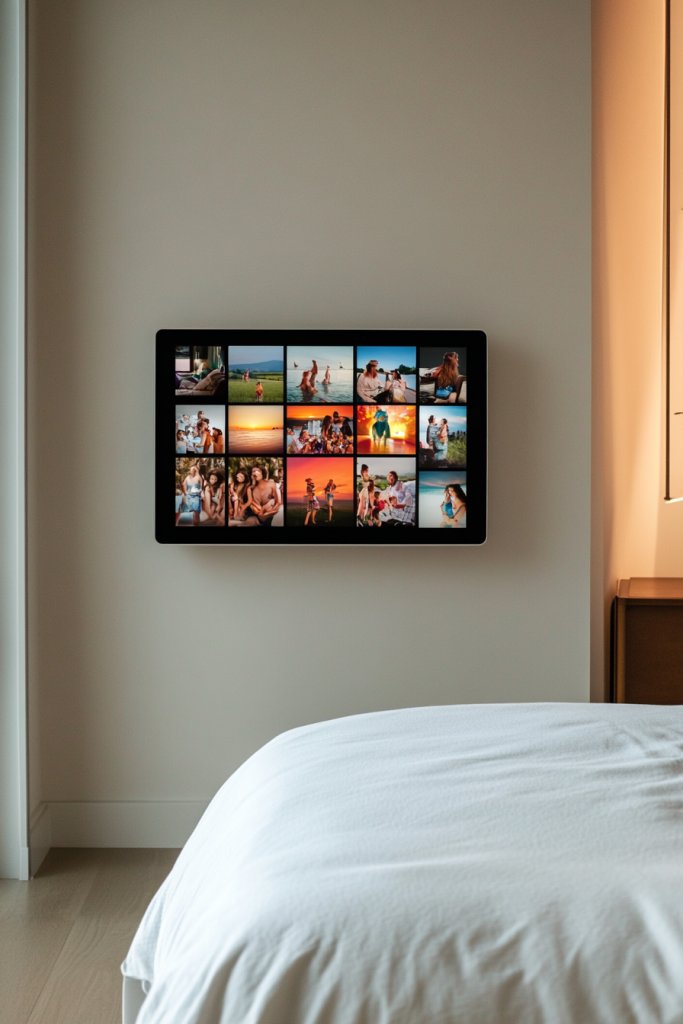
Feeling limited by traditional wall decor? You want a high-tech, ever-changing display that keeps your favorite memories alive. A digital photo wall with a screen or digital frame combines function and fun. It’s the ultimate way to showcase an extensive collection without clutter.
Imagine a sleek digital screen mounted on your wall cycling through hundreds of photos—vacations, friends, pets, and milestones. The images change seamlessly, creating a dynamic, vibrant backdrop. Bright and colorful, the digital display can be customized to suit your mood or theme. It’s like having a personal slideshow that’s always fresh and engaging.
Choose a high-resolution digital frame or monitor that matches your decor style—minimal, modern, or tech-inspired. Mount it flush against the wall with minimal hardware for a clean look. You can set the cycle timer, choose transition effects, or create themed playlists. Pair it with other tech elements like smart lighting for a futuristic vibe.
Select a digital frame or monitor with enough storage and resolution for your needs. Connect it to your Wi-Fi or local storage device. Mount it securely on the wall, ensuring proper ventilation. Load your favorite photos or albums, organizing them into playlists or slideshows. Adjust settings for timing and transitions. Consider investing in a remote or app control for easy updates.
Create custom playlists for different moods or seasons. Add captions, quotes, or background music for a personalized touch. Use decorative wall panels or frames around the screen to integrate it with your decor. Regularly update the photo collection to keep the display lively and relevant.
A digital photo wall is a cutting-edge way to celebrate your life’s moments. It keeps your memories front and center with minimal effort and maximum impact. Plus, it’s a conversation starter and a modern update to your decor. Ready to step into the future of wall art? Let’s go!
Conclusion
Embrace the chance to personalize your space with these diverse bedroom picture wall ideas, ranging from simple arrangements to intricate displays. Each concept offers a unique way to elevate your decor and showcase what matters most to you. Don’t hesitate to experiment and find the perfect style that speaks to your personality—your dream bedroom is just a wall away! Let your creativity shine and turn your bedroom into a stunning visual story that inspires every day.
Leave a Reply