Stepping into a teenage girl’s bedroom is like entering a personal sanctuary filled with dreams, personality, and style. These spaces are more than just places to sleep—they’re reflections of evolving tastes, hobbies, and individuality, which is why girls’ bedroom ideas for teenagers are so popular and inspiring. From trendy decor to cozy corners, these ideas help teens express themselves and create environments that grow with their changing preferences.
In this article, you’ll discover a variety of creative and stylish bedroom ideas tailored for teenage girls, whether they love bold colors, minimalist aesthetics, or playful themes. Each concept is designed to spark inspiration and help you transform a room into a unique haven. Get ready to explore fresh ideas that can turn any bedroom into a stylish retreat that perfectly matches her growing personality.
1. Bright and Playful Color Blocking Walls for a Fresh Look
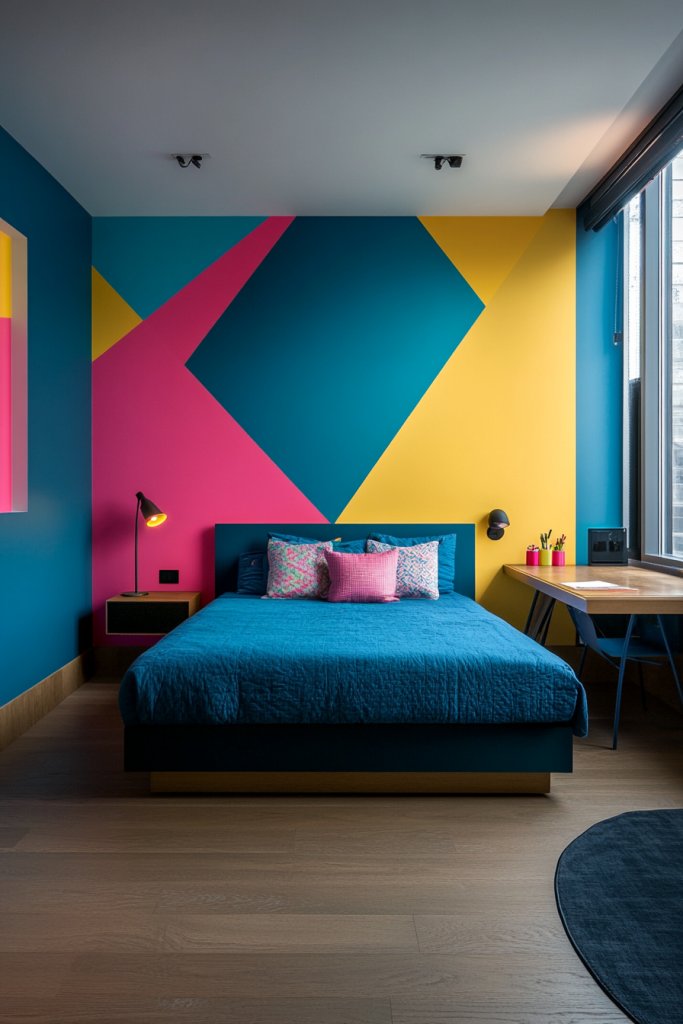
Ever feel like your room needs a splash of personality but don’t want to commit to permanent decor? Color blocking is the perfect way to add vibrancy without overwhelming the space. It allows you to experiment with bold hues and create a playful, energetic vibe that screams teenage spirit. Plus, it’s an easy project that can be changed as your style evolves.
Imagine walls painted in large, geometric sections of bright pink, turquoise, and sunny yellow. The sharp lines are crisp, created with painter’s tape that guides your brush or roller. The matte finish absorbs light softly, giving the room a lively yet cozy feel. The contrast between colors highlights architectural details and makes the space feel larger and more dynamic.
You can soften the look with pastel shades or keep it bold with primary tones. For a more mature vibe, try combining muted tones like blush and charcoal with subtle transitions. Seasonal adjustments could include swapping out bright colors for warmer or cooler shades depending on the mood or decor theme. This technique works well on accent walls or entire rooms, depending on your confidence level.
Start by choosing your color palette and planning your design with painter’s tape on a test surface. Paint the largest sections first, using washable, low-VOC paint for easy cleanup. Use a level to ensure geometric lines stay straight, and allow each section to dry thoroughly before removing tape. For sharp edges, press tape down firmly and paint just inside the lines. Clean brushes immediately to keep colors crisp. You can add a clear sealer to protect the finish over time.
Add your initials or favorite symbols within the blocks using stencils or freehand techniques. Incorporate textured paint or metallic accents for extra depth. Layer in decorative textiles like a soft cream throw blanket with chunky knit texture or patterned cushions that complement the colors. Personal touches make the room uniquely yours and reflect your evolving personality.
Bold color blocking transforms a basic room into a statement space that embodies youthful energy. It’s an affordable and customizable way to express your creativity. Remember, your room is your canvas—don’t be afraid to experiment and make it entirely your own. Your friends will be impressed by how vibrant and fun your space feels!
2. Multi-Functional Loft Bed with Workspace and Storage
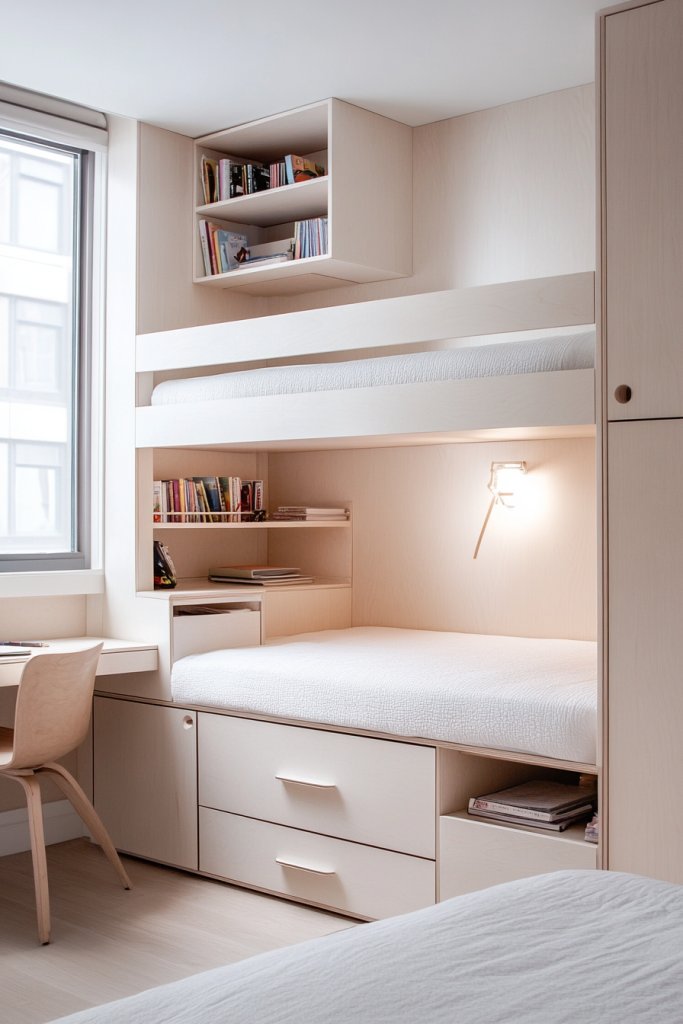
Limited space often feels like a curse, especially when you’re trying to juggle studying, hanging out, and sleeping. A multi-functional loft bed cleverly stacks these essentials, freeing up precious floor space. It’s like having a secret weapon that makes your room feel bigger and more organized without sacrificing style.
Picture a sleek metal or wooden loft with a cozy mattress perched above a compact desk and open shelves. The workspace underneath is perfect for homework, hobbies, or scrolling through social feeds. The space under the bed is optimized with drawers or baskets for clothes, tools, or tech accessories. The whole setup creates an efficient, modern retreat that feels like a mini apartment.
Choose a loft design that matches your aesthetic — from industrial with black metal frames to Scandinavian-inspired with light wood finishes. Add a colorful rug beneath the desk or hang string lights (no pendant lights needed) for ambiance. If space is tight, opt for wall-mounted shelves or foldable desks that tuck away when not in use. Seasonal decor can include cozy throws or vibrant cushions to keep the space fresh.
Start by measuring your room and selecting a loft bed that fits comfortably without blocking windows or doors. Use sturdy materials like solid wood or metal with a weight capacity suitable for your needs. Assemble the frame following manufacturer instructions—consider professional help for complex builds. Decorate with storage bins, desk organizers, and wall-mounted hooks for maximum efficiency. Make sure to anchor the structure securely for safety. Customize the space with personal items on open shelves and a comfy chair or bean bag nearby.
Add a chalkboard or corkboard on the wall for notes and inspiration. Use colorful storage bins or decorative baskets to organize supplies. Personalize the desk with a creative mouse pad or a small sculpture instead of artwork or vases, aligning with restrictions. Incorporate a soft blanket or plush cushion for extra comfort. This setup grows with you, adapting as your needs change.
A loft bed with integrated workspace is more than just space-saving—it’s a statement of smart living. It encourages independence, organization, and a sense of style. Your room will feel like a cool, functional sanctuary where everything has its place. Embrace the versatility and make your space truly yours!
3. Minimalist White and Pastel Decor with Geometric Accents
Sometimes less really is more, especially when your room feels cluttered or chaotic. Minimalist decor uses simple lines and neutral tones to create a calm, organized space. It’s perfect for teens who crave a clean aesthetic that’s easy to update as your style matures. Plus, it’s a foolproof way to make small rooms feel larger.
Picture a room painted in crisp white, with pastel-colored bedding and accessories. Geometric decor—think sharp-edged pillows, rugs, and wall decals—adds modern flair. The interplay of light and shadow highlights clean lines and creates depth without visual overload. Sleek furniture with slim profiles and hidden storage keeps the space looking fresh and uncluttered. The overall vibe is airy, sophisticated, and endlessly adaptable.
Switch out pastels for bold monochromes or metallic accents for a more glamorous look. Add seasonal touches with plush throws or subtle textured pillows that complement the base colors. This style can be scaled down to smaller rooms or expanded with larger geometric patterns for dramatic impact. You can also introduce soft lighting options like LED strips or fairy lights to enhance the minimalist feel without adding bulky lamps.
Begin with a neutral color palette—white or light gray walls work best—and choose simple furniture with clean lines. Incorporate pastel textiles such as bedding or curtains, avoiding overly ornate patterns. Use geometric decals, rugs, or artwork made from durable materials like vinyl or woven fiber. Keep surfaces clear by adding storage solutions like under-bed bins or wall-mounted shelves. Use hidden compartments or multi-purpose furniture to maintain the sleek aesthetic.
Personalize with subtle accents like a soft pastel throw or a geometric-patterned cushion. Add a few statement pieces, such as a sculptural side table or a textured blanket, to infuse personality. Incorporate functional decor like stylish storage boxes or decorative baskets. Keep clutter minimal, but add one or two eye-catching elements that reflect your taste, like a unique clock or a set of decorative trays.
A minimalist room offers a peaceful retreat that’s easy to maintain and refresh. As your style evolves, you can swap out textiles or add new geometric accents. It’s a timeless look that keeps your space feeling clean, modern, and inviting. Trust that simplicity and subtle details can create a big impact, making your room a stylish haven.
4. Statement Headboard with DIY Fabric or Upholstered Design
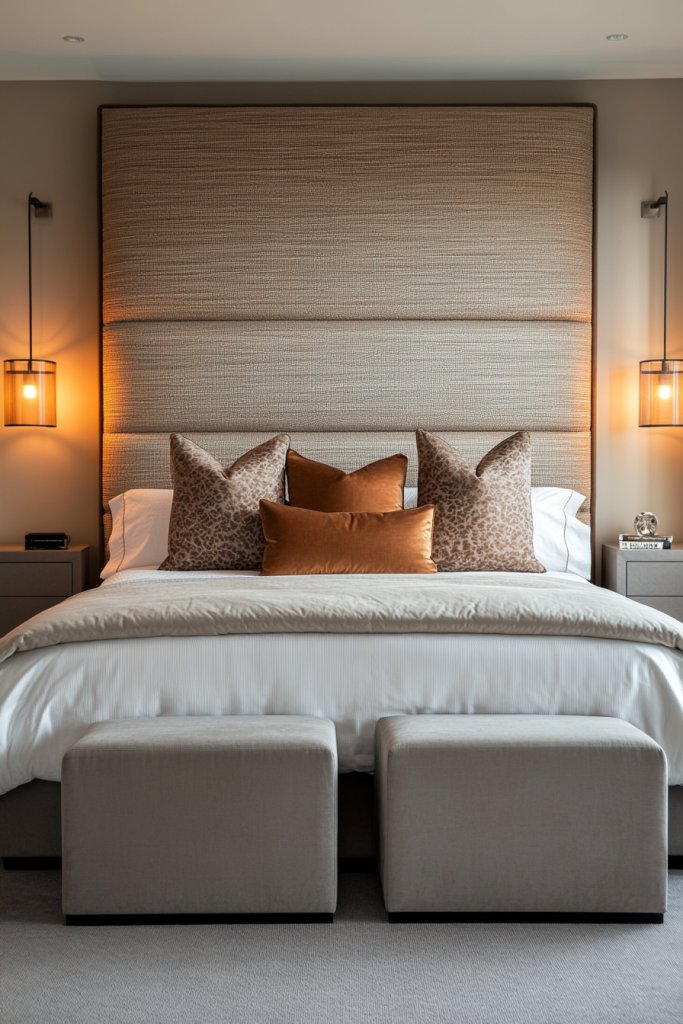
Tired of boring headboards that don’t bring any personality to your room? A statement headboard instantly elevates your bed and sets the tone for your entire space. DIYing one means you can customize the fabric, color, and shape to match your vibe. It’s a fun project that turns your bed into a focal point without breaking the bank.
Imagine a plush, upholstered headboard in a rich velvet or textured linen fabric, extending across the width of your bed. The headboard features tufted buttons or piping details for added sophistication. It’s mounted on the wall or attached directly to your bed frame, creating a soft, inviting backdrop. The fabric’s tactile quality invites you to lean back and relax, making every bedtime feel like a spa retreat.
Choose fabrics that reflect your style—bold patterns for a dramatic look or soft neutrals for understated elegance. Frame it with decorative trim or add custom shapes like a rounded or geometric silhouette. Seasonal updates could include slipcovers or removable fabric covers in different textures or colors. Combine it with layered bedding, cushions, or throws for a cozy, personalized vibe.
Start by measuring your bed and selecting a sturdy plywood or foam board as the base. Cover the board with foam padding if you want extra plushness, then staple or glue your fabric in place. Use a staple gun or upholstery tacks for a clean finish. Attach your headboard to the wall using brackets or wall anchors, ensuring it’s level and secure. Finish with decorative trim or piping for a polished appearance. You can add buttons or embellishments for extra detail.
Add your favorite colors or textures, like faux fur or metallic accents, to match your decor. Incorporate decorative elements like stitched initials or patches. Use contrasting fabrics or piping to create a border that makes the headboard stand out. Keep it removable to switch fabrics easily for a new look, or add decorative nailhead trim for a classic touch.
A DIY statement headboard transforms your space into a personalized retreat. It’s an achievable project that adds style and comfort while reflecting your taste. Once finished, it boosts your confidence in creating custom decor that feels truly yours. Your room will look polished and uniquely designed—no professional required!
5. Floating Shelves for Books, Accessories, and Personal Items
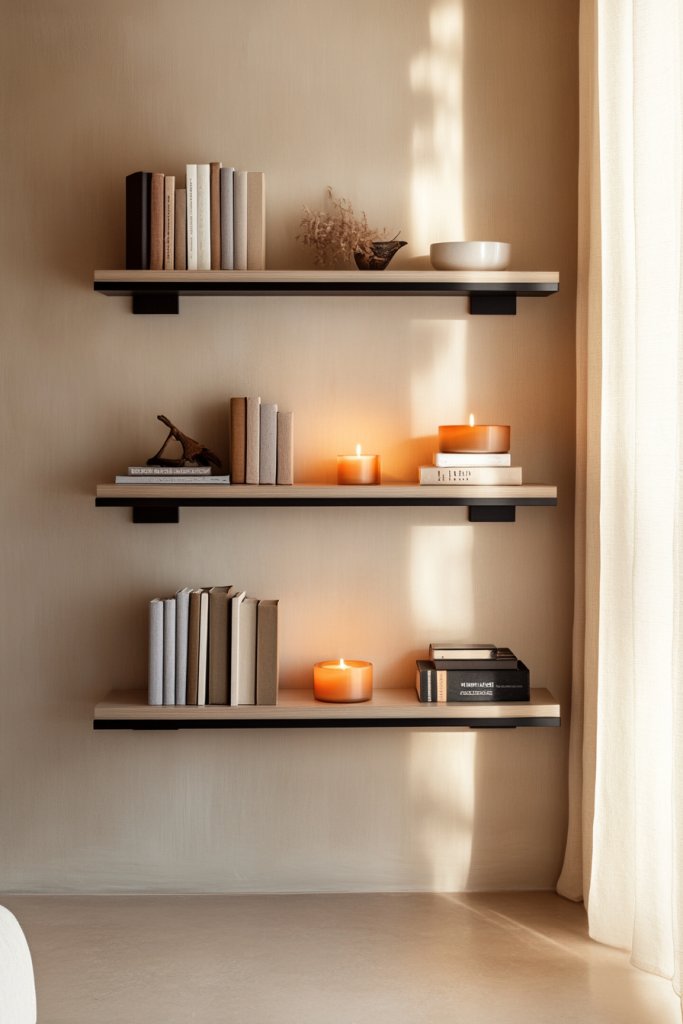
Cluttered surfaces and overcrowded nightstands can make even the coolest rooms feel chaotic. Floating shelves offer a sleek, minimalist way to organize your books, accessories, and little treasures. They keep essentials within reach without sacrificing style. Plus, they add architectural interest and can make any wall look modern and intentional.
Picture slim, matte-finished shelves mounted on your wall in a staggered or symmetrical pattern. They hold a curated selection of your favorite books, decorative jars, or small personal items—no bulky furniture needed. The floating design creates an illusion of space, making your room feel open and airy. Complemented by soft lighting underneath, they highlight your belongings and add warmth.
Use narrow shelves for displaying small collectibles or wider ones for books and framed photos (if you’re ok with restricted wall decor). Mount shelves at different heights for visual interest or keep them aligned for a clean, modern look. Incorporate seasonal decor, like mini pumpkins or faux snow globes, for a quick refresh. They work well in bedrooms of any size, especially small or awkwardly shaped rooms.
Decide on the wall location and measure carefully to ensure your shelves fit well. Select durable, lightweight materials like MDF or wood with a matte finish. Use a level and wall anchors to secure the brackets, ensuring they can support your items. Mount the shelves using appropriate screws, making sure they’re flush and stable. Organize your items by size and color to keep the display tidy. Regularly dust and adjust items for a fresh look.
Add decorative touches like small potted plants (if you’re allowed), framed photos, or themed accessories. Use different shelf sizes for variety, or incorporate hidden storage behind a false back panel. Incorporate LED strip lighting or fairy lights underneath for a cozy glow. Personalize with your favorite colors or themes—think celestial, tropical, or monochrome palettes—creating a space that truly reflects your vibe.
Floating shelves are a simple way to elevate your decor and stay organized. They give you space to showcase your personality creatively and can be rearranged easily as your tastes change. This adaptable solution helps turn clutter into curated displays, making your room feel more intentional. Once installed, you’ll see how a few well-placed shelves can transform your entire space.
6. Wall-Mounted Desk with Under-Desk Storage for Compact Workspaces
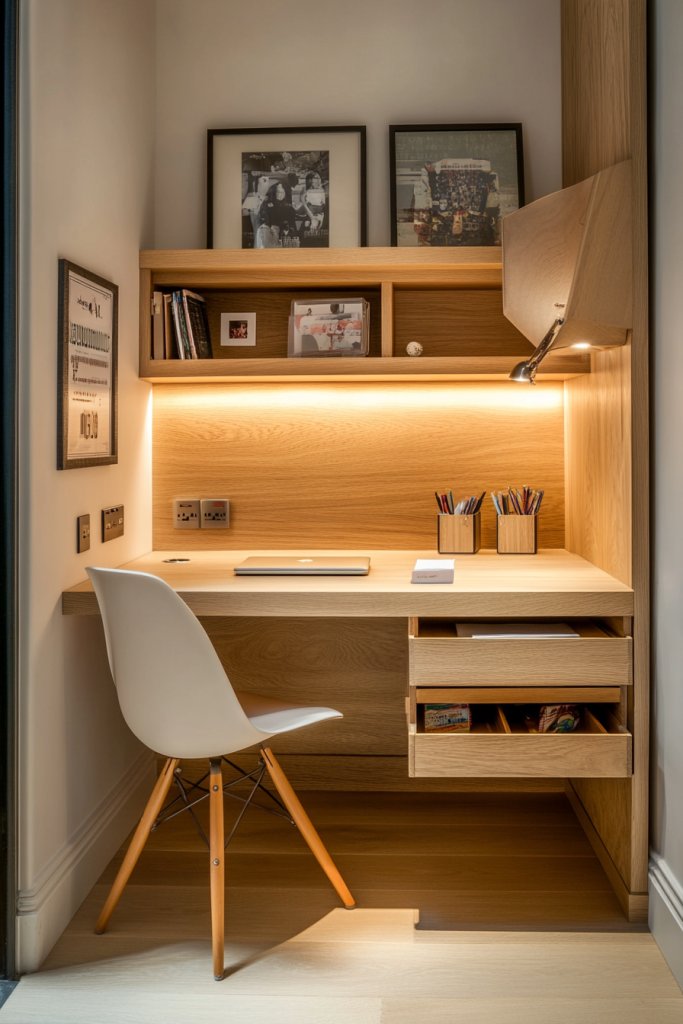
Struggling to find enough space to study or work comfortably? A wall-mounted desk with clever storage options can turn a tiny corner into your personal productivity zone. It keeps your workspace organized and out of the way, freeing up floor space for other activities. Plus, it’s a modern, sleek solution for any room.
Picture a slim, minimalist desk mounted just below a window or on a blank wall, with neat baskets or drawers tucked underneath. The surface is clutter-free, with only your essentials like a laptop and a few supplies. Floating shelves above hold books or decorative items, creating a layered, functional setup. The overall look is clean, airy, and designed to boost focus and creativity.
Opt for a fold-down desk for maximum flexibility or a fixed, sturdy surface for everyday use. Incorporate open or concealed storage underneath based on your needs. Decorate with colorful organizers or textured desk accessories—no vases or artwork necessary—to keep it lively yet simple. Seasonal updates might include new storage bins or a fresh coat of paint on the desk surface.
Start by measuring your available wall space and selecting a wall-mounted desk with appropriate weight capacity. Use a level and anchors to secure it firmly to the wall, ensuring stability. Organize supplies in labeled baskets or small drawers underneath for quick access. Install additional shelves or hooks above for extra storage or hanging items. Keep the workspace tidy by regularly clearing clutter and adjusting organization systems as needed.
Add color with a vibrant desk mat or textured organizers. Incorporate a small corkboard or magnetic strip for notes and reminders—no frames needed. Use decorative storage boxes that match your room’s theme, or add a fun patterned placemat on the surface. Keep it functional, stylish, and personalized for your daily routines.
A well-designed wall desk transforms a cramped corner into a dedicated zone for productivity. It helps you stay organized and motivated, making study or work sessions more enjoyable. Once set up, it’s a space you’ll want to use every day. Remember, a smart workspace is a reflection of your ability to adapt and thrive—so own it!
7. Industrial Pendant Lighting with Dimmable Features
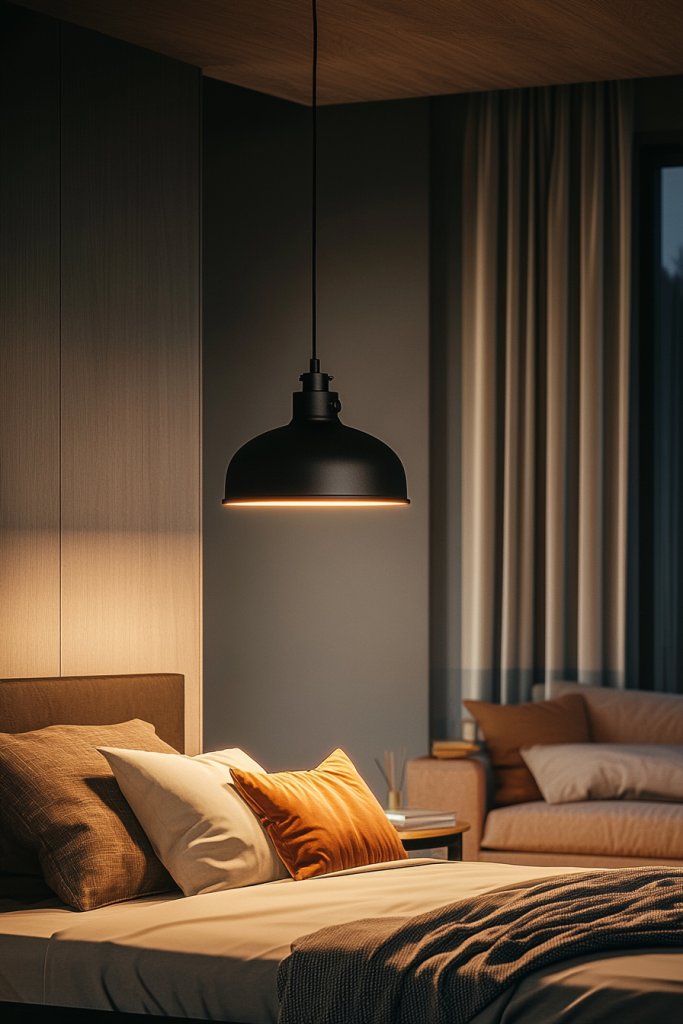
Lighting can make or break a room’s vibe, but standard fixtures often lack personality. Industrial pendant lights add a trendy, edgy feel that elevates your decor instantly. Dimmable features mean you can set the mood for studying, relaxing, or hanging out. It’s a simple upgrade that packs a serious style punch.
Imagine sleek metal pendants hanging at varying heights, their exposed bulbs casting warm, inviting light. The industrial finish—think matte black, brushed brass, or dark bronze—adds texture and character. The adjustable dimmer switch allows you to go from bright task lighting to soft, cozy illumination. The design pairs well with modern, vintage, or eclectic decor, creating a focal point that’s both functional and stylish.
Choose fixtures with different shapes or finishes to match your aesthetic—simple globe bulbs for minimalism, or vintage filament bulbs for a nostalgic touch. Place them over your desk, bed, or reading nook for targeted lighting. Use dimming controls to transition from energizing daytime light to relaxing evening glow. You can also add smart features, like remote control, for tech-savvy setups.
Select fixtures that fit your ceiling height and room style—measure carefully before purchasing. Install the pendant lights using a sturdy ceiling hook and appropriate wiring, or hire an electrician if needed. Connect the dimmer switch to your existing wiring, following safety protocols. Hang the pendants at varying heights for visual interest or in a symmetrical pattern for balance. Keep the cords tidy with clips or conduits for a clean look.
Customize with vintage-style bulbs or colored glass shades to match your decor theme. Incorporate smart dimming or remote controls for convenience. Avoid overly bright settings for relaxing spaces, and switch to full brightness when working. Add decorative elements like a textured fabric lampshade or a metallic accent piece nearby to complement the industrial vibe.
Industrial pendant lighting is a versatile upgrade that shows off your sense of style. It transforms basic ceiling fixtures into eye-catching decor elements. With adjustable brightness, it adapts to every mood and activity. Your space will feel more modern and dynamic—proof that simple changes can make a big difference.
8. DIY Wall Art Using Canvas Prints, Stencils, or Washi Tape
Looking to personalize your space without spending a fortune? DIY wall art offers endless possibilities to showcase your creativity. Whether you love abstract designs, inspiring quotes, or playful patterns, you can craft your own decor that’s totally unique. Plus, it’s a fun project that makes your room feel more like a reflection of you.
Picture a large canvas painted with bold brush strokes in your favorite colors, accented with stenciled motifs or hand-lettered quotes. Alternatively, use washi tape in geometric patterns or stripes directly on the wall for a quick, removable design. The textures and patterns add visual interest and personality without the need for expensive art pieces. This approach creates a gallery-like vibe that’s playful and modern.
Mix and match techniques—combine painted canvases, stenciled words, and tape accents for layered effects. Change colors seasonally or as your mood shifts. Use themed motifs or favorite quotes to motivate or inspire you daily. Keep the artwork flexible by choosing removable tapes or paints that are easy to update or remove without damage. These DIY pieces work well in small spots or as focal points.
Start by selecting your medium—canvas, wall, or paper—and gather your supplies: paints, stencils, washi tape, brushes, or cutting tools. Plan your design on paper first, then execute with steady hands or tape guides. For canvas art, use acrylics or washable paints; for wall designs, opt for removable tape or decals. Use painter’s tape or stencils for clean lines. Finish by sealing paintings with a spray or protective coating if desired. Hang or display your art at eye level for maximum impact.
Add your favorite colors, themes, or motivational words to make it meaningful. Incorporate metallic accents with gold or silver leaf for luxe touches. Personalize with small embellishments like stickers, glitter, or textured elements. Change your art seasonally or when you feel inspired to keep your decor fresh and engaging.
Creating your own wall art is empowering and fun. It proves that you don’t need professional skills—just a bit of patience and creativity. Your space will feel more personal and vibrant, inspiring you every day. Remember, the best decor is the one made with your own hands—so get started and own your style!
9. Functional Closet Organization with Open Shelves and Hooks
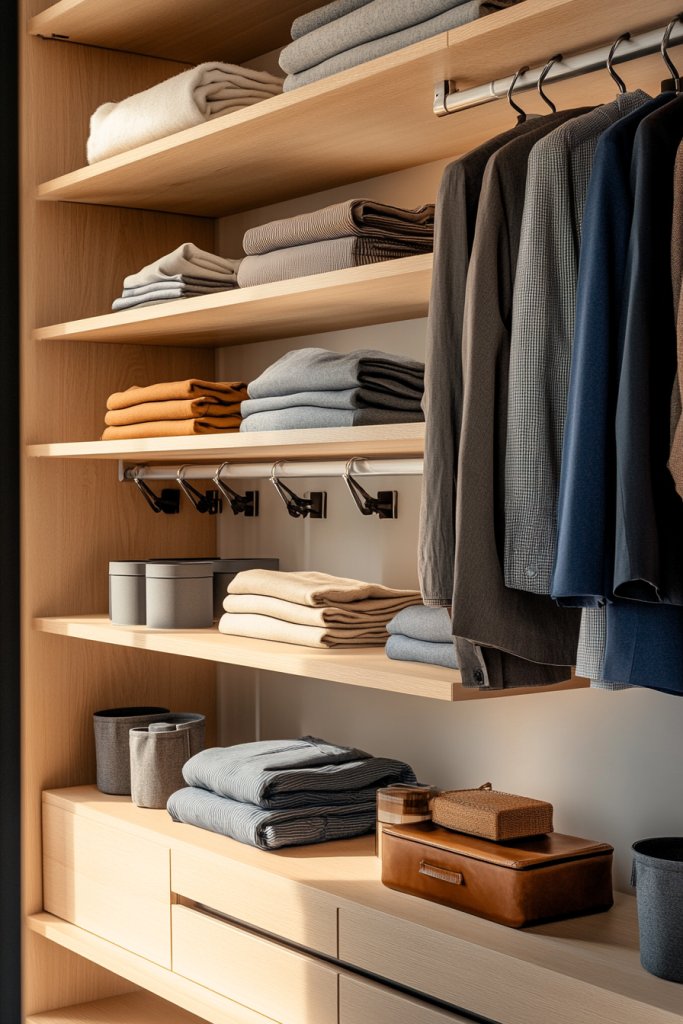
Cluttered closets can make mornings stressful and your room look chaotic. A well-organized closet with open shelves and hooks simplifies your routine and makes everything easier to find. It transforms a messy space into a sleek, functional area that boosts your confidence in your organization skills.
Imagine open wooden shelves holding neatly folded sweaters and shoes, with hooks above for hanging bags, belts, or accessories. Clear containers or baskets keep small items tidy, while a hanging rod provides space for your favorite jackets or dresses. The open design makes everything visible at a glance, reducing chaos and adding a modern touch. The space feels airy, accessible, and tailored to your needs.
Use different shelf heights and hook styles to suit your wardrobe. Incorporate seasonal storage—swap lightweight items for warmer gear as seasons change. Add labels or color-coded bins for extra organization. Consider a mix of open and closed storage depending on your preference for visibility or concealment. This system adapts easily to small closets or walk-in spaces, making the most of every inch.
Start by decluttering and measuring your closet space. Install adjustable open shelves and sturdy hooks using a drill and wall anchors. Organize your clothing by type and frequency of use, placing daily essentials at eye level. Use baskets or bins to contain smaller items like socks or jewelry. Keep everything accessible and label where needed. Regularly review and reorganize to maintain order.
Add decorative elements like patterned baskets or fabric liners inside bins. Incorporate hooks with fun shapes or colors that match your room’s theme. Use matching hangers or coordinated storage bins for a cohesive look. Personalize with small decorative touches that make organization enjoyable, like quirky labels or themed accessories.
A tidy closet isn’t just about looks—it’s about feeling in control and efficient. Your organized space will motivate you to keep things tidy and make mornings less stressful. It’s a simple project that pays off big, giving you confidence in your ability to create a space that works for you. You’ve got this!
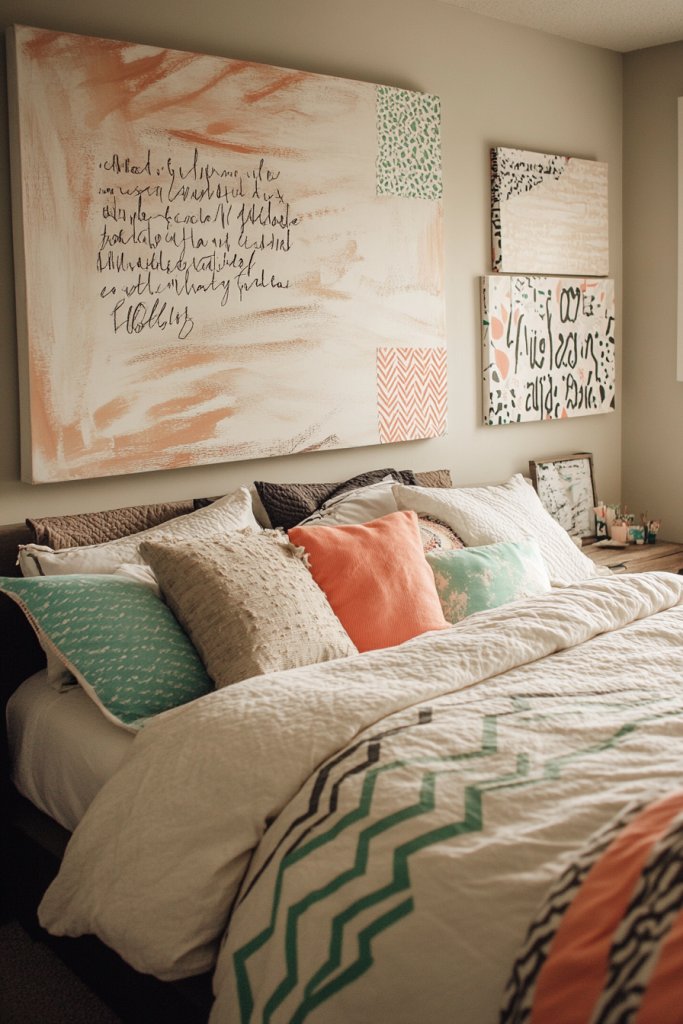
10. Soft Pastel Bedding with Mix-and-Match Patterns
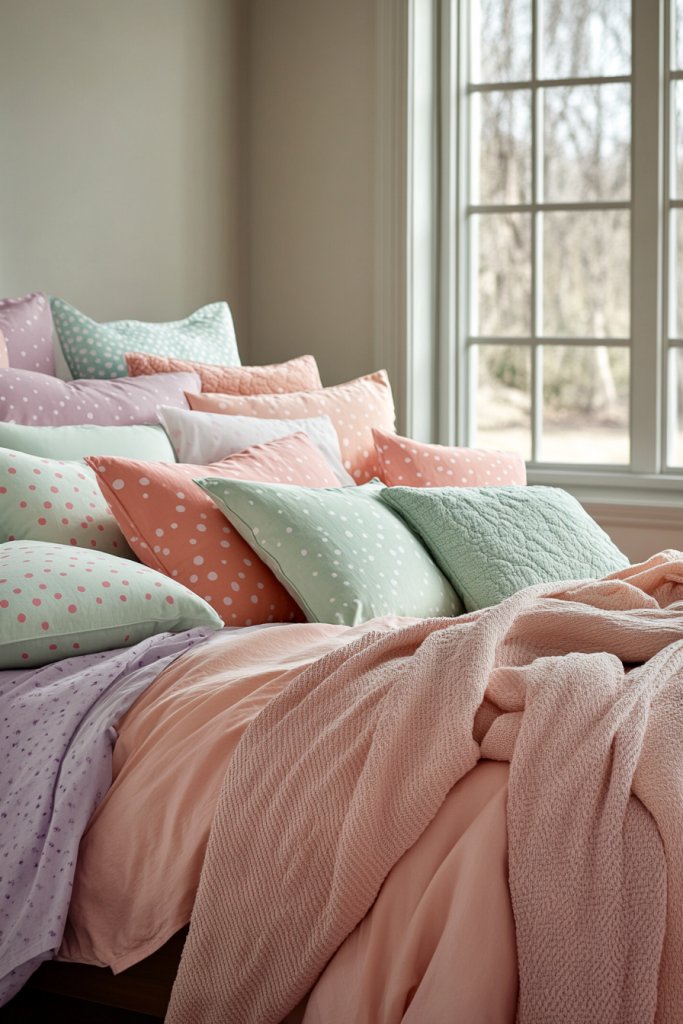
Does your bed feel a little dull or too uniform? Pastel bedding in playful patterns can brighten your room and add a touch of personality. Mixing textures and designs creates a layered, inviting look that’s both youthful and sophisticated. It’s an easy way to refresh your space without a full overhaul.
Picture a bed covered with a soft, blush pink duvet, paired with patterned pillowcases—stripes, polka dots, or florals—in coordinating pastel hues. Layer a textured throw blanket over the end, perhaps in a chunky knit or embroidered fabric. The combination of patterns and textures adds depth and interest, making your bed the cozy centerpiece of your room. Natural light enhances the gentle color palette, creating a soothing, welcoming vibe.
Play with different patterns—mix florals with geometrics or solids with subtle prints—to keep the look fresh. Swap out pillow covers seasonally or when your mood changes, using colors that complement your decor. For a more mature aesthetic, choose softer tones like mint, lavender, or peach, and incorporate silky or matte fabrics. You can also add a textured bed skirt or decorative cushions for extra dimension.
Start with a neutral or pastel duvet cover as your base. Mix in several patterned pillowcases and throws, choosing fabrics like cotton, linen, or velvet based on your preferred texture. Use a color scheme that’s calming and cohesive—avoid clashing patterns or overly bright colors. Layer accessories thoughtfully, keeping the overall look balanced. Wash and rotate your bedding regularly for freshness. This simple swap can dramatically elevate your room’s aesthetic.
Add your favorite colors or patterns through DIY pillowcases or decorative stitched details. Incorporate textured elements like ruffles, embroidery, or appliqué to make your bedding stand out. Personal touches such as monogrammed initials or custom patches make your bed uniquely yours. Keep a few versatile pieces for easy updates as trends or tastes change.
Soft pastel bedding with mixed patterns creates a serene, stylish retreat that’s all about your personality. It encourages you to experiment with colors and textures without fear. Your bed becomes a cozy haven that lifts your mood and inspires your daily routine. Remember, small changes make a big difference—so start layering and enjoy the transformation!
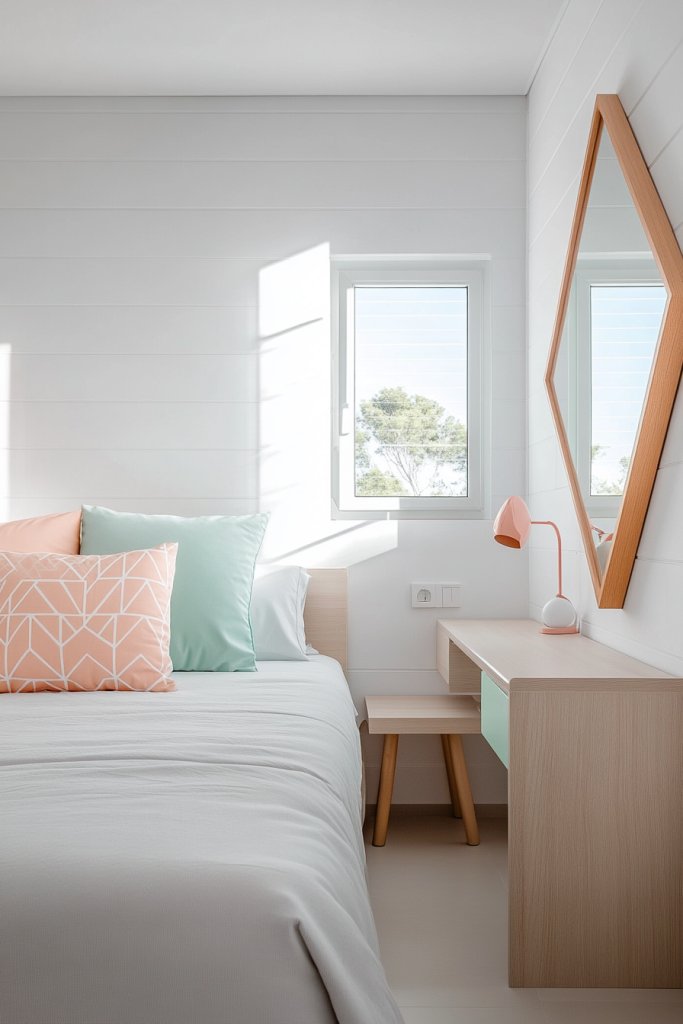
11. Elegant Vanity Area with Mirror and Makeup Storage
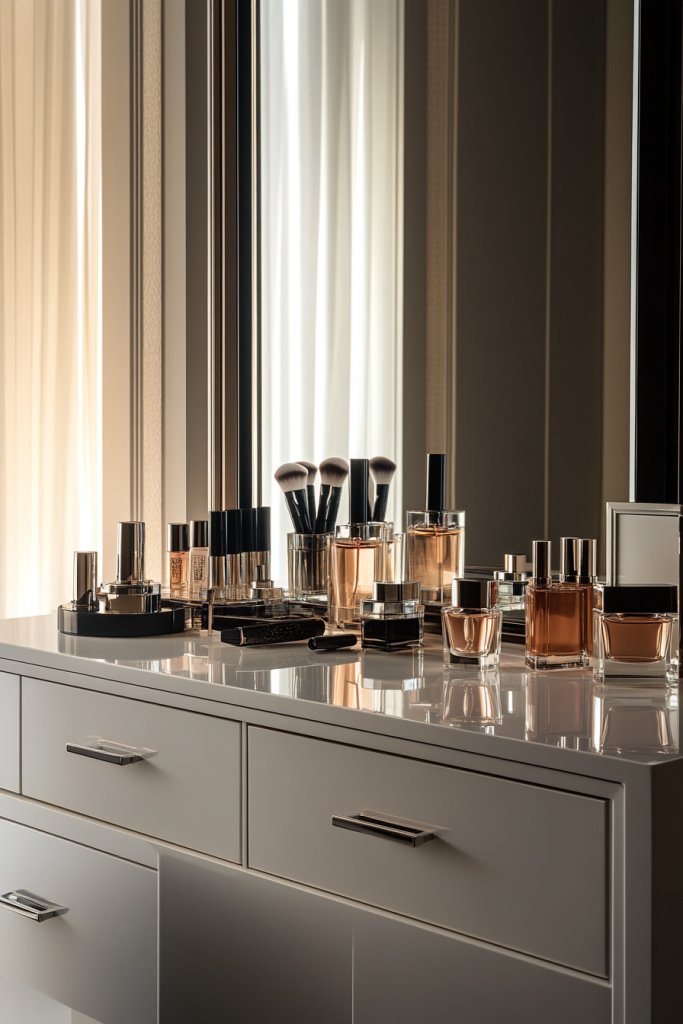
Ever wish you had a dedicated place to get ready without clutter? An elegant vanity with smart storage makes your beauty routine simple and stylish. It turns a mundane task into a luxurious experience and adds a touch of sophistication to your room. Plus, it helps keep your essentials organized and within reach.
Imagine a sleek, mirrored tabletop resting on a vintage-inspired frame, with compartments for brushes, lipsticks, and jewelry. The mirror can be framed with decorative trim or kept minimalist for a modern look. Nearby, small drawers or open shelves hold skincare and hair tools, while soft lighting from nearby sconces or LED strips ensures perfect illumination. The overall setup feels elegant, functional, and inviting—a space you’ll love to spend time in.
Choose a mirror shape—round, rectangular, or oval—to suit your style. Incorporate different storage options like glass jars, acrylic drawers, or vintage boxes, avoiding vases or artwork. Adapt the space with a small stool or chair that matches your decor. Decorate the area seasonally with soft textiles or decorative trays, keeping it fresh and practical. This setup suits small bedrooms or alcoves and can be expanded with additional lighting or accessories.
Start with a sturdy tabletop or a dedicated dressing table. Organize makeup and skincare in small containers or drawer inserts, placing frequently used items at the front. Mount a mirror at eye level, choosing one with built-in lighting if possible. Use dividers to separate brushes, lipsticks, and jewelry—clear acrylic options work well. Keep the area tidy by regularly cleaning and reorganizing your supplies. Add decorative touches like a faux fur mat or a scented candle (if allowed) for ambiance.
Personalize with your favorite colors, patterns, or themed accessories—think metallic accents or pastel details. Incorporate small decorative elements like a vintage jewelry box or a framed quote nearby. Use matching containers or trays that complement your decor for a cohesive look. Keep your daily essentials accessible but organized, so your routine stays smooth and stress-free.
A dedicated vanity elevates your grooming routine and boosts your confidence. It’s a space that reflects your style and makes you feel special every day. As you experiment with new looks or organize your products, you develop a stronger sense of self and creativity. Remember, a beautiful space inspires beautiful moments—so enjoy crafting yours!
12. DIY Pegboard Wall for Jewelry, Accessories, and Small Items
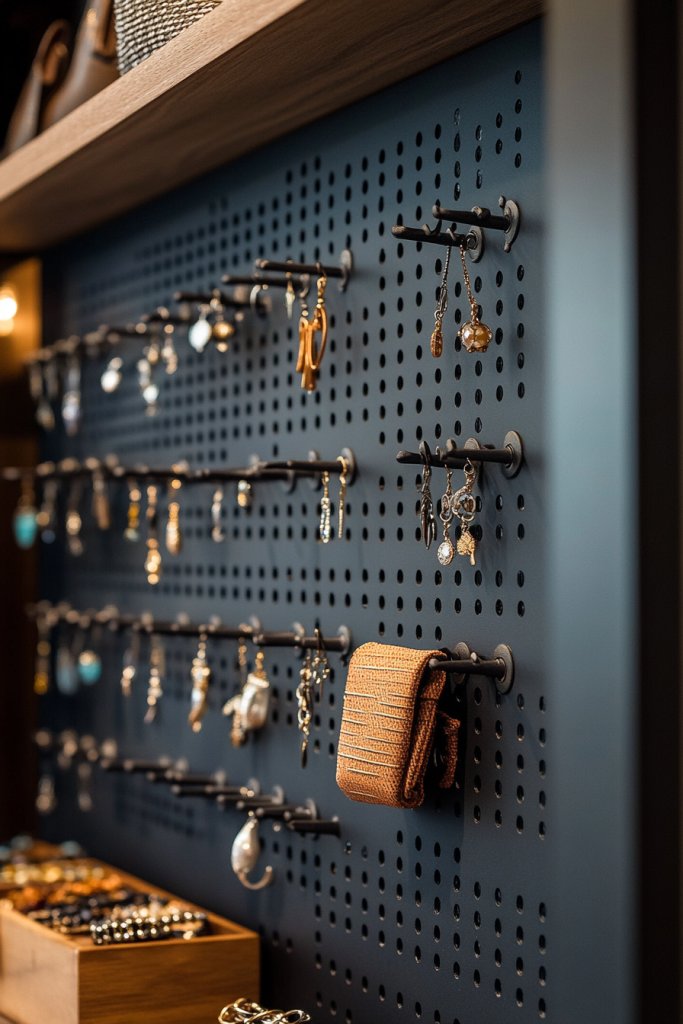
Tired of hunting for your favorite earrings or losing small jewelry pieces? A DIY pegboard wall provides a practical, stylish solution to keep everything organized and in sight. It’s customizable, easy to install, and makes your room look more curated and intentional. Plus, it’s a fun project that adds a touch of industrial-chic flair.
Picture a grid of small hooks and pegs mounted on your wall, holding necklaces, bracelets, and earrings in a neat display. Small baskets or containers can store rings, pins, or hair accessories, while decorative clips hang scarves or keychains. The pegboard’s open design makes everything easy to see and grab, creating a functional art piece. The raw metal or painted finish adds texture and contrast to your decor.
Paint the pegboard in a color that complements your room’s theme—white, black, or a bold hue. Arrange hooks in patterns or clusters based on your needs. Add decorative elements like small shelves for mini plants or framed photos (if you’re avoiding artwork). Use different peg sizes or shapes to create visual interest and maximize storage. It’s adaptable to small or large walls, fitting your personal style.
Cut a piece of pegboard to size, then mount it securely using brackets or screws. Organize your jewelry and accessories by type, hanging earrings in pairs and necklaces on hooks. Use small containers or baskets attached to the board for tiny items, avoiding vases or decorative ceramics. Label sections if needed for easy identification. Keep the display tidy by regularly reorganizing and cleaning the surface.
Paint the pegboard in your favorite color or add decorative decals. Incorporate themed hooks or customized labels for a personal touch. Mix in small decorative elements like LED fairy lights or a fabric backdrop behind the board. Use the space to showcase your favorite accessories or seasonal pieces, making the display a reflection of your personality. Regularly update for a fresh look.
A pegboard wall is a creative, practical way to keep your accessories organized while adding style. It encourages you to keep things neat and makes your space more inspiring. As you develop your organizing skills, you’ll feel more in control and proud of your space. Remember, a little DIY effort goes a long way in transforming your room into a personalized haven!
13. Personal Touch with Inspirational Quotes and Custom Decor
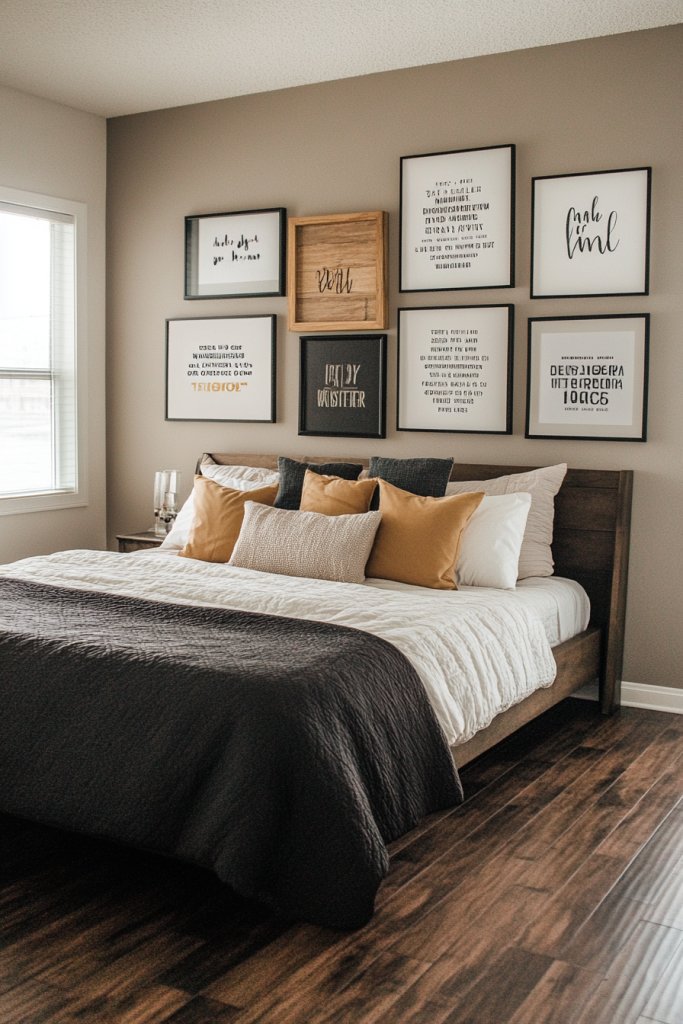
Sometimes, all your space needs is a little boost of motivation or personality to really feel like home. Inspirational quotes and custom decor can uplift your mood and remind you of your goals every day. They’re easy to incorporate and can be tailored to your style, making your room truly your sanctuary. Who doesn’t love a daily dose of positivity?
Imagine framed quotes or motivational posters arranged in a gallery wall, or wall decals with uplifting sayings in stylish fonts. You could also craft your own signs with painted wood or canvas, adding a personal touch. Bright colors, metallic accents, or minimalist black and white designs set different moods, depending on your taste. These elements become focal points that inspire and energize your space.
Mix different types of decor—like framed prints, wall stickers, or hand-lettered signs—to keep things fresh. Rotate or update quotes seasonally to reflect your evolving mindset. Use themed decor—like floral motifs or geometric patterns—that match your overall aesthetic. Keep the background simple to let the quotes stand out or combine with other decorative elements like textiles or shelving for a layered look.
Choose a wall space that’s visible and easy to access. Frame your favorite quotes using inexpensive frames or create wall decals using removable adhesive vinyl. Arrange your signs in a balanced layout, using painter’s tape first for placement. Hang or stick them securely, ensuring they’re straight. Mix in complementary decor like small shelves or hooks to add variety, avoiding vases or artwork if restricted. Regularly refresh with new quotes or signs.
Create your own quotes or sayings that resonate with your goals. Incorporate your favorite colors or fonts for a cohesive look. Add small decorative elements like metallic or glitter accents for extra flair. Personalize with initials, symbols, or icons that hold special meaning. This ongoing customization keeps your space lively and inspiring.
A room filled with uplifting words and personalized decor makes every day brighter. It’s a reflection of your personality and aspirations, encouraging positivity and growth. As your space evolves, so will your confidence and motivation. Remember, your room should be your personal cheerleader—so fill it with what inspires you!
Conclusion
This collection of girls’ bedroom ideas for teenagers showcases a wide range of styles—from modern and minimalist to vibrant and whimsical—giving you plenty of options to personalize any space. Whether you’re redecorating or starting from scratch, these ideas can help turn a simple room into a stunning, functional retreat. Don’t be afraid to experiment and let your teen’s personality shine through—your dream bedroom is just a few creative steps away! Embrace the opportunity to craft a space that inspires confidence, comfort, and joy.
Leave a Reply