Transforming your bedroom into a stylish sanctuary has never been easier thanks to the magic of shelves! Not only do they serve as practical storage solutions, but they also add personality and charm to any space. Whether you’re craving sleek modern designs or cozy vintage vibes, shelves are a versatile way to showcase your favorite decor, books, or even plants, making your bedroom both functional and fabulous.
In this article, you’ll discover a wide variety of creative shelving ideas to suit every style and space. From floating shelves to multi-tiered units, each concept is designed to inspire and help you maximize your room’s potential. Get ready to elevate your bedroom decor and turn everyday storage into a stunning design feature!
1. Floating Wooden Shelves for a Minimalist Look
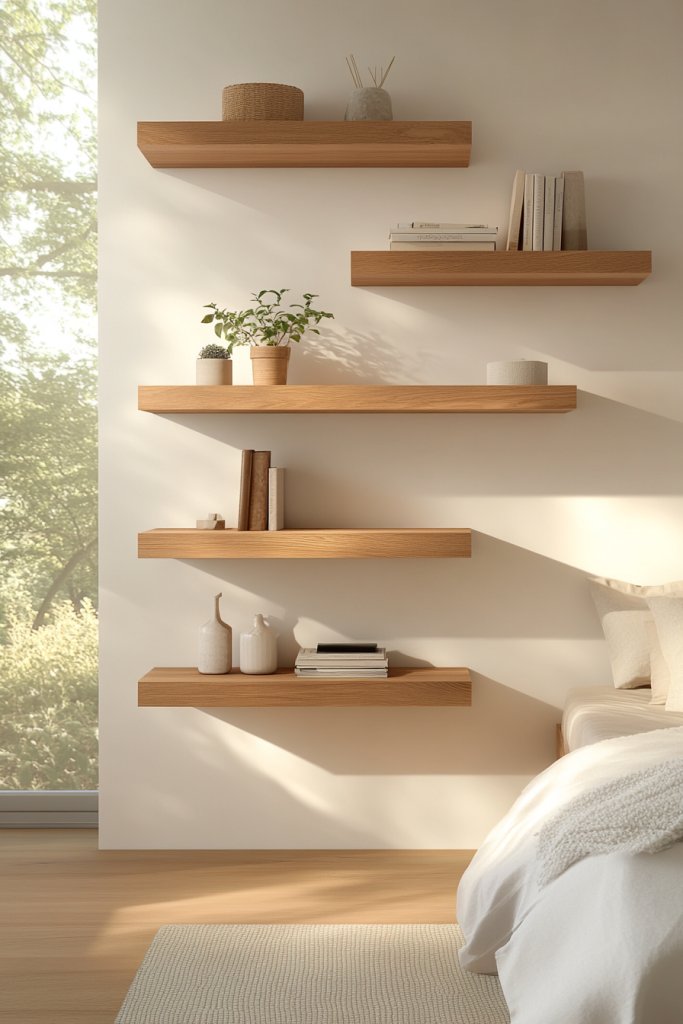
Ever feel overwhelmed by clutter but crave a sleek, modern aesthetic? Floating wooden shelves offer a simple yet effective way to keep essentials within reach without sacrificing style. They help create visual calm in a busy space, making your bedroom feel more open and organized. If you love a clean, uncluttered vibe, this idea might just be your new best friend.
Imagine a set of slim, matte-finish wooden planks mounted seamlessly on your wall, floating like they defy gravity. They hold a few carefully curated books, a soft ceramic dish, and maybe a tiny succulent—no plants, remember. The natural wood adds warmth, contrasting with your wall color for a balanced look. Soft lighting from sconces highlights these shelves, casting gentle shadows that add depth. It’s a minimalist’s dream come true.
You can customize the wood tone—light pine for Scandinavian serenity, dark walnut for sophistication. For small rooms, opt for narrow shelves to avoid crowding. Seasonal styling can involve swapping decor items, like textured textiles or sculptural objects, instead of plants or artwork. Adjustable shelf heights help accommodate taller books or decorative boxes, fitting your personal style and space constraints.
Begin by choosing sturdy, wall-mountable brackets and pre-cut wooden planks or repurpose reclaimed wood for eco-friendliness. Mark your wall with a level to ensure even installation. Drill holes and secure brackets firmly, then slide the shelves into place. Use a stud finder for extra support, especially if holding heavier items. Finish with a clear sealant or paint, depending on the look you want. Keep tools simple: drill, level, measuring tape, and a pencil.
Add personal flair by painting the edges in a contrasting color or staining the wood for a richer tone. Incorporate textured fabric baskets or ceramic trays atop shelves to organize small essentials stylishly. Consider integrating LED strip lighting underneath for ambient glow—perfect for cozy nights. Or, hang decorative textiles on the wall behind the shelves to soften the look while avoiding artwork.
Floating shelves are all about combining form and function effortlessly. With a bit of DIY spirit, you can transform your space into a calming, clutter-free retreat. They’re trendy, versatile, and fit nearly any decor style—whether modern, rustic, or Scandinavian. Ready to give your walls a sleek upgrade without breaking the bank?
2. Reclaimed Pallet Shelves for Rustic Charm
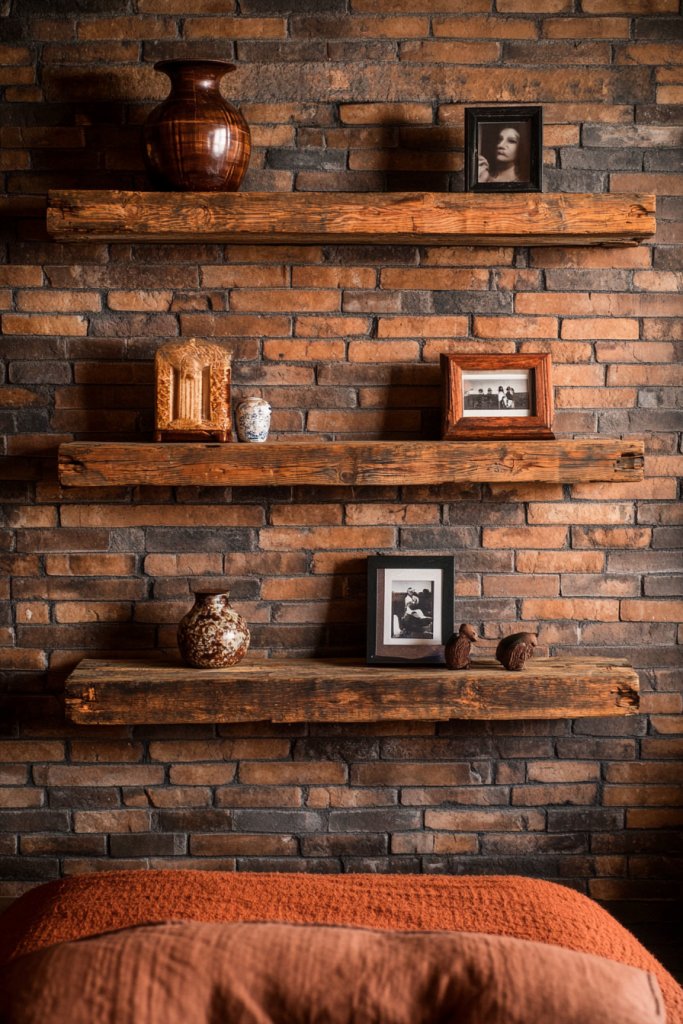
Craving that warm, cozy vibe in your bedroom but tired of over-polished decor? Reclaimed pallet shelves bring rustic charm and eco-consciousness together in one package. They add texture and character, turning plain walls into focal points. Plus, upcycling feels good—like giving old wood a second life while decorating your space.
Picture weathered wooden pallets sliced into planks, mounted horizontally with visible nails and natural imperfections. They hold vintage-style books, a ceramic bowl, and maybe a chunky knit throw blanket draped over the edge. The rough textures and uneven edges create a tactile, inviting atmosphere. Natural light accentuates the grain and knots, emphasizing the handcrafted appeal. It’s a relaxed, lived-in look that exudes personality.
You can stain or paint the pallets to match your color scheme—think distressed white for shabby chic or dark walnut for a more refined look. Mount them at different heights to create a layered effect, or use different sizes for variety. Seasonal decor can involve adding cozy textiles or vintage trinkets that reflect current trends or personal memories. These shelves work well with farmhouse, industrial, or eclectic styles.
Start by sourcing reclaimed pallets—local farms, hardware stores, or online marketplaces are good bets. Remove nails and splinters carefully, then cut to size using a saw. Sand surfaces for safety and smoother finish; then stain or seal if desired. Mount sturdy L-brackets or heavy-duty cleats on the wall, ensuring they align with wall studs for maximum support. Attach the pallets securely, using appropriate hardware, and double-check for levelness. Decorate with your favorite non-restricted items.
Add personal touches by painting the edges in bold colors or distressing the wood for a vintage look. Layer textiles like woven baskets or fabric-lined boxes on the shelves for added organization. Incorporate decorative hooks underneath for hanging accessories, or affix metal accents for an industrial touch. These shelves become a backdrop for your personality, not just storage.
Reclaimed pallet shelves prove that beautiful, functional decor doesn’t have to be new or polished. They showcase your eco-friendly values and creativity, plus they’re budget-friendly. Your space gains instant warmth and character—perfect for relaxing and unwinding. Ready to transform salvaged wood into a statement piece?
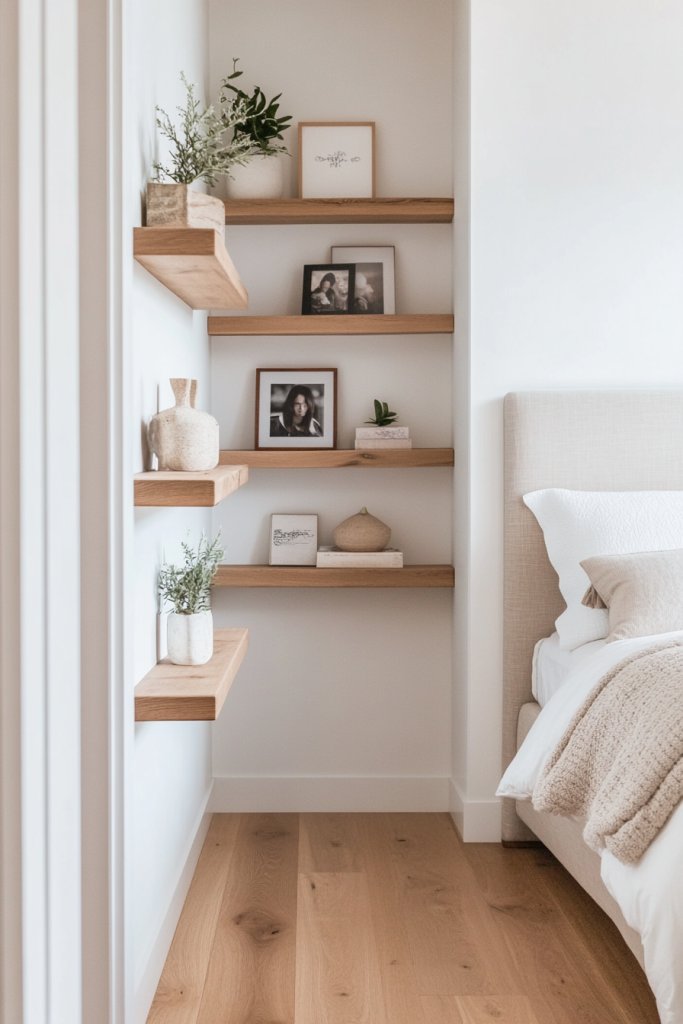
3. Corner Shelves to Maximize Space
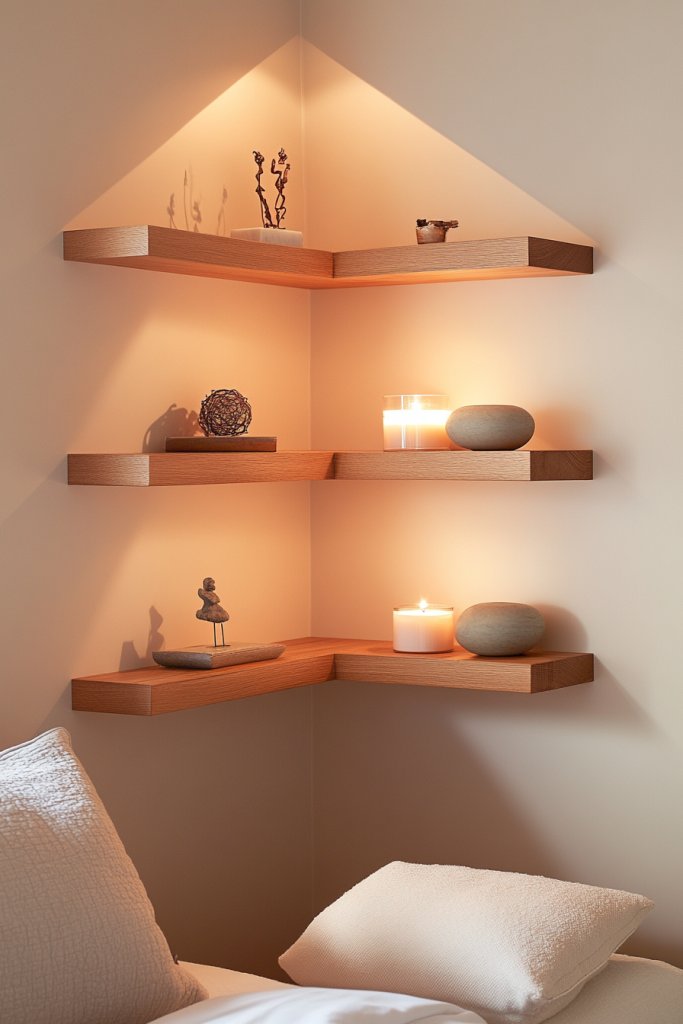
Ever notice how corners often become dead zones filled with clutter? Corner shelves are the perfect fix, turning awkward spaces into useful storage or display areas. They help you make the most of every inch without overcrowding. If your bedroom feels tight or cluttered, these clever additions can open things up visually and practically.
Imagine small, triangular shelves snugly fitted into a corner, painted in a soft matte hue. They hold a few decorative storage boxes, a tiny clock, and a couple of cherished keepsakes—no plants or artwork involved. The shelves follow the wall angles, creating an architectural detail that draws the eye upward. Soft lighting from nearby sconces highlights each shelf, making the corner inviting rather than wasted space.
Choose corner shelves in different shapes—triangular, quarter-round, or curved—to match your style. For small spaces, opt for narrow, floating units that don’t protrude much. Larger bedrooms can handle multi-tiered corner units for more storage. Seasonal styling could include textured boxes or fabric-lined trays, keeping clutter out of sight but within reach. Mix and match materials—wood, metal, or acrylic—to suit your aesthetic.
Begin by measuring your corner space carefully. Select shelves with mounting hardware suitable for your wall type—stud-mounted brackets are ideal for stability. Use a level to ensure precise placement, especially in angled corners. Drill pilot holes and secure brackets firmly into studs or wall anchors. Attach the shelves, then finish with decorative details like small hooks or liners if needed. Keep the look minimalist to avoid overcrowding.
Customize with painted backs or accent colors to make the shelves stand out. Incorporate fabric baskets or small decorative containers to organize items neatly. For a cohesive look, match shelf colors to wall paint or trim. Add subtle metallic accents or textured elements to elevate the design, making your corner both functional and stylish.
Corner shelves are a smart, space-saving solution that proves every inch counts. They add personality and practicality without cluttering your room’s flow. A little DIY effort goes a long way—your space can look thoughtfully designed and totally unique. Ready to turn those awkward corners into eye-catching features?
4. Ladder Shelves for Vertical Storage
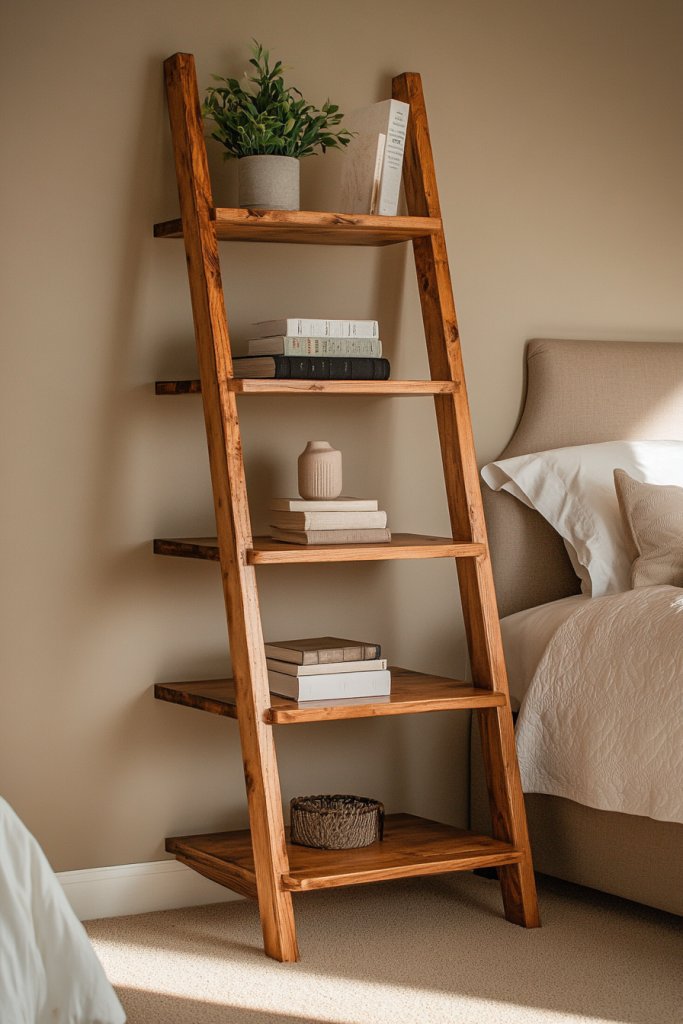
Struggling with limited storage but don’t want your bedroom to look crowded? Ladder shelves provide a tall, open solution that adds storage without sacrificing style. They utilize vertical space, leaving your floor free for other furniture. If you love a relaxed, boho vibe, these shelves are both functional and decorative—perfect for small or large rooms alike.
Visualize a tall, lean ladder leaning against the wall, with multiple rungs holding books, baskets, and decorative objects. The open design keeps the room feeling airy, while the natural wood or painted finish complements various styles. The shelves’ angular shape introduces a dynamic element, breaking up flat wall space. Soft ambient lighting enhances the relaxed feel, making it a focal point that invites you in.
Choose between natural wood, painted, or distressed finishes to match your decor. Use the rungs for stacking books or arranging baskets for hidden storage. For a more eclectic look, mix sizes and orientations—some shelves can be angled or staggered. Incorporate textiles or small decorative objects to personalize without adding clutter. These shelves adapt well to boho, rustic, or modern interiors.
Select a sturdy ladder with appropriate height for your wall. Position it at an angle, leaning against the wall, then secure the top with wall anchors or hooks if needed. Use a level to ensure it leans evenly. Install optional wall brackets for extra stability—especially if you plan to store heavier items. Organize your items thoughtfully, balancing heavier objects at the bottom for stability. Finish with a test to ensure safety.
Add decorative baskets or fabric-lined boxes on the rungs for a polished look. You can paint the ladder in bold colors for a statement piece or leave it natural for a rustic vibe. Incorporate small string lights or LED strips along the sides for ambient glow. Personal touches like vintage trinkets or framed quotes turn the ladder into a truly unique feature.
Ladder shelves blend practicality with style, creating a lively, inviting atmosphere. They’re a great way to showcase your personality while keeping clutter at bay. DIY-friendly and adaptable, they suit nearly any space. Ready to elevate your bedroom with some vertical flair?
5. Glass Shelves for a Light, Airy Feel
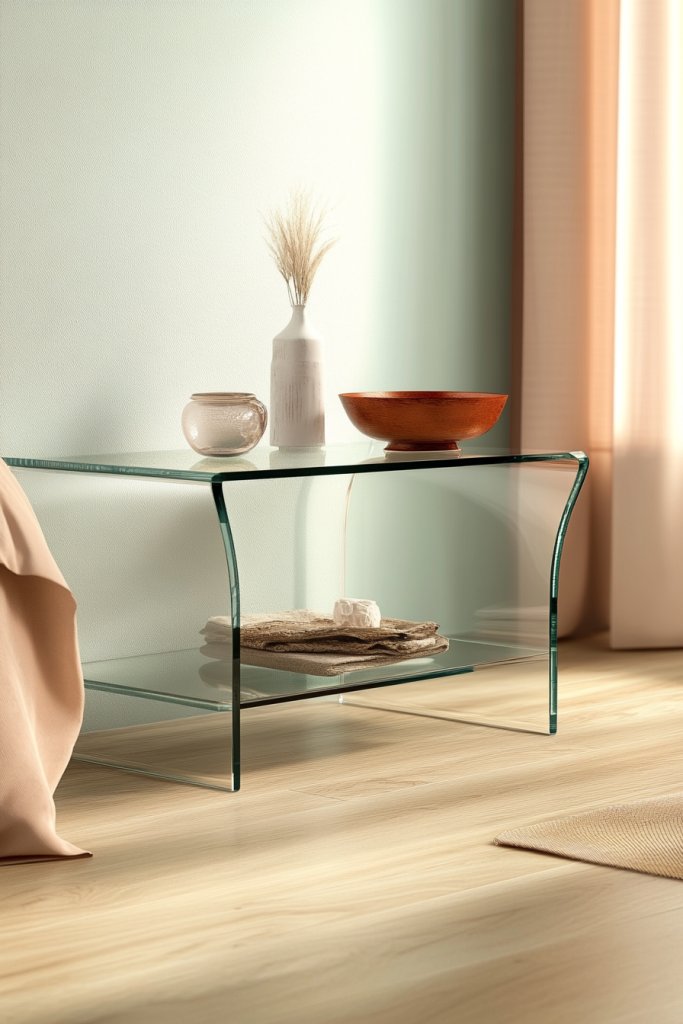
Want your bedroom to feel open, spacious, and bright? Glass shelves offer a sleek, contemporary solution that visually expands your space. They create a sense of airiness while providing a platform for display or storage. If you’re tired of bulky furniture, these transparent surfaces give your room a minimalist edge without sacrificing functionality.
Picture clear or frosted glass shelves mounted seamlessly on your wall, almost floating. They hold delicate items—perhaps a textured ceramic sculpture or a set of beautifully boxed accessories—avoiding the heavy look of traditional units. The reflective quality of glass bounces light around the room, brightening even the darkest corners. The minimalist design pairs well with modern, industrial, or even Scandinavian decor, adding sophistication.
Choose tempered glass for strength and safety, and experiment with different thicknesses for visual impact. Mount them at varying heights to create a dynamic display space. Use a mix of transparent and frosted glass for subtle variation. Seasonal decor can include textured fabrics or decorative boxes—no plants or artwork needed. These shelves work well in small apartments or rooms with limited wall space.
Select strong, wall-mounting brackets compatible with your glass thickness. Measure carefully to position shelves at desired heights, ensuring symmetry and stability. Drill into wall studs or use wall anchors for extra support—especially if holding heavier items. Clean the glass thoroughly before installation to avoid smudges. Secure the brackets, then carefully place the shelves, checking for levelness. Finish with decorative items that complement your overall aesthetic.
For a personalized touch, add LED strip lighting underneath the glass for a subtle glow. Incorporate textured or fabric-lined boxes for hidden storage that maintains the light, airy feel. Opt for tinted or frosted glass in bold colors for a pop of personality. Keep the display simple to maximize the clean, modern vibe and avoid visual clutter.
Glass shelves elevate your room’s style while keeping the space feeling open and fresh. They’re perfect for showcasing your favorite accessories without overwhelming your decor. Easy to install and versatile, they suit nearly any aesthetic, from minimalist to glam. Ready to add a touch of elegance and lightness?
6. Industrial Pipe Shelves for a Modern Edge
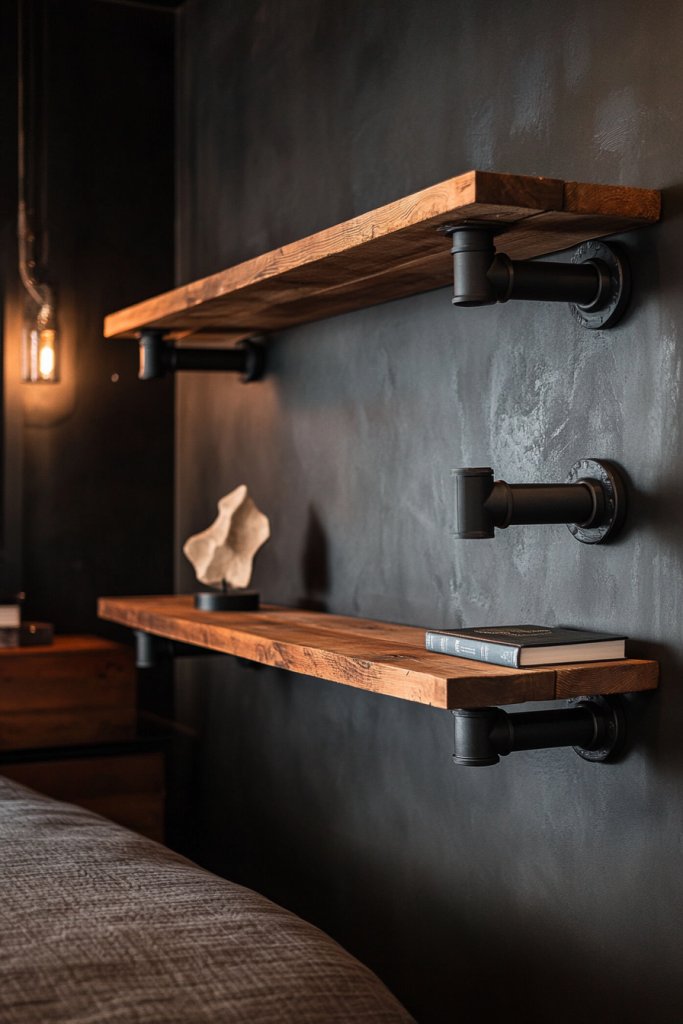
Looking to add some edge to your bedroom decor? Industrial pipe shelves combine rugged metal with warm wood for a bold, modern statement. They offer sturdy storage and a distinctive visual appeal that transforms plain walls into focal points. If your style leans toward urban, vintage, or industrial, these shelves are a perfect fit.
Visualize black iron pipes supporting reclaimed wood planks, mounted along your wall in a sleek, linear arrangement. They hold a mix of vintage cameras, decorative storage bins, and textured fabrics—no plants or artwork, remember. The exposed hardware and raw materials lend a utilitarian charm, while the contrast of metal and wood adds depth. Matte black finishes and distressed textures reinforce the industrial vibe.
Mix pipe sizes and configurations—single straight runs or multiple levels—to suit your space. Use dark-stained wood for a vintage look, or paint the pipes in matte black or metallic finishes for a contemporary feel. Incorporate brackets or pipe elbows for added visual interest. This style works well with minimalist, loft, or eclectic decors, especially when paired with other metal accents.
Start by planning your layout—measure the wall, decide on shelf lengths, and sketch the design. Purchase industrial pipe fittings, flanges, and reclaimed wood planks. Mount flanges securely into wall studs using heavy-duty screws, then attach pipes and shelves. Use a level to ensure straight alignment. Finish by sealing the wood if desired and arranging your decor. Heavy-duty anchors may be necessary if supporting heavy items.
Add personalized touches with metal hooks or brackets for hanging accessories or tools. Finish the wood with stain or paint to match your room’s palette. Incorporate decorative metal accents or vintage signage for extra flair. Keep the overall look industrial yet curated, blending utility with style.
Industrial pipe shelves are more than just storage—they’re a design statement. They can be tailored to fit any space, big or small, with a DIY touch that feels satisfying and unique. Your room will radiate personality and craftsmanship, perfect for modern city living or loft-inspired decor. Ready to build something bold?
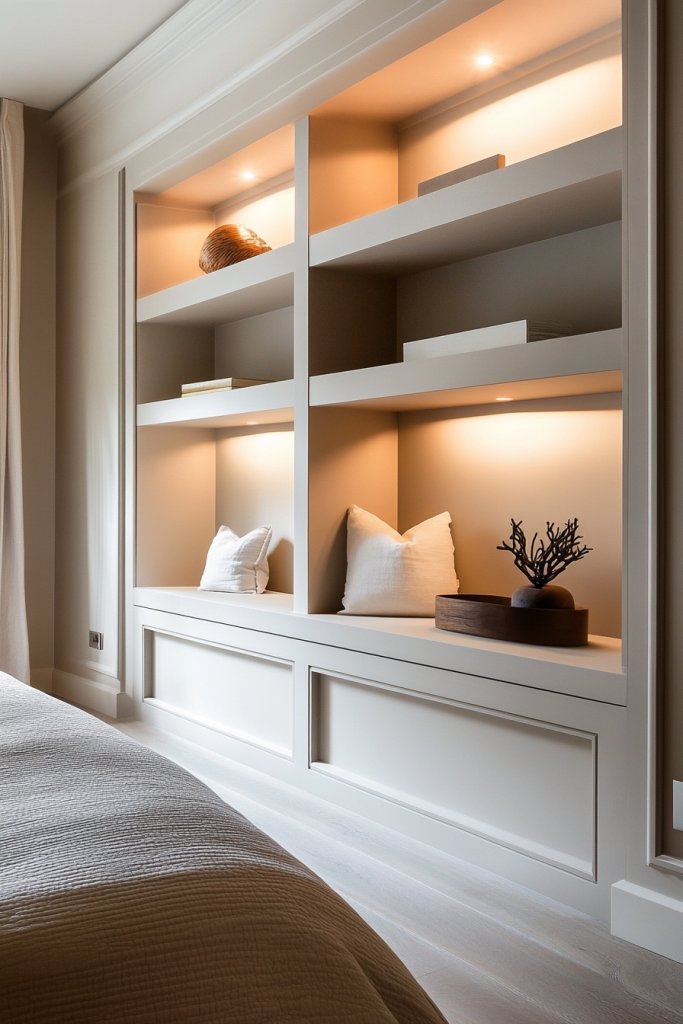
7. Built-In Shelving Units for Seamless Integration
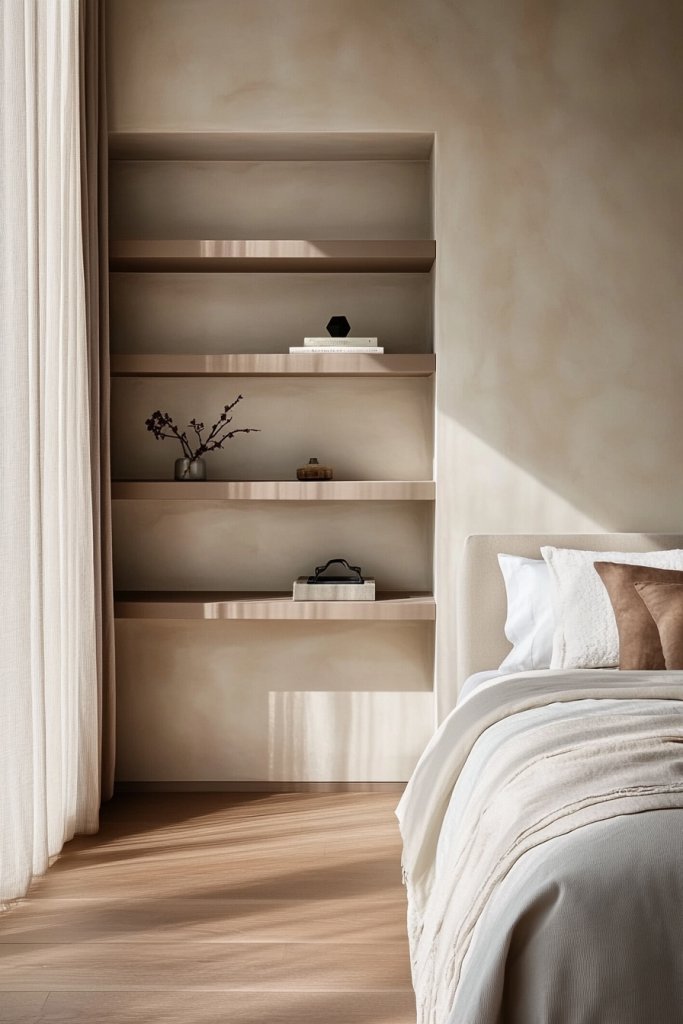
Tired of clutter breaking up your sleek bedroom look? Built-in shelves offer a seamless, integrated solution that maximizes space and appears as part of the wall itself. They eliminate bulky furniture and create a clean, unified aesthetic. If you want a refined, designer vibe, built-ins are the ultimate upgrade.
Imagine custom-designed shelving nestled into a wall niche, painted to match the wall color for a disappearing act. They hold a mix of minimalist storage boxes and decorative objects—no plants, no artwork—just pure architectural elegance. The flush finish makes the room feel spacious and polished. Soft lighting can be installed within or beneath for a subtle glow, emphasizing the sleekness.
Design your built-ins with adjustable shelves or fixed compartments depending on your storage needs. Use materials like painted MDF, plywood, or high-quality wood for a luxurious feel. Incorporate hidden drawers or cabinets for concealed storage—perfect for keeping clutter out of sight. Adapt the depth and width to your specific items, from books to folded textiles.
Start with precise measurements, then create a detailed plan or hire a carpenter for custom work. Prepare the wall by removing drywall or existing finishes. Frame the opening with studs or support beams, then install shelves or cabinets securely within the framework. Finish with paint or veneer for a seamless look. Consider adding lighting or electrical outlets within for extra functionality. This is a project best suited for DIY enthusiasts or professionals.
Add personal touches with painted backs or textured finishes inside the shelves. Use decorative hardware or trim for a custom look. Incorporate hidden electrical outlets or LED strips to illuminate your display. Keep styling minimalist or add textured fabrics behind glass doors for a layered effect.
Built-in shelving elevates your room from plain to sophisticated, showcasing your sense of style. They’re a long-term investment that adds value and elegance. With a bit of planning or professional help, you can achieve a flawless, integrated look that feels high-end. Ready to redefine your space?
8. Bedside Shelves for Easy Reach
Reaching for your glasses or phone in the dark is a hassle? Small bedside shelves solve that problem by placing essentials right next to your bed. They keep things within arm’s reach without cluttering your nightstand. If you want quick access and a clutter-free space, these tiny shelves are a game-changer.
Picture a compact floating shelf mounted just above your mattress, painted in a neutral tone. It holds a minimalistic clock, a textured ceramic dish, and a small softcover book—no plants or artwork needed. The shelf blends into the wall, creating a clean line that doesn’t interfere with your sleeping area. Soft bedside lighting accentuates the simplicity and ease of access.
Choose slim, rectangular shelves that fit your decor style—modern, rustic, or minimalist. Mount one on each side of the bed for symmetry or just one for a minimalist look. Use different finishes—matte, gloss, or painted—to match your room’s palette. Add small, decorative containers or fabric-lined trays on top for organizing tiny items.
Pick a sturdy wall that can handle your shelf’s weight, preferably into a wall stud. Measure carefully and mark the placement, ensuring height is comfortable for reaching. Drill pilot holes, then secure brackets or anchors. Mount the shelf, then load with your essentials. Keep the installation simple with a level, screwdriver, and measuring tape. Double-check stability before use.
Personalize with painted edges or textured finishes for added style. Use decorative fabric or leather accents underneath to soften the look. Incorporate small, stylish containers for jewelry or tech accessories. For added convenience, attach a magnetic strip or small hooks for keys or glasses.
Small bedside shelves turn a cluttered nightstand into a sleek, organized space. They’re easy to install, customizable, and instantly elevate your room’s look. Plus, they make your mornings smoother and nights more relaxing. Ready to keep your essentials close and your space neat?
9. Floating Cube Shelves for Modular Style
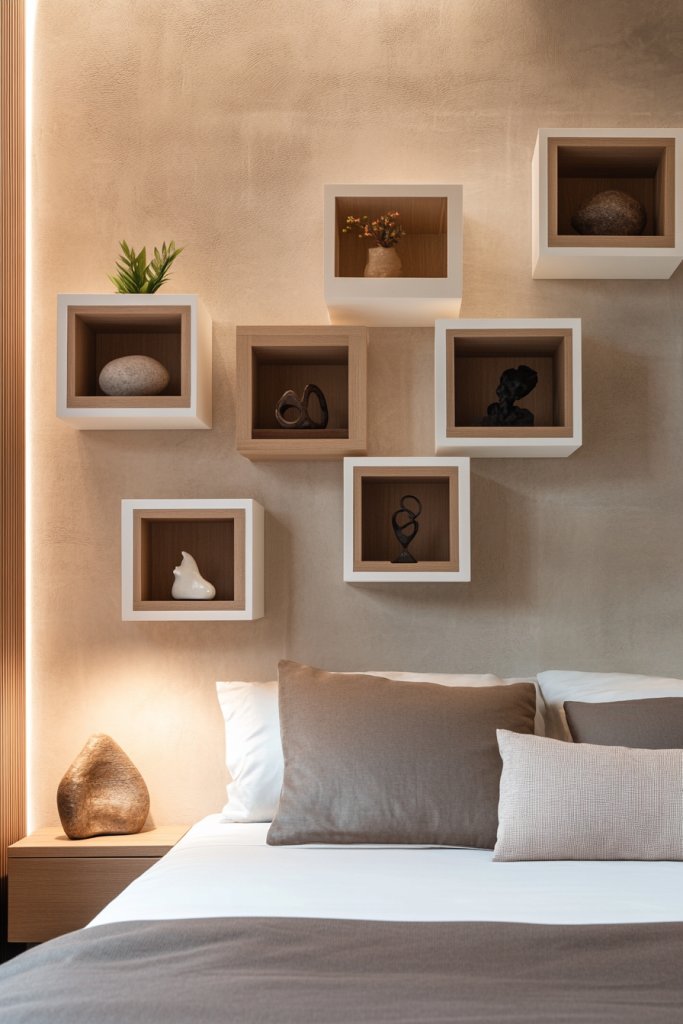
Looking for a flexible, modern way to display and organize? Floating cube shelves offer a modular solution that you can customize to fit your space and style. They add a geometric flair and can be arranged in countless configurations. If you love a playful yet tidy aesthetic, these cubes will quickly become your favorite decor feature.
Visualize a cluster of small, colorful cube shelves mounted in an asymmetrical pattern on your wall. They hold a mix of textured boxes, decorative objects, and a few books—no plants or artwork. Each cube’s clean lines and bold colors create a striking visual impact, breaking up plain wall space. Soft lighting highlights the geometric shapes, adding depth and interest.
Choose from a variety of sizes and colors to match your decor. Arrange the cubes in grids, staggered patterns, or scattered clusters for a dynamic look. Use open or closed cubes depending on whether you want to display or hide items. Seasonal styling can involve swapping out accessories or adding textiles inside the cubes for texture.
Purchase or build modular cube shelving units in your preferred size and color. Mark the wall for the desired arrangement—use a level and painter’s tape to visualize the layout first. Secure each cube with sturdy wall anchors or screws into studs. Mix and match orientations for visual interest. Once installed, organize your items in a way that balances color and size for maximum effect.
Personalize with painted backs or contrasting colors inside the cubes. Incorporate decorative fabric or textured liners for hidden storage options. Add small LED lights inside for illumination or use decorative labels for organization. Keep the arrangement fresh with seasonal swaps or new accessories.
Modular cube shelves are versatile and fun, allowing you to express your personality creatively. They’re easy to upgrade and adapt as your style evolves. With a little planning, you can create a captivating focal point that’s both functional and trendy. Ready to build your own geometric masterpiece?
10. Slanted Shelves for Display and Ease of Access
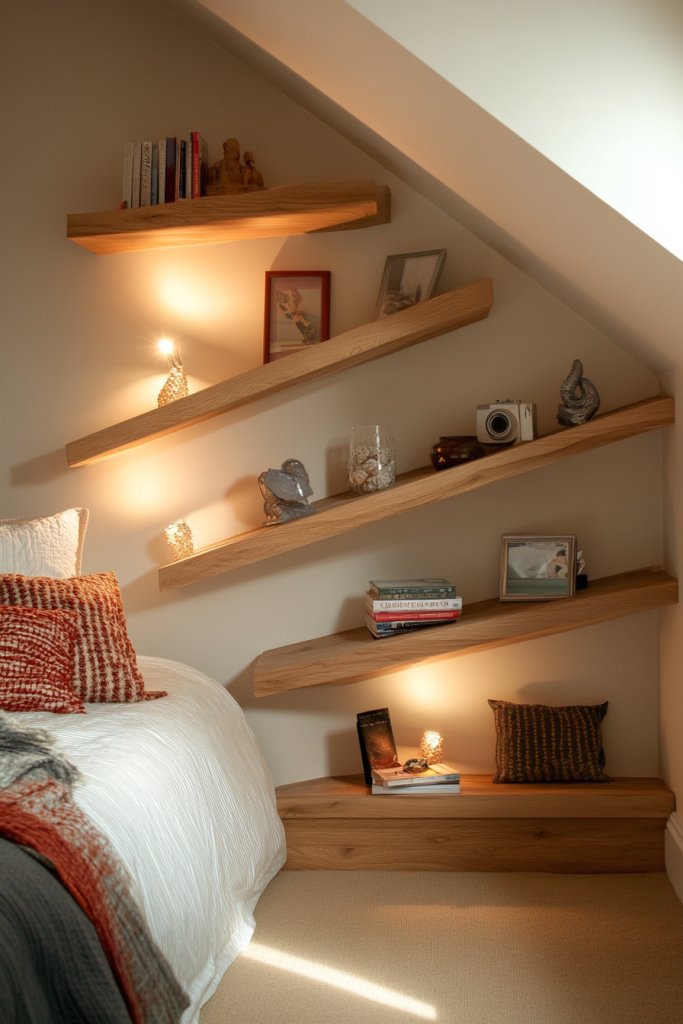
Ever struggle to see or reach items stored on flat shelves? Slanted shelves angle downward, making items more visible and easier to grab. They add a unique design element to your bedroom while improving accessibility. If you want a functional yet stylish upgrade, this idea hits the mark.
Imagine sleek wooden shelves mounted at a gentle incline, holding a mix of small boxes, books, and decorative trinkets—no plants or artwork, remember. The angle creates a dynamic visual flow, drawing the eye along the line of the shelf. The textured wood combined with simple brackets enhances the modern, practical aesthetic. Soft lighting from nearby fixtures highlights the slope, emphasizing ease and style.
Adjust the angle and length of the shelves to suit your space and items. Use materials like stained wood, painted MDF, or even acrylic for a contemporary look. Incorporate a lip or edge at the front for added security and to prevent items from falling. These shelves work well in small bedrooms or as part of a larger storage wall, fitting various decor styles.
Measure your wall space and determine the desired angle and length. Mount brackets at the appropriate angle, ensuring they are securely anchored into wall studs or anchors. Attach the shelves, ensuring they are level along the slant. Use a level tool to confirm the angle, then load with your chosen items. Finish with a protective sealant or paint if desired. Ensure stability before placing items.
Personalize with painted or stained edges, or add decorative elements like textured fabric liners underneath. Incorporate small label tags or dividers for organization. Pair with minimalist lighting to emphasize the slope and display. Keep styling simple to highlight the geometric feature.
Slanted shelves combine form and function effortlessly, making your storage both practical and eye-catching. They’re adaptable to different spaces and a fun DIY project for those who love creative solutions. Your bedroom will feel more organized and modern—ready to give it a try?
11. Mirrored Shelves to Enhance Light and Space
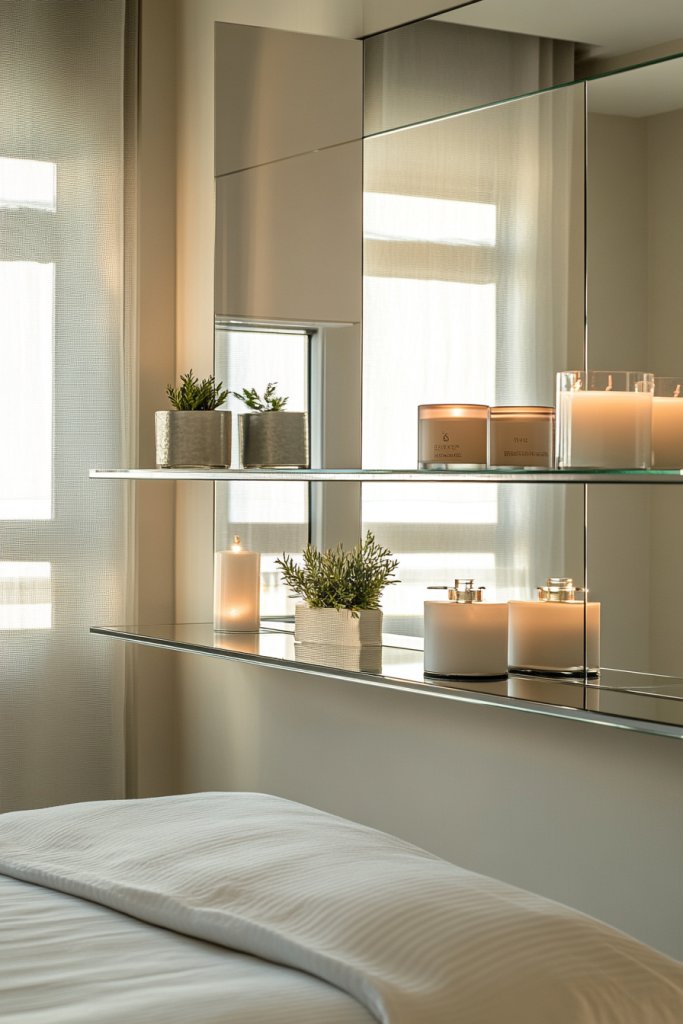
Want to make your bedroom appear bigger and brighter? Mirrored shelves reflect light and create an illusion of space, perfect for smaller rooms. They add a touch of glam while doubling as storage or display surfaces. If you’re looking to brighten up your space without adding lamps or plants, mirrored shelves are a smart choice.
Visualize sleek glass or mirrored-front shelves mounted flush on your wall, holding a few decorative boxes or small collectibles—no artwork necessary. The reflective surfaces bounce light around, making the room feel more open. The mirrored fronts also add a subtle sophistication, blending seamlessly into modern, minimalist, or even vintage decor styles. When illuminated by ambient light, they sparkle and add depth.
Choose frameless glass shelves or those with decorative frames in metallic finishes. Mount them at varying heights for visual interest or in symmetrical arrangements for a more formal look. Use mirrored panels with storage behind for a dual-purpose feature. Incorporate textured or colored backing for contrast, depending on your style.
Select heavy-duty brackets suitable for glass or mirror shelves. Measure carefully to align the shelves evenly, and mark wall points precisely. Drill into wall studs or use anchors depending on weight requirements. Attach brackets securely, then carefully place the mirrored shelves, ensuring they are level. Finish with decorative or safety film if needed, and organize your items.
Add LED strip lighting behind or underneath for a luminous effect. Incorporate textured or fabric-lined boxes to hide clutter behind the reflective surfaces. You can also frame the mirrors with decorative moldings for a more ornate look. Keep styling simple to maximize their light-reflecting qualities.
Mirrored shelves elevate your decor, adding brightness and a sense of space instantly. They’re a clever way to incorporate glam or modern style without clutter. With minimal effort, your room can feel larger, more luminous, and stylish—ready to transform?
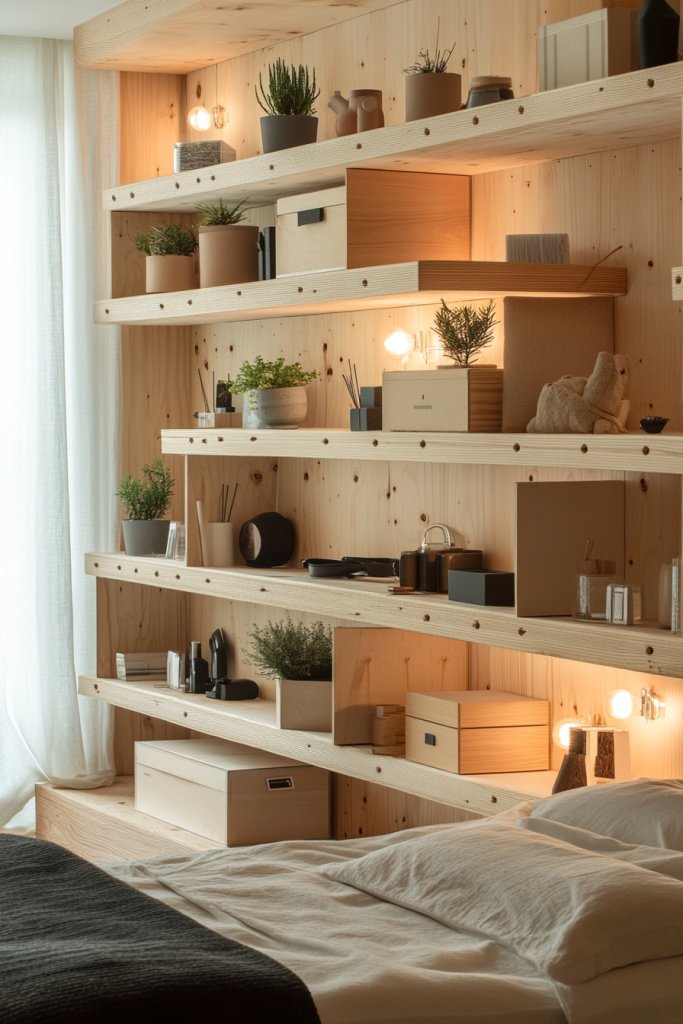
12. Multi-Level Shelves for Layered Storage
Struggling to keep things organized while maintaining visual interest? Multi-level shelves create a layered effect that maximizes storage and adds architectural depth. They’re perfect for showcasing a variety of items—books, decor, or textiles—without cluttering. If you crave a dynamic, curated look, these shelves are your new go-to.
Imagine a series of staggered shelves stacked at different heights, painted in coordinating tones. They hold a mix of books, textured storage boxes, and decorative objects—no plants or artwork. The varying levels add visual rhythm, guiding the eye across the wall. Soft lighting from above highlights each tier, emphasizing the layered arrangement.
Use different widths and depths for each shelf to create a sense of movement. Mix materials like wood, metal, or painted MDF for texture. Incorporate open and closed compartments to hide or display items. Seasonal styling can involve swapping textiles or decorative containers that fit the layered theme.
Plan your layout carefully, measuring wall space and shelf dimensions. Install brackets at different heights, ensuring they are securely anchored into studs or wall anchors. Use a level to align each shelf horizontally and vertically. Attach the shelves, then organize your items to balance visual weight. Finish with protective coatings or paint if necessary.
Add decorative liners, textured boxes, or fabric baskets for variety and concealment. Choose colors that complement your room’s palette for a cohesive look. Incorporate small LED lights or spotlights to accentuate key items. Personal touches make the layered shelves truly your own.
Multi-level shelves transform a flat wall into a textured, engaging display. They’re adaptable, customizable, and bring a layered depth to your decor. Easy to install and style, they make your space feel thoughtfully curated and vibrant. Ready to add dimension?
13. Over-the-Door Shelves for Space-Saving Storage
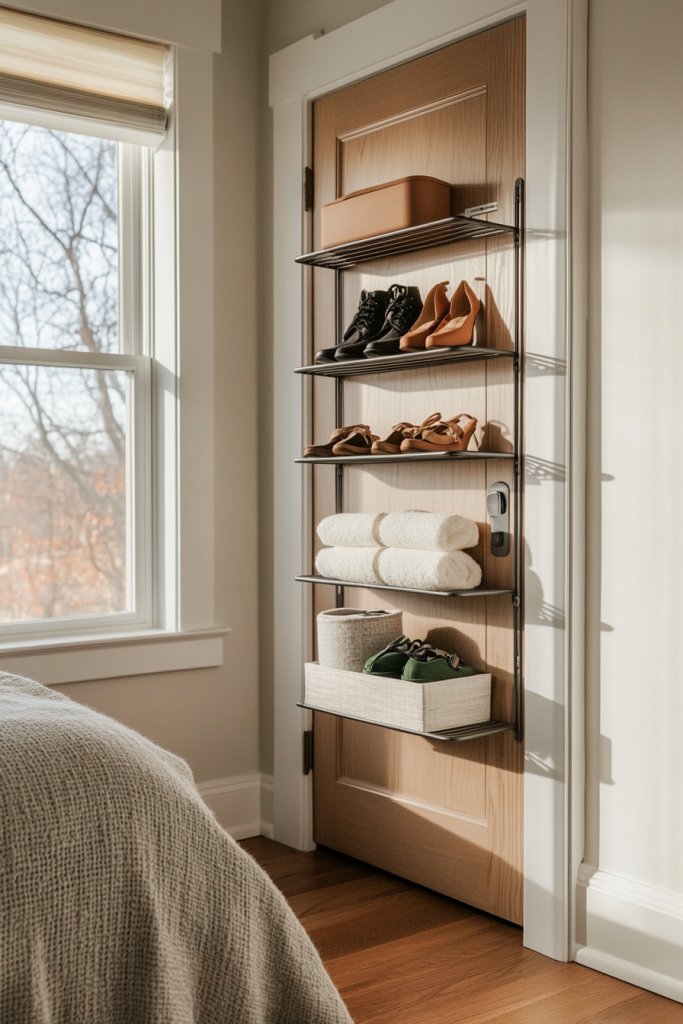
Limited wall space but still need extra storage? Over-the-door shelves utilize often-overlooked areas, providing quick and easy organization. They’re perfect for shoes, accessories, or small items, and they don’t require any wall drilling. If you want to save space while maintaining easy access, this is a simple yet effective solution.
Picture a sturdy fabric or plastic over-the-door rack hanging behind your bedroom door. It holds neatly organized shoes, folded linens, or small baskets—no plants, no artwork. The design keeps everything at your fingertips, while the back remains unobtrusive. Its slim profile maintains a clean look, blending into your room’s functional aesthetic.
Choose between fabric, wire, or plastic baskets, depending on your preferred look and the items stored. For a more decorative approach, select options with patterned or textured fabrics. Mount multiple units if needed for more storage, or combine with hooks for jewelry or accessories. Use color coordinating or contrasting options to match your decor.
Select an over-the-door organizer with sturdy hooks, ensuring they fit your door thickness. Hang the unit at a height that’s easy to access—usually at eye level or just above it. Fill the compartments with your selected items, balancing weight for stability. For heavier objects, ensure the hooks are securely anchored into the door frame. No tools required, just a few minutes.
Add decorative fabric liners or labels to organize items better. Choose vibrant or coordinated colors to complement your overall decor. For a cohesive look, match the storage containers with other textiles in your room. You can also layer with over-the-door hooks for additional hanging storage.
Over-the-door shelves are a quick, affordable way to boost your bedroom’s storage capacity without sacrificing style. They’re versatile, easy to install, and perfect for renters or anyone reluctant to drill into walls. They keep essentials handy and your room clutter-free—ready to try?
14. Rustic Open Shelves with Metal Brackets
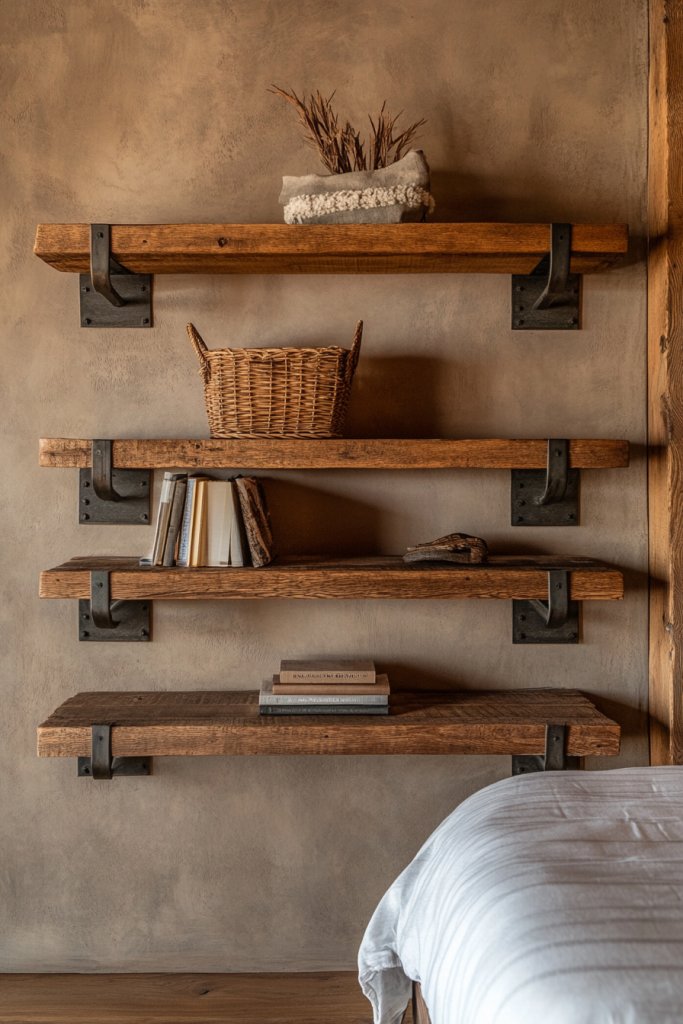
Want a cozy, farmhouse vibe that’s easy to achieve? Rustic open shelves with metal brackets combine warmth and industrial edge for a charming look. They offer functional storage and a decorative element that adds texture and character. If your goal is a relaxed, inviting space, these shelves are an effortless upgrade.
Imagine thick, reclaimed wood planks supported by black iron brackets with a matte finish. They are mounted at varying heights, holding soft textiles, vintage-style containers, and a few small decorative objects—no plants or artwork. The raw textures and visible hardware create a layered, tactile feel. Warm lighting enhances the rustic appeal, making the room feel cozy and curated.
Opt for distressed or stained wood to match your decor—light wash for a beachy look or dark for a richer vintage vibe. Use industrial-style brackets or decorative metal accents for added flair. Mix sizes and placements for an eclectic feel or keep it uniform for simplicity. Seasonal styling might include textured throws or vintage accessories.
Choose sturdy reclaimed wood or budget-friendly alternatives like plywood finished with stain or paint. Mark your wall for bracket placement, ensuring they align with studs for maximum support. Drill pilot holes, then secure brackets with heavy-duty screws. Mount the wood planks, checking for levelness. Decorate with your chosen items, keeping the look balanced and inviting.
Add decorative metal accents or painted edges for a custom look. Incorporate fabric-lined baskets or textured containers to organize smaller items. Finish with a clear matte or satin sealant to preserve the wood’s rustic charm. Personalize with vintage finds or seasonal accents to keep the shelves fresh.
Rustic open shelves marry style and practicality, creating a warm, lived-in vibe. They’re easy to install and adapt to any decor style—whether farmhouse, industrial, or eclectic. Your space will feel more welcoming and thoughtfully curated. Ready to build your own rustic haven?
15. Narrow Wall-Mounted Shelves for Slim Spaces
Limited on space but still want to add storage and style? Narrow wall-mounted shelves are perfect for tight spots—hallways, small bedrooms, or alcoves. They maximize vertical space without overwhelming the room. If you want to keep things functional yet sleek, these shelves are your answer.
Imagine a pair of slender, white or dark-colored shelves mounted one above the other in a narrow corridor or beside your bed. They hold a few small books, decorative boxes, and a textured ceramic dish—no plants or artwork. Their slim profile creates a clean, minimalist look that visually extends the wall. Soft lighting highlights their neat arrangement, making the space feel open.
Choose lightweight materials like painted MDF or thin wood strips for a minimalist look. Mount them at varying heights for visual interest or keep them aligned for orderliness. Use brackets or hidden mounting hardware for a seamless appearance. Seasonal styling could involve swapping out small accessories or textured objects for variety.
Measure your wall space carefully, then mark where to install the brackets—preferably into studs or using wall anchors for stability. Install the brackets with a level, then place the shelves on top. Secure the shelves, ensuring they are flush and level. Organize your items with simplicity in mind—less is more for narrow spaces.
Personalize with painted or textured finishes, or add subtle decorative elements like metallic accents or textured liners. Keep styling minimal to maintain the sleek look—use small, coordinated containers or textured objects. Keep the overall aesthetic clean and uncluttered.
Narrow shelves prove that even tiny spaces can be stylish and functional. They’re a quick upgrade that makes your room feel bigger and more organized. Easy to install and adaptable, they’re a practical solution for modern living. Ready to optimize your space?
16. Floating Shelves with Hidden Supports for a Clean Look
Want your shelves to look like they’re floating effortlessly without bulky brackets? Hidden support floating shelves create a sleek, minimalist vibe that keeps your wall looking clean and uncluttered. They’re perfect for showcasing essentials or decorative items while maintaining a modern aesthetic. If you crave simplicity and elegance, these shelves deliver.
Picture sturdy, concealed mounting hardware inside the wall, supporting simple wooden planks that seem to hover. They hold a few textured boxes and minimalist decor—no plants or artwork, remember. The seamless look draws attention to the items displayed rather than the hardware. Soft ambient lighting accentuates the floating effect, making the space feel open and airy.
Opt for materials like stained wood, painted MDF, or even stone for a high-end look. Mount the shelves at different heights for a layered display or keep them uniform for a streamlined effect. Use concealed brackets with a dowel or keyhole system for a truly hidden support. Seasonal styling can include textured fabrics or decorative objects that complement the clean lines.
Choose strong, concealed mounting hardware compatible with your wall type. Mark the wall precisely, then install the supports into wall studs or anchors. Attach the shelves onto the supports, ensuring they are flush and level. Use a level tool for accuracy and secure all connections tightly. Finish with minimal decor to keep the illusion intact—less is more.
Add a subtle edge with painted or stained finishes, or incorporate textured liners to add depth. Use lighting like LED strips underneath to enhance the floating effect further. For a personal touch, arrange items carefully, balancing visual weight and texture. Keep the overall look minimalist to preserve the clean, floating illusion.
Floating shelves with hidden supports elevate your room’s style with a modern, clutter-free look. They’re a DIY-friendly project that results in a polished, high-end aesthetic. Your space will feel more open, organized, and thoughtfully designed—ready to upgrade?
17. Colorful Shelving Units to Brighten the Room
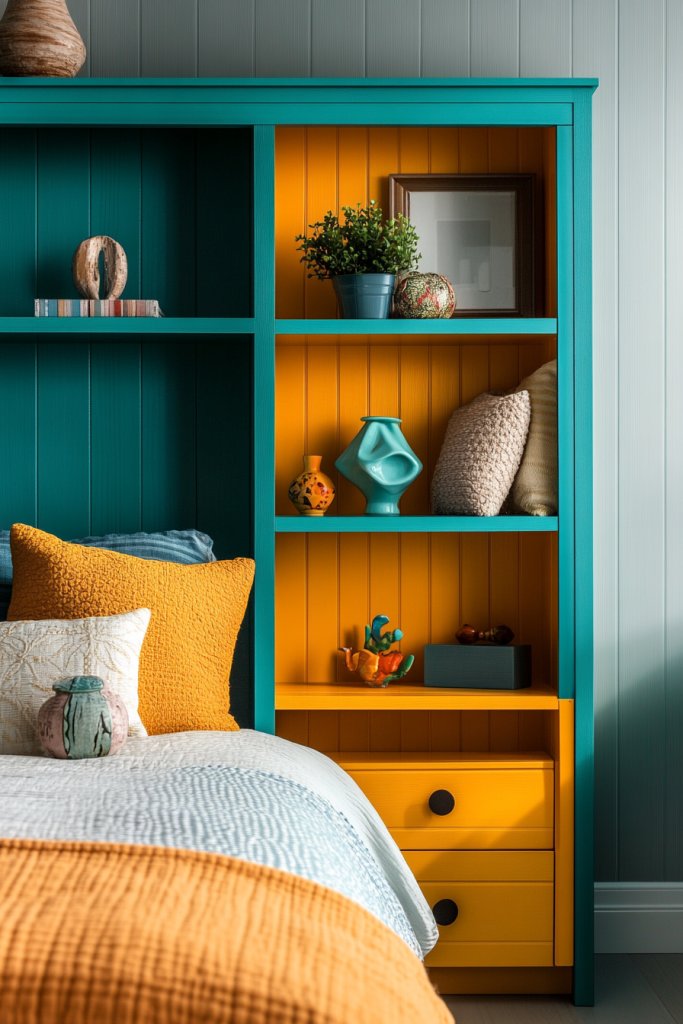
Feeling like your bedroom needs a splash of personality? Colorful shelving units inject fun and vibrancy into your space while providing practical storage. They break the monotony of neutral tones and add a playful yet functional element to your decor. If you’re ready for a mood boost, these shelves make a bold statement.
Imagine bright, painted cube shelves or open units in cheerful hues like turquoise, coral, or sunshine yellow. They hold a mix of textured boxes, books, and decorative objects—no plants, no artwork—just color and shape. The vivid shades create focal points on your wall, energizing the room. Coordinated accessories and soft lighting complete the lively, inviting scene.
Mix colors for a vibrant, eclectic look or stick with a monochromatic palette for subtle sophistication. Use different shapes—square, rectangular, or circular—for added interest. Incorporate contrasting finishes like matte and gloss for depth. Seasonal updates can include swapping out decor for new color schemes or textures that align with your mood or trends.
Select shelving units in your favorite colors—painted wood, MDF, or metal with powder coating work well. Mount them securely into wall studs or with anchors for stability. Arrange in symmetrical or asymmetrical patterns depending on your style. Load with colorful boxes, fabric bins, and decorative storage, balancing visual weight. Finish with a clear sealant if painted or leave as is for a bold look.
Add decorative trims or borders in metallic or contrasting colors for a custom look. Incorporate textured fabrics inside open bins or boxes for tactile interest. Use colorful lighting or LED strips to highlight the vibrancy. Personalize further with decals or stencils if painting your own units.
Bright, colorful shelves are a playful way to express your personality and energize your space. They’re easy to style and update, making your room a reflection of your mood. With bold choices and creative arrangements, your bedroom will feel lively and uniquely yours—are you ready to add some color?
18. Tiered Shelves for Decorative and Functional Needs
Looking for a way to organize small items while adding visual interest? Tiered shelves stack different levels, creating a layered display that’s both decorative and practical. They help you maximize vertical space and showcase your favorite accessories or collectibles. If you love a curated look, these shelves are a perfect fit.
Picture a set of small, interconnected shelves arranged in a cascading pattern, painted in complementary tones. They hold a mix of jewelry boxes, textured containers, and small decor objects—no plants or artwork—just a charming display. The multi-level setup adds depth and texture, making the wall a focal point. Soft lighting enhances the layered effect.
Use different sizes and shapes—round, square, or irregular—to create visual rhythm. Mount them at various heights for a dynamic look, or keep a uniform arrangement for order. Materials like painted wood, MDF, or even acrylic can be used. Seasonal styling might include swapping out textiles, containers, or decorative objects for variety.
Plan your layout by measuring wall space and selecting tiered units or building your own. Install brackets or supports at the desired heights, ensuring they are secured into wall studs or anchors. Attach the tiers, then organize items thoughtfully, balancing visual weight across levels. Finish with paint or stain for a polished look. Keep the display simple and balanced.
Personalize with painted or textured finishes, or add decorative liners inside the tiers. Incorporate small LED lights or spotlights to highlight key objects. Use labels or tags for organization, especially if you have a collection. Seasonal updates keep the display fresh and engaging.
Tiered shelves turn clutter into art by creating a layered, textured display. They’re highly customizable and easy to update, making your space feel curated and stylish. With a little planning, you can showcase your personality beautifully. Ready to layer your decor?
19. Modular Shelving Systems for Flexibility
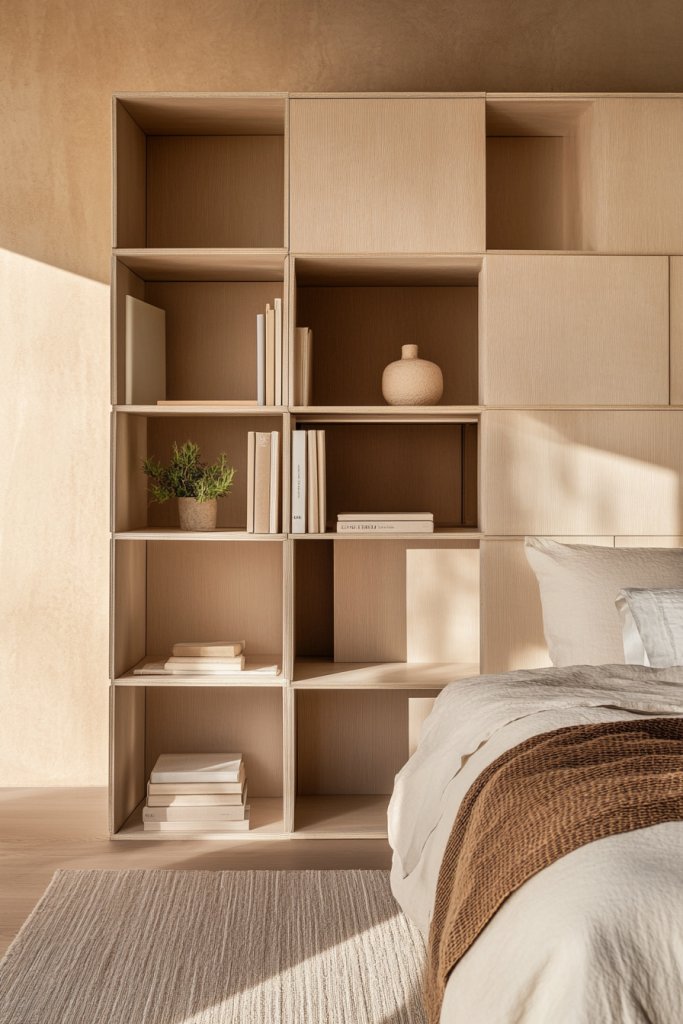
What if your storage could grow and change with your needs? Modular shelving systems offer the ultimate flexibility, allowing you to customize and expand your storage as you go. They adapt to different spaces and styles, making them perfect for dynamic bedrooms. If you want an adaptable, future-proof solution, these are your answer.
Visualize interlocking cubes or panels in neutral tones, arranged in a pattern that suits your space. They hold a mix of functional storage boxes and display items—no plants or artwork, remember. The clean, geometric look adds a contemporary edge while remaining versatile. When illuminated with soft lighting, they create a sleek, adaptable focal point.
Choose from open or closed modules, stacking or aligning them in different configurations. Materials range from painted MDF to high-end woods, depending on your budget. Add doors or drawers for concealed storage. Seasonal styling can involve swapping out decorative containers or reconfiguring the layout to suit your evolving taste.
Start by assessing your available space and needs. Purchase a modular system designed for easy assembly—many come with connectors and supports. Mount panels or cubes into your wall, ensuring secure attachment into studs. Reconfigure as needed, balancing aesthetics and storage. Finish with paint or veneer for a polished look, and organize your items for easy access.
Personalize with painted or textured finishes, or add decorative hardware. Incorporate lighting or label systems to keep track of items. Mix materials and colors to match your decor, creating a system that feels effortless and tailored. Update the layout seasonally or as your needs change.
Modular systems are a smart, versatile investment that grows with you. They make your space adaptable and organized while offering endless styling options. With a bit of planning, you can create a personalized storage solution that’s both functional and fashionable. Ready to build your perfect system?
20. Niche Shelves Built into Wall Cavities
Want a sophisticated, space-saving way to display or store items? Niche shelves built into wall cavities turn everyday walls into architectural features. They provide a seamless, clean look while offering ample space for your essentials. If you’re after a modern, minimalist vibe with a secret twist, this idea is perfect.
Imagine a recessed shelf carved into a wall, painted in the same color for a subtle effect. It holds a few textured containers or decorative objects—no plants or artwork—just sleek architectural detail. The depth of the niche creates shadows that add visual interest and dimension. It’s an elegant way to showcase your style while maintaining a clutter-free environment.
Design niches with varying depths or shapes—rectangular, square, or rounded—for visual variety. Use high-quality drywall or plaster for a smooth finish, or add textured wallpaper inside for contrast. Incorporate lighting within the niche for accent and ambiance. These can be combined with built-in lighting or architectural features to suit your decor.
Plan your layout carefully, marking the wall for precise cuts or carving. Hire a professional if needed to ensure clean, accurate openings. Finish with drywall repair, sanding, and painting to match the wall surface. Install the shelves or insert decorative panels, then organize your items neatly. Consider electrical wiring for lighting if desired.
Add textured or painted backs inside the niches for contrast. Use decorative liners or textured containers for organization. Install LED lighting or spotlights inside for a dramatic effect. Personalize with small, curated objects that reflect your personality and style.
Niche shelves elevate your space with architectural sophistication and clever storage. They’re a subtle yet striking way to display your favorite items while saving space. With careful planning, you can create a high-end look that feels custom and refined. Ready to carve out your ideal niche?
21. Hanging Rope Shelves for Boho Vibe
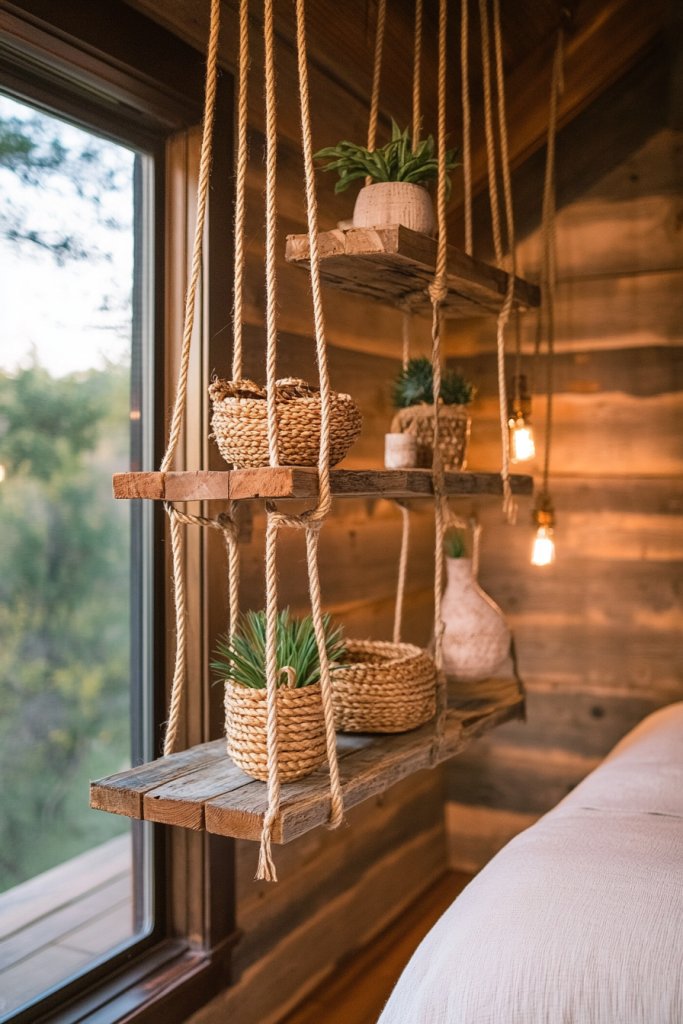
Craving a relaxed, bohemian look that’s also functional? Hanging rope shelves bring a carefree, natural vibe to any bedroom while offering practical storage. They’re easy to install and add texture and movement to your walls. If you love a laid-back, artisanal aesthetic, these shelves are a perfect choice.
Picture sturdy wooden planks suspended from thick, knotted ropes anchored to the ceiling or wall. They hold a few textured baskets, a soft throw, or decorative objects—no plants or artwork, remember. The natural fibers and raw wood combine for a tactile, inviting feel. When lit softly, they cast cozy shadows, enhancing their boho charm.
Use different lengths of rope and varieties of wood for a layered, eclectic look. Choose natural jute, hemp, or colored cords for visual interest. Mount the ropes at varying heights or angles, and add decorative knots or beads for personalization. These shelves suit relaxed, beachy, or vintage interiors, especially when paired with textured textiles.
Cut wooden planks to size and drill holes for the ropes. Thread the ropes through the holes, tying secure knots underneath. Anchor the ropes into ceiling hooks or wall brackets, ensuring they are tight and stable. Adjust the height, then load with your selected items—think lightweight, textured decor or small baskets. Use a level to ensure even hanging.
Add decorative beads or colorful knots for a playful touch. Incorporate textured fabrics or woven baskets for added warmth. Use natural or painted wood for contrast, and consider adding fairy lights or small lanterns nearby for a cozy glow. Personalize with meaningful objects or collections.
Hanging rope shelves exude a relaxed, creative charm that transforms your room into a boho sanctuary. They’re an easy DIY project that adds texture and personality. With minimal tools and effort, you can craft a space that feels both stylish and inviting—ready to start?
22. Hidden Shelves Behind Headboards
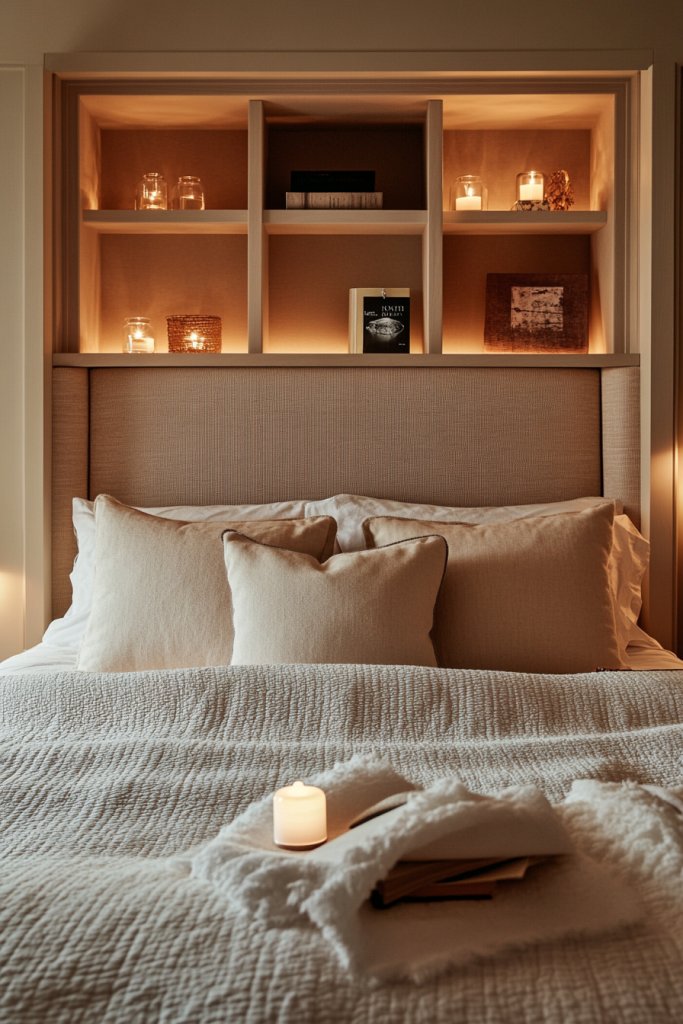
Hate clutter around your bed but want a streamlined look? Hidden shelves behind your headboard offer discreet storage for essentials, keeping your space tidy and stylish. They blend seamlessly into your decor while providing easy access to items like glasses, books, or small electronics. If you’re into sleek, clutter-free bedrooms, this idea is a game-changer.
Imagine a custom-built headboard with slim shelves integrated into the back panel, painted to match the wall or headboard finish. They hold a few neatly stacked books, a textured box, or a small decorative object—no plants or artwork involved. The shelves are almost invisible from the front, maintaining a clean, minimalist silhouette. Soft, indirect lighting behind the headboard adds a cozy glow.
Design the shelves to be shallow, just enough for small essentials. Use materials like painted MDF, plywood, or high-quality veneer for a polished look. Install with hidden brackets or supports for a seamless appearance. For a more decorative touch, add textured finishes or paint contrasting colors inside the shelves.
Begin by designing your headboard with built-in shelves or hiring a carpenter to custom-build one. Mark your wall for precise placement, then attach the headboard securely into wall studs or anchors. Make sure the shelves are level and sturdy enough to hold your items. Finish with paint or veneer, then organize your essentials neatly behind the headboard.
Add textured liners or fabric-backed panels inside the shelves for a softer look. Incorporate small LED strips for subtle illumination. Keep accessories minimal and organized—use small containers or pouches to avoid clutter. Personalize with your favorite small items or keepsakes.
Hidden shelves behind the headboard combine practicality with sleek design, creating a clutter-free, sophisticated bedroom. They’re a smart, custom solution that elevates your space’s style. With a little planning, you can enjoy a neat, modern retreat—are you ready?
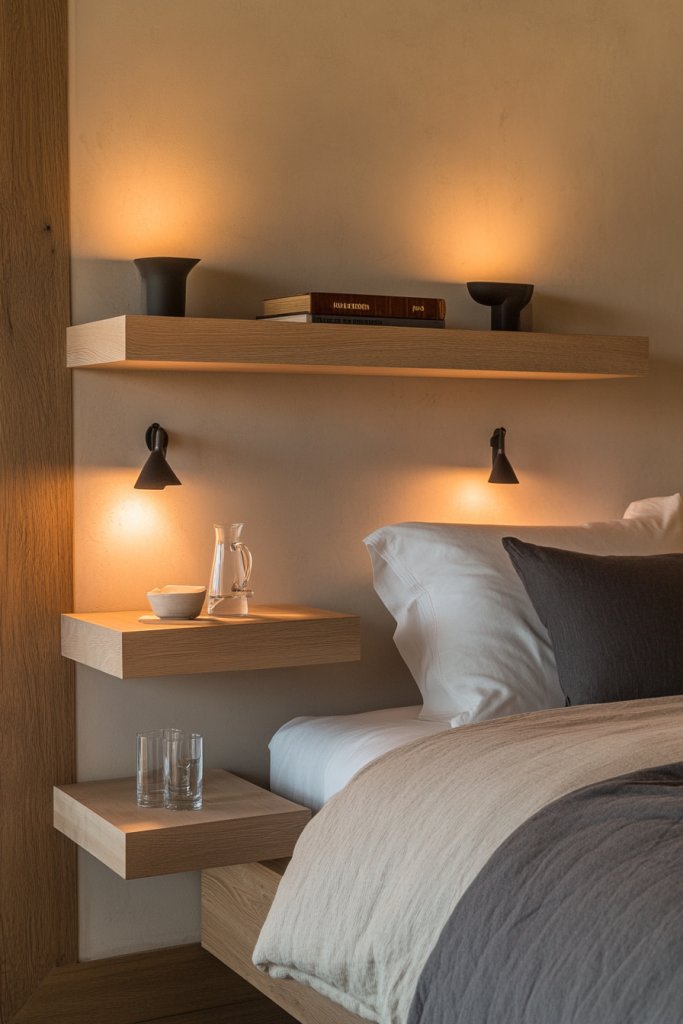
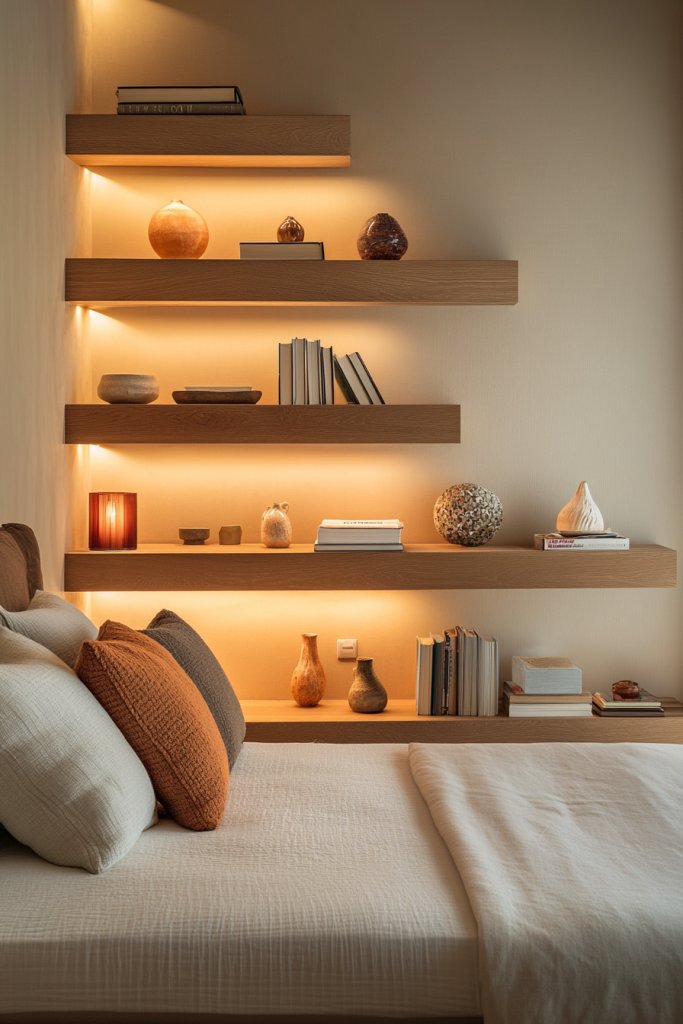
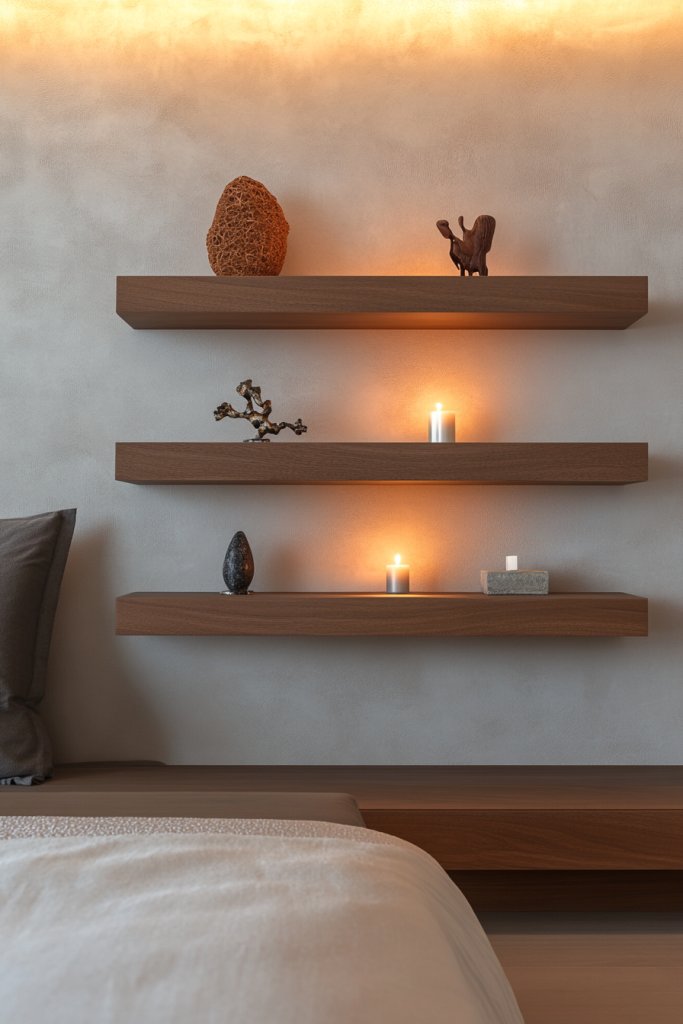
23. Floating Shelf with Integrated Lighting for Atmosphere
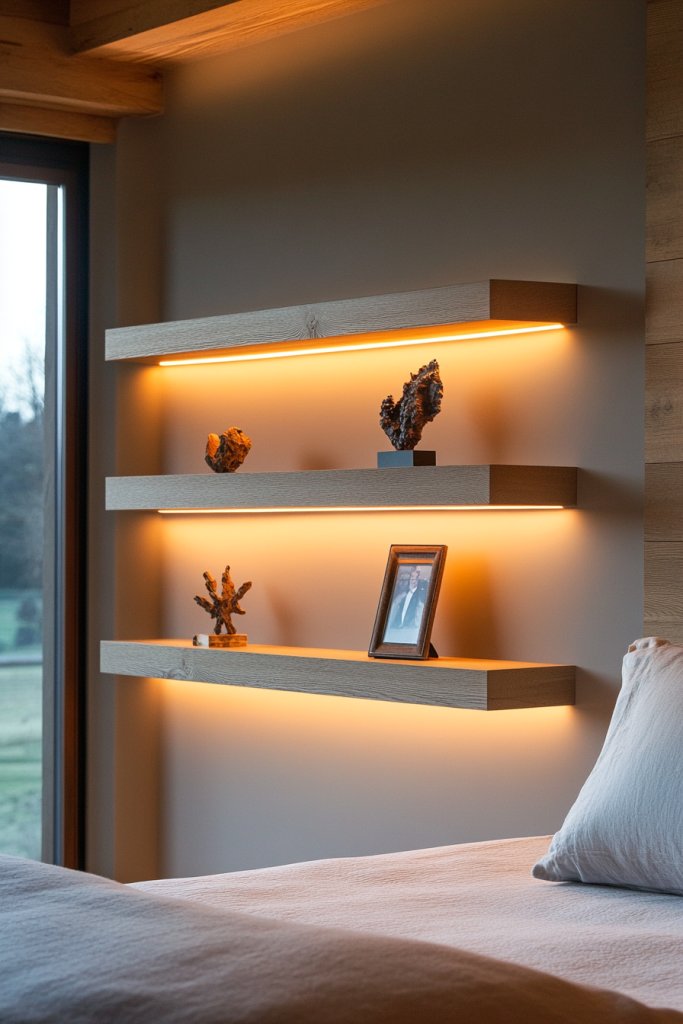
Want to add warmth and ambiance to your bedroom while showcasing your favorite items? Floating shelves with integrated lighting create a cozy atmosphere and highlight decor effortlessly. They blend function with mood-setting style, perfect for relaxing nights. If you crave a space that feels inviting and thoughtfully designed, this idea is ideal.
Visualize sleek, minimalist floating shelves mounted on your wall, with LED strip lighting tucked underneath or inside. They hold a few curated decor objects—textured boxes, sculptures, or personal mementos—no plants or artwork needed. The lighting casts a soft, diffuse glow, emphasizing the display and creating a warm, inviting atmosphere. The clean lines and gentle illumination make the space feel intimate.
Choose adjustable LED strips or warm-toned lighting for a cozy glow. Mount the shelves at different heights for visual interest, or keep a uniform level for a sleek look. Materials can include painted wood, high-gloss MDF, or even glass for a contemporary vibe. Seasonal styling can involve swapping decor or changing lighting color temperatures.
Select sturdy, minimalist floating shelves that can hide the wiring for the lighting. Install the shelves into wall studs with concealed brackets or hardware. Run LED strips behind or underneath, connecting to a power source—preferably with a dimmer switch for mood control. Organize your decor on the shelves, then turn on the lighting for an instant ambiance upgrade.
Add textured or patterned liners inside the shelves to complement the lighting glow. Use dimmable or color-changing LEDs to customize the atmosphere. Incorporate small, textured objects or personal keepsakes to make the display meaningful. Keep the overall look minimalist to let the lighting set the mood.
Floating shelves with integrated lighting elevate your decor and create a warm, inviting retreat. They’re stylish, functional, and easy to update—perfect for modern bedrooms. With the right lighting, your space will feel cozy and personalized, ready for relaxing evenings or romantic nights. Want to set the perfect mood?
Conclusion
With a diverse range of shelving ideas—from minimalist floating styles to bold statement pieces—this collection offers endless inspiration to transform your bedroom. Whether you’re sprucing up a small space or reimagining a larger room, these ideas make decorating both fun and achievable. Don’t be afraid to experiment and personalize your shelves—your dream bedroom is just a shelf away! Start creating a space that truly reflects your style and watch your room come alive.
Leave a Reply